소개
Bose doesn't sell batteries for the NC700 and doesn't seem to make replacements. I couldn't even find a Chinese equivalent. In this guide, I describe the process of replacing the original battery with a universal battery.
Please do not try this again unless you have a basic knowledge of electronics and have never soldered.
필요한 것
-
-
Use a plastic card to remove the ear pad from the left cup. Slide the card into the slot and make a rotating motion.
-
-
-
Remove the fabric cover and remove the four screws using a Torx TR6 screwdriver.
-
-
-
Carefully disconnect the flex cable.
-
Cut the three battery cables. Cut one wire at a time to avoid short circuits!
-
-
-
The battery is glued to the case. Use a knife to carefully cut off the battery. Take care not to damage the battery!
-
Be sure to clean any adhesive residue from the case.
-
-
-
-
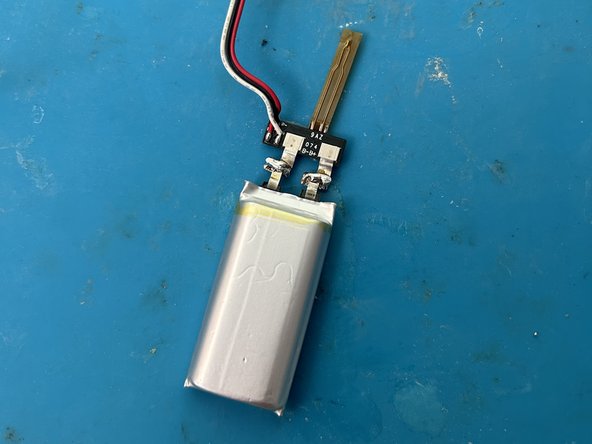
Solder the new battery to the old controller. Observe the polarity!
-
-
-
Measure the voltage at the controller pins. You will most likely get 0 volts. It is necessary to wake up the controller.
-
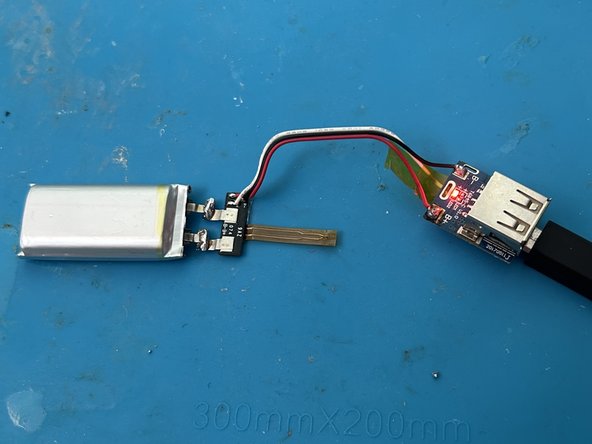
Use any battery controller. Solder the battery to the battery terminals on the controller.
-
Charge the battery through the external controller for 5-10 minutes.
-
Disconnect the charging cable and verify that the battery is energized. Charge the battery to 4 volts (if required).
-
Unsolder the external controller.
-
-
-
Solder the battery. Use heat shrink tubing or duct tape to insulate the soldering area.
-
Your headphones will turn on when you solder the battery. Turn off the headphones.
-


To reassemble the unit, follow the instructions in reverse order.
To reassemble the unit, follow the instructions in reverse order.
다른 4명이 해당 안내서를 완성하였습니다.
다음 번역가들에게 특별히 감사 드립니다:
100%

Andrew Yakunin님은 저희가 세상을 수리하는데 동참하신 분입니다! 기여하시겠습니까?
번역 시작하기 ›

댓글 7개
Thank you, very useful and money saving
Happy to help.
Cool! how did you knew the battery was the issue? Did you have the red/white blinking LED issue on your headphones? I got that issue since the end of last year, and am not quite sure if it is a software or hardware related issue. Would love to fix it but indeed couldnt find any official replacement batteries or anything.
Yeah, I had the same problem. I think there's a bug in these headphones. If the battery is very low, the headphones think there is no battery and don't charge it.