주요 콘텐츠로 건너뛰기

Breville BKC600XL Heating Tank Replacement

필요한 것

  1. Breville BKC600XL Heating Tank Replacement, Bottom Cover #1: 1 단계, 이미지 1/3 Breville BKC600XL Heating Tank Replacement, Bottom Cover #1: 1 단계, 이미지 2/3 Breville BKC600XL Heating Tank Replacement, Bottom Cover #1: 1 단계, 이미지 3/3
    • Use a Phillips #0 screwdriver to remove the following ten screws:

    • Four 18mm Phillips screws.

    • Four 9.75mm Phillips screws.

    • Two 8mm Phillips screws.

    • The cover will not remove entirely. Keep green ground wire attached to the cover.

  2. Breville BKC600XL Heating Tank Replacement, Black Water Inlet: 2 단계, 이미지 1/2 Breville BKC600XL Heating Tank Replacement, Black Water Inlet: 2 단계, 이미지 2/2
    • Remove the two 14.5 Phillips screws.

    • Ensure that only the water inlet valve can be moved.

  3. Breville BKC600XL Heating Tank Replacement, Bottom Cover #2: 3 단계, 이미지 1/2 Breville BKC600XL Heating Tank Replacement, Bottom Cover #2: 3 단계, 이미지 2/2
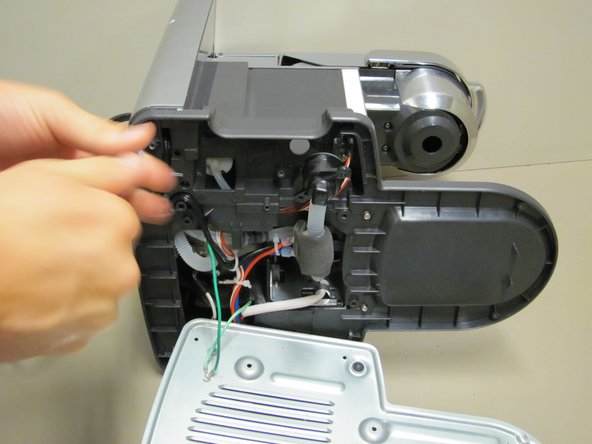
    • Use a Phillips #0 screwdriver to remove the following six screws:

    • Six 14.5mm Phillips screws.

  4. Breville BKC600XL Heating Tank Replacement, Power Cord: 4 단계, 이미지 1/2 Breville BKC600XL Heating Tank Replacement, Power Cord: 4 단계, 이미지 2/2
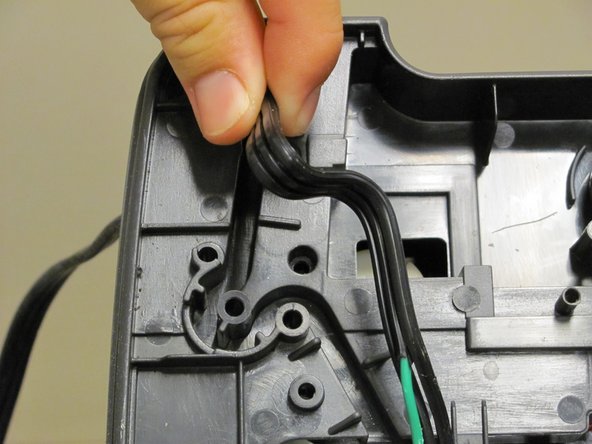
    • Remove the power cord from the groove. (the black cord that leads into the green wire.)

    • This creates more slack in the wire to give you more room to work with.

    • DO NOT remove green wire from the cover its attached to.

  5. Breville BKC600XL Heating Tank Replacement, Clear Hose: 5 단계, 이미지 1/2 Breville BKC600XL Heating Tank Replacement, Clear Hose: 5 단계, 이미지 2/2
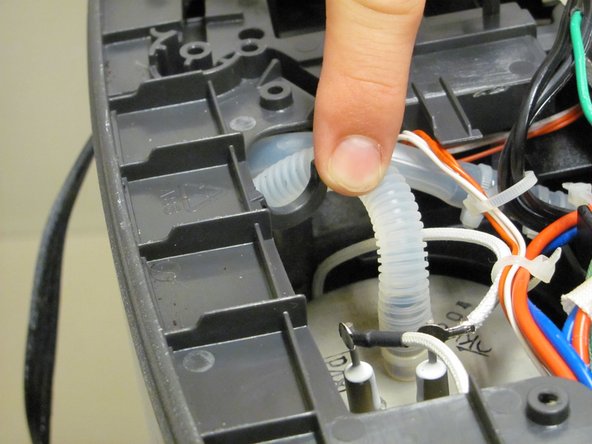
    • Identify the hose that connects to the heating tank. (Observe that it is held up on a small hook.)

    • Push down on the hook and carefully move the hose from its grip.

  6. Breville BKC600XL Heating Tank Replacement, Heating Tank: 6 단계, 이미지 1/1
    • Carefully pull out the heating tank by hand.

    • The heating tank may still be hot. Exercise caution when grabbing hold of the tank. If necessary, wait four to six hours after last use.

    • Reminder for reassembly; You will need a new band to tie the hose back to the heating tank.

결론

To reassemble your device, follow these instructions in reverse order.

다른 2명이 해당 안내서를 완성하였습니다.

Antonio

회원 가입일: 09/26/12

120 평판

안내서 6개 작성하였습니다

Cal Poly, Team 1-3, Propen Fall 2012 Cal Poly, Team 1-3, Propen Fall 2012 회원

CPSU-PROPEN-F12S1G3

4 회원들

안내서 6개 작성하였습니다

댓글 0개

댓글 쓰기

조회 통계:

24 시간 전: 0

7일 전: 4

30일 전: 9

전체 시간: 4,580