주요 콘텐츠로 건너뛰기

Brother PT-1290 Cutter Blade Replacement

필요한 것

  1. Brother PT-1290 Cutter Blade Replacement, Removing the bottom cover of the Brother PT-1290: 1 단계, 이미지 1/3 Brother PT-1290 Cutter Blade Replacement, Removing the bottom cover of the Brother PT-1290: 1 단계, 이미지 2/3 Brother PT-1290 Cutter Blade Replacement, Removing the bottom cover of the Brother PT-1290: 1 단계, 이미지 3/3
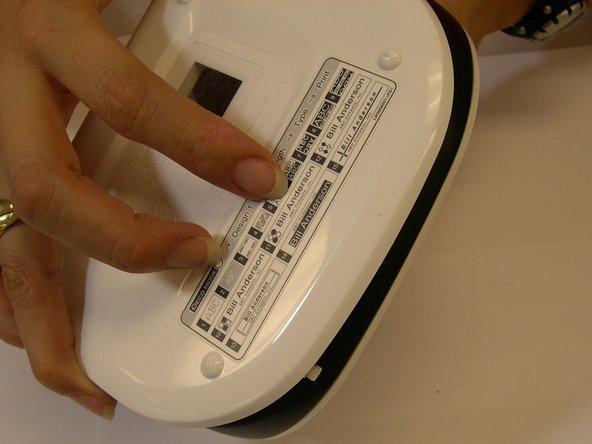
    • Flip the device over and locate the round part right next to the face plate. Gently but firmly, push it down. At the same time, while holding both sides of the device, split them apart carefully because some cables are attached to both sides.

    • In this step, spudger is being used only to indicate the area. No tools other than the hands will be used.

  2. Brother PT-1290 Cutter Blade Replacement, Accesing the area where the blade is located: 2 단계, 이미지 1/3 Brother PT-1290 Cutter Blade Replacement, Accesing the area where the blade is located: 2 단계, 이미지 2/3 Brother PT-1290 Cutter Blade Replacement, Accesing the area where the blade is located: 2 단계, 이미지 3/3
    • Once the device has been split open, locate the blade, that in this particular label printer the color is yellow as is indicated in this guide.

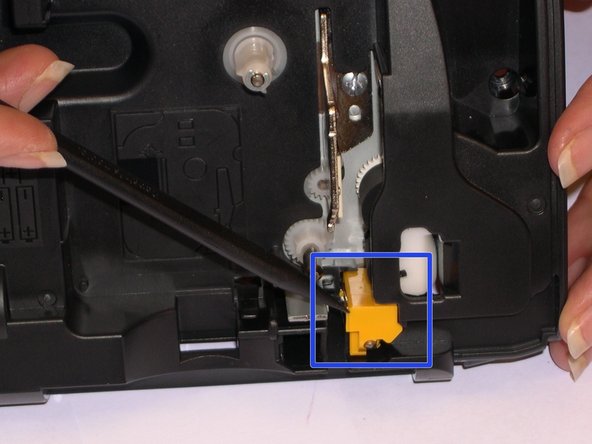
    • Locate the area where the blade is located and get ready to start the replacing process.

  3. Brother PT-1290 Cutter Blade Replacement, Removing and replacing the cutter blade: 3 단계, 이미지 1/3 Brother PT-1290 Cutter Blade Replacement, Removing and replacing the cutter blade: 3 단계, 이미지 2/3 Brother PT-1290 Cutter Blade Replacement, Removing and replacing the cutter blade: 3 단계, 이미지 3/3
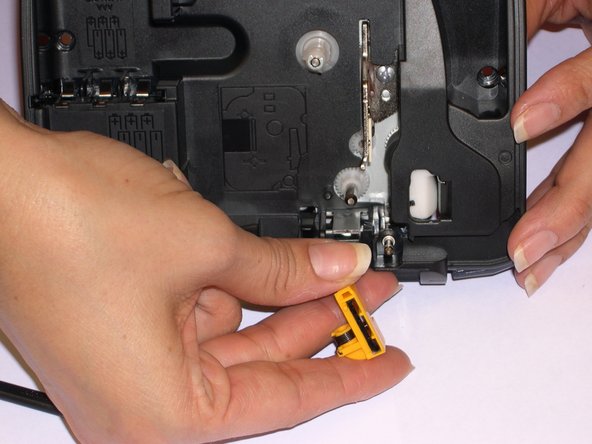
    • Release the blade by pushing it with the spudger and have the replacement ready to install.

    • Avoid touching the blade for safety reasons, even though is not sharp enough to cut the label, it can cut through your skin.

  4. Brother PT-1290 Cutter Blade Replacement, Putting the pieces back together: 4 단계, 이미지 1/3 Brother PT-1290 Cutter Blade Replacement, Putting the pieces back together: 4 단계, 이미지 2/3 Brother PT-1290 Cutter Blade Replacement, Putting the pieces back together: 4 단계, 이미지 3/3
    • After replacing the cutter blade, you want to make sure the bottom cover is placed correctly and the two pins that lock the cover are aligned first. These pins are not a problem at the beginning while opening the cover, because they split open right away. However, you have to be careful when closing it to avoid any damage.

    • Happy fix it and after finishing the assembly...be proud of yourself!

결론

To reassemble your device, follow these instructions in reverse order.

다른 한 분이 해당 안내서를 완성하였습니다.

Yadira Jones

회원 가입일: 10/25/14

273 평판

안내서 2개 작성하였습니다

Gateway, Team 1-4, Johnson Fall 2014 Gateway, Team 1-4, Johnson Fall 2014 회원

GCC-JOHNSON-F14S1G4

3 회원들

안내서 6개 작성하였습니다

댓글 0개

댓글 쓰기

조회 통계:

24 시간 전: 1

7일 전: 3

30일 전: 23

전체 시간: 2,669