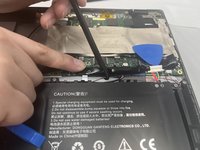
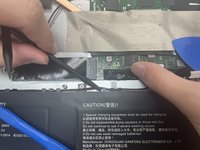
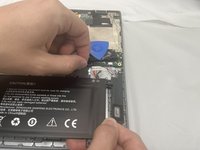
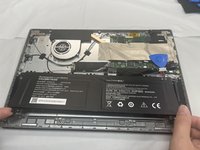
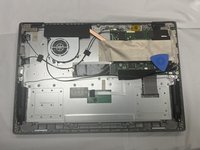
주요 콘텐츠로 건너뛰기

CHUWI GemiBook XPro SSD Replacement

필요한 것

  1. CHUWI GemiBook XPro SSD Replacement, Battery: 1 단계, 이미지 2개 중 1개 CHUWI GemiBook XPro SSD Replacement, Battery: 1 단계, 이미지 2개 중 2개
    • Peel off the black tape on the upper-right side of the motherboard.

  2. CHUWI GemiBook XPro SSD Replacement: 2 단계, 이미지 2개 중 1개 CHUWI GemiBook XPro SSD Replacement: 2 단계, 이미지 2개 중 2개
    • Use two opening tools or your fingernails to carefully "walk" the battery connector out of its socket.

  3. CHUWI GemiBook XPro SSD Replacement: 3 단계, 이미지 3개 중 1개 CHUWI GemiBook XPro SSD Replacement: 3 단계, 이미지 3개 중 2개 CHUWI GemiBook XPro SSD Replacement: 3 단계, 이미지 3개 중 3개
    • Unseat the speaker wires and antenna wire from their retaining hooks on the battery with a halberd spudger.

  4. CHUWI GemiBook XPro SSD Replacement: 4 단계, 이미지 1개 중 1개
    • Use a Phillips #1 screwdriver to remove the five 4.3 mm screws that secure the battery.

  5. CHUWI GemiBook XPro SSD Replacement: 5 단계, 이미지 3개 중 1개 CHUWI GemiBook XPro SSD Replacement: 5 단계, 이미지 3개 중 2개 CHUWI GemiBook XPro SSD Replacement: 5 단계, 이미지 3개 중 3개
    • Lift the battery up and out of the chassis.

  6. CHUWI GemiBook XPro SSD Replacement, SSD: 6 단계, 이미지 1개 중 1개
    • Use a Phillips #0 screwdriver to remove the single 3 mm screw securing the SSD.

  7. CHUWI GemiBook XPro SSD Replacement: 7 단계, 이미지 3개 중 1개 CHUWI GemiBook XPro SSD Replacement: 7 단계, 이미지 3개 중 2개 CHUWI GemiBook XPro SSD Replacement: 7 단계, 이미지 3개 중 3개
    • Carefully grip and pull the SSD out of its port.

    • Make sure to purchase the correct form factor of the SSD. The CHUWI GemiBook XPro uses 2280 size M.2 SSD.

결론

To reassemble your device, follow the above steps in reverse order.

Take your e-waste to an R2 or e-Stewards certified recycler.

작성자

3다른 기여자 명과 함께

JakeV

회원 가입일: 08/28/24

407 평판

안내서 3개를 작성함

댓글 0개

댓글 쓰기

조회 통계:

지난 24시간: 3

지난 7일: 8

지난 30일: 31

전체 시간: 143