주요 콘텐츠로 건너뛰기

Canon EOS 5D Mark II Internal Speaker Replacement

필요한 것

  1. Canon EOS 5D Mark II Internal Speaker Replacement, Clock Battery: 1 단계, 이미지 1/1
    • Lift the rubber flap covering the input/output jacks.

  2. Canon EOS 5D Mark II Internal Speaker Replacement: 2 단계, 이미지 1/1
    • Using a Phillips #000, remove the single 3.4 mm screw.

  3. Canon EOS 5D Mark II Internal Speaker Replacement: 3 단계, 이미지 1/1
    • This step will permanently erase all user settings.

    • The memory battery can now be easily slid out of place.

    • If you are following this guide in an effort to perform a hard reset, you should now press the shutter button multiple times in order to drain any left over power, then replace the batteries and power the device back on. You have just performed a hard reset!

  4. Canon EOS 5D Mark II Internal Speaker Replacement, Back Panel: 4 단계, 이미지 1/1
    • Peel back the rubber cover above the in/out ports to reveal two screw heads.

  5. Canon EOS 5D Mark II Internal Speaker Replacement: 5 단계, 이미지 1/1
    • Remove both 5.4 mm screws using a Phillips #0.

  6. Canon EOS 5D Mark II Internal Speaker Replacement: 6 단계, 이미지 1/1
    • Lift the in/out port plastic covering from the bottom where the backup battery used to be.

  7. Canon EOS 5D Mark II Internal Speaker Replacement: 7 단계, 이미지 1/1
    • Remove each 6.3 mm screw on either side of the viewfinder using a Phillips #0 screwdriver.

  8. Canon EOS 5D Mark II Internal Speaker Replacement: 8 단계, 이미지 1/1
    • Remove the three 4.8 mm screws on the bottom of the back plate using a Phillips #0.

  9. Canon EOS 5D Mark II Internal Speaker Replacement: 9 단계, 이미지 1/1
    • Peel back the rubber covering next to the menu dial to access the screw.

    • Remove the single 3.4 mm screw using a Phillips #0.

  10. Canon EOS 5D Mark II Internal Speaker Replacement: 10 단계, 이미지 1/1
    • The back panel can now fall off easily by turning the device upside down. Be sure to catch it so the data ribbons do not tear or tug.

  11. Canon EOS 5D Mark II Internal Speaker Replacement: 11 단계, 이미지 1/1
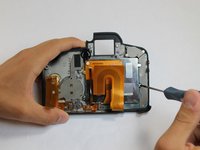
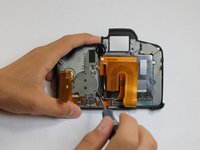
    • Remove each data ribbon cable from the motherboard by applying pressure down towards the motherboard and gently sliding your thumb upwards on the slot where the cable meets the motherboard. This will raise a very small clip that locks the cable in place.

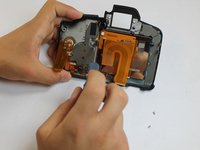
    • The back panel is now free from the rest of the device.

  12. Canon EOS 5D Mark II Internal Speaker Replacement, LCD: 12 단계, 이미지 1/3 Canon EOS 5D Mark II Internal Speaker Replacement, LCD: 12 단계, 이미지 2/3 Canon EOS 5D Mark II Internal Speaker Replacement, LCD: 12 단계, 이미지 3/3
    • Remove each of the 3.4 mm screws holding in the LCD using a Phillips #0.

  13. Canon EOS 5D Mark II Internal Speaker Replacement: 13 단계, 이미지 1/1
    • Grip the wire attaching the speaker to the data ribbon cable and pull it out.

    • The LCD is now free from the back panel.

  14. Canon EOS 5D Mark II Internal Speaker Replacement, Internal Speaker: 14 단계, 이미지 1/1
    • Remove the single 4.8 mm screw using a Phillips #0.

  15. Canon EOS 5D Mark II Internal Speaker Replacement: 15 단계, 이미지 1/1
    • Remove the speaker by firmly gripping the top of the speaker and pulling down towards the bottom of the back panel while rotating the top of the speaker upwards, away from the back panel. This will allow the speaker to come off of its pivot point.

결론

To reassemble your device, follow these instructions in reverse order.

다른 2명이 해당 안내서를 완성하였습니다.

Mike Seed

회원 가입일: 09/22/14

2,956 평판

안내서 8개 작성하였습니다

USF Tampa, Team 1-6, Hickman Fall 2014 USF Tampa, Team 1-6, Hickman Fall 2014 회원

USFT-HICKMAN-F14S1G6

3 회원들

안내서 16개 작성하였습니다

댓글 0개

댓글 쓰기

조회 통계:

24 시간 전: 0

7일 전: 0

30일 전: 1

전체 시간: 1,852