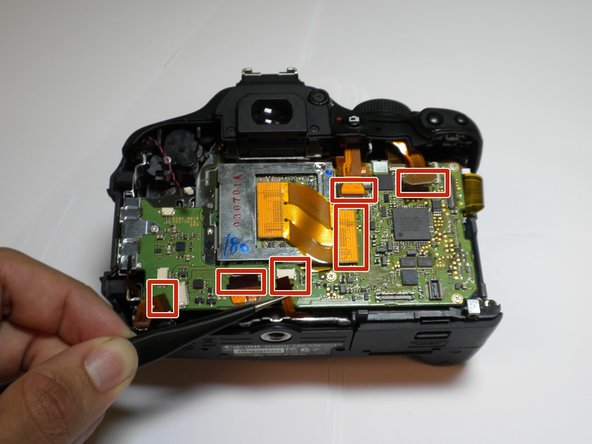
주요 콘텐츠로 건너뛰기

Canon EOS Rebel T3i Motherboard Replacement

필요한 것

  1. Canon EOS Rebel T3i Motherboard Replacement, Battery: 1 단계, 이미지 1/1
    • Locate the battery compartment on the bottom of the camera.

  2. Canon EOS Rebel T3i Motherboard Replacement: 2 단계, 이미지 1/1
    • Hook your finger onto the compartment door latch.

    • Open the battery compartment door.

  3. Canon EOS Rebel T3i Motherboard Replacement: 3 단계, 이미지 1/1
    • Remove the battery from the compartment.

  4. Canon EOS Rebel T3i Motherboard Replacement, Motherboard: 4 단계, 이미지 1/2 Canon EOS Rebel T3i Motherboard Replacement, Motherboard: 4 단계, 이미지 2/2
    • Peel away the rubber grip on the left side of the camera with your fingers.

    • The grip should feel like a thick sticker as it comes off.

  5. Canon EOS Rebel T3i Motherboard Replacement: 5 단계, 이미지 1/1
    • Remove four 3 mm Phillips #000 screws on the left side of the camera.

  6. Canon EOS Rebel T3i Motherboard Replacement: 6 단계, 이미지 1/3 Canon EOS Rebel T3i Motherboard Replacement: 6 단계, 이미지 2/3 Canon EOS Rebel T3i Motherboard Replacement: 6 단계, 이미지 3/3
    • Remove four 3 mm Phillips #000 screws on the bottom of the camera.

  7. Canon EOS Rebel T3i Motherboard Replacement: 7 단계, 이미지 1/1
    • Remove two 3 mm Phillips #000 screws on the right side of the camera.

  8. Canon EOS Rebel T3i Motherboard Replacement: 8 단계, 이미지 1/2 Canon EOS Rebel T3i Motherboard Replacement: 8 단계, 이미지 2/2
    • Remove the back of the camera by lifting from both the left and right sides.

    • Be careful not to break the orange and blue cables connecting the back panel of the camera to the motherboard.

  9. Canon EOS Rebel T3i Motherboard Replacement: 9 단계, 이미지 1/1
    • Disconnect the orange cable at the bottom of the camera by gently pinching with your fingers.

  10. Canon EOS Rebel T3i Motherboard Replacement: 10 단계, 이미지 1/1
    • Detach the blue cable by sliding the pointed end of a spudger between the motherboard and the silver prongs connected to the cable.

  11. Canon EOS Rebel T3i Motherboard Replacement: 11 단계, 이미지 1/1
    • Locate the cable on the top left corner of the motherboard.

    • Pinch the round, white connector with tweezers and gently remove the cable.

  12. Canon EOS Rebel T3i Motherboard Replacement: 12 단계, 이미지 1/2 Canon EOS Rebel T3i Motherboard Replacement: 12 단계, 이미지 2/2
    • With tweezers, pinch the ends of the remaining orange ribbon cables, and gently pull these ends off of the motherboard.

    • Leave the other end of all ribbon cables attached to their components.

  13. Canon EOS Rebel T3i Motherboard Replacement: 13 단계, 이미지 1/1
    • Remove the five 4 mm Phillips #000 screws.

  14. Canon EOS Rebel T3i Motherboard Replacement: 14 단계, 이미지 1/1
    • Gently lift the motherboard away from the camera.

결론

To reassemble your device, follow these instructions in reverse order.

다른 19명이 해당 안내서를 완성하였습니다.

Natalie Crock

회원 가입일: 08/27/15

752 평판

안내서 5개 작성하였습니다

USF Tampa, Team 5-2, Blackwell Fall 2015 USF Tampa, Team 5-2, Blackwell Fall 2015 회원

USFT-BLACKWELL-F15S5G2

4 회원들

안내서 10개 작성하였습니다

댓글 7개

Publicación muy esmerada y didáctica, gracias.

Japons - 답글

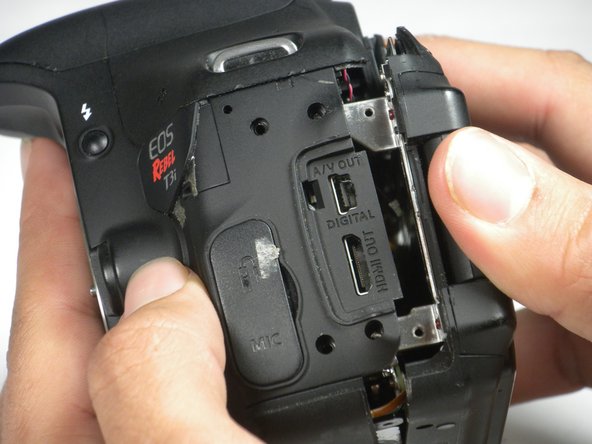
There was one huge step left out. On the T3i there is a fiber optic cable connection on the underside, top right hand side of the motherboard. If you don't reconnect this before reassembly your camera won't work. It is difficult to make sure both this cable and the adjacent white round-wire cable are connected before putting the motherboard back in place.

Albert Einstein - 답글

How do you connect it?

art.w.abate -

I concur with Albert Einstein. It was very difficult. This should be mentioned int the steps, not reserved for the comments!

Raymond Pedersen - 답글

Yes, 15 step. to make it easier to connect the optical cable and the second rear cable is better to remove the top cover

Evgeny Rozalenok - 답글

댓글 쓰기

조회 통계:

24 시간 전: 3

7일 전: 7

30일 전: 55

전체 시간: 13,341