이 버전에는 잘못된 편집 사항이 있을 수 있습니다. 최신 확인된 스냅샷으로 전환하십시오.
필요한 것
-
이 단계는 번역되지 않았습니다. 번역을 도와주십시오
-
Use the spudger to pry off the rubber grip and reveal the screws.
-
Unscrew the four 5.5mm Torx screws using the Torx T6 screwdriver.
-
-
이 단계는 번역되지 않았습니다. 번역을 도와주십시오
-
Pull off the plastic cover from the viewfinder.
-
Unscrew the two 3.4mm Phillips screws using the Phillips #00 screwdriver.
-
-
이 단계는 번역되지 않았습니다. 번역을 도와주십시오
-
Remove the following screws from the device using the Phillips #00 screwdriver:
-
Two 3.4mm Phillips head screws.
-
Two 5.9mm Phillips head screw.
-
-
-
이 단계는 번역되지 않았습니다. 번역을 도와주십시오
-
Remove the following screws from the device using the Phillips #00 screwdriver:
-
One 3.4mm Phillips head screw.
-
One 5.9 mm Phillips head screw.
-
-
이 단계는 번역되지 않았습니다. 번역을 도와주십시오
-
In the lower right corner of the mother board, detach the blue cable.
-
Then detach the ribbon cable going from the motherboard to the rear panel.
-
-
이 단계는 번역되지 않았습니다. 번역을 도와주십시오
-
In the upper left corner of the motherboard, remove the small multicolored wire from the motherboard.
-
-
이 단계는 번역되지 않았습니다. 번역을 도와주십시오
-
Use the plastic opening tool to flip up ribbon cable connector.
-
Gently disconnect the ribbon cable by pulling it away from the motherboard.
-
-
이 단계는 번역되지 않았습니다. 번역을 도와주십시오
-
In the upper right corner of the motherboard, use the plastic opening tool to remove the clear cable connector from the motherboard.
-
-
이 단계는 번역되지 않았습니다. 번역을 도와주십시오
-
Use the plastic opening tool to remove the ribbon cable connecting the image sensor to the motherboard.
-
-
이 단계는 번역되지 않았습니다. 번역을 도와주십시오
-
Use the plastic opening tool to push on the indents of the plastic header to disconnect from the motherboard.
-
Make sure all cables are disconnected from the motherboard.
-
-
이 단계는 번역되지 않았습니다. 번역을 도와주십시오
-
Remove the following screws from the motherboard using the Phillips #00 screwdriver:
-
Two 3.9mm Phillips head screws.
-
Three 2.9mm Phillips head screws
-
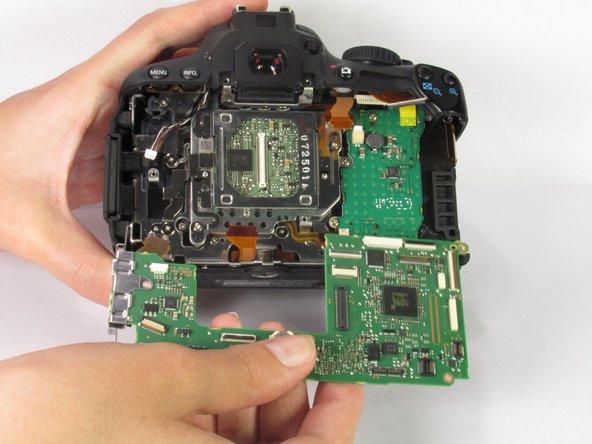
Gently pull the motherboard out of the camera.
-
다른 16명이 해당 안내서를 완성하였습니다.
댓글 2개
This guide gets an upvote.
It's the first camera disassembly guide I've seen so far on ifixit that includes the single most important precaution: the camera has a body cap fitted to avoid dust, dirt or other objects getting into the mirror box. Bravo!


