주요 콘텐츠로 건너뛰기

Canon EOS Rebel T5 SD Card Reader Replacement

필요한 것

  1. Canon EOS Rebel T5 SD Card Reader Replacement, Battery: 1 단계, 이미지 1/1
    • Lay the camera on its back so that the card/battery door is facing you.

    • Using your fingernail, slide the tab on the battery door up to release the battery door latch.

  2. Canon EOS Rebel T5 SD Card Reader Replacement: 2 단계, 이미지 1/1
    • Lift the now free card/battery door to reveal the battery compartment.

    • Push the gray lever to the right side so that the battery can be removed and replaced with a new one.

  3. Canon EOS Rebel T5 SD Card Reader Replacement, SD Card: 3 단계, 이미지 1/1
    • Lay the camera on its back so that the card/battery door is facing you.

    • Using your fingernail, slide the tab on the battery door up to release the battery door latch.

  4. Canon EOS Rebel T5 SD Card Reader Replacement: 4 단계, 이미지 1/1
    • Open the battery compartment by lifting the card/battery door. You will see a thin SD Card slot below the battery.

    • Push in the old SD card until it clicks to remove it and then push in the new card until it clicks into place.

  5. Canon EOS Rebel T5 SD Card Reader Replacement, Back Panel: 5 단계, 이미지 1/1
    • Turn the camera so that the back is facing to your right.

    • Remove the 5mm Phillips #000 screw above the rubber USB port cover.

  6. Canon EOS Rebel T5 SD Card Reader Replacement: 6 단계, 이미지 1/1
    • Remove the rubber piece.

    • Unscrew the two screws under the rubber cover to completely remove the rubber cover piece.

    • It is held in place by a notched tether, but can be easily manipulated to slide out.

  7. Canon EOS Rebel T5 SD Card Reader Replacement: 7 단계, 이미지 1/1
    • Turn your camera so that the bottom is facing you.

    • Remove the 5mm Phillips #000 screws.

  8. Canon EOS Rebel T5 SD Card Reader Replacement: 8 단계, 이미지 1/1
    • Now turn the camera so that the front is facing towards your right.

    • Remove the two remaining 5mm Phillips #000 screws.

  9. Canon EOS Rebel T5 SD Card Reader Replacement: 9 단계, 이미지 1/3 Canon EOS Rebel T5 SD Card Reader Replacement: 9 단계, 이미지 2/3 Canon EOS Rebel T5 SD Card Reader Replacement: 9 단계, 이미지 3/3
    • Now that all of the exterior screws have been removed, grip the camera firmly on both sides.

    • Gently pry the back panel from the main body of the camera.

    • There are two ribbon cables that need to be removed in order for the back panel to come free from the camera body, as indicated.

    • This back panel contains various control components of the camera as well as the LCD screen.

  10. Canon EOS Rebel T5 SD Card Reader Replacement, LCD Screen: 10 단계, 이미지 1/2 Canon EOS Rebel T5 SD Card Reader Replacement, LCD Screen: 10 단계, 이미지 2/2
    • Remove the four silver 4mm Phillips #000 screws connecting the LCD screen to the back of the camera.

    • Be sure to lift the ribbon cable to remove the remaining hidden black 4mm Phillips #000 screw.

  11. Canon EOS Rebel T5 SD Card Reader Replacement: 11 단계, 이미지 1/1
    • The LCD screen can now be lifted from the right side to be replaced.

  12. Canon EOS Rebel T5 SD Card Reader Replacement, Motherboard: 12 단계, 이미지 1/1
    • Remove all ribbon cables with the plastic spudger.

    • Gently pry up the black plastic tabs to slide out the ribbon cables

  13. Canon EOS Rebel T5 SD Card Reader Replacement: 13 단계, 이미지 1/1
    • Turn your camera so that the top is facing you.

    • Remove the two black 5 mm Phillips #000 screws.

  14. Canon EOS Rebel T5 SD Card Reader Replacement: 14 단계, 이미지 1/3 Canon EOS Rebel T5 SD Card Reader Replacement: 14 단계, 이미지 2/3 Canon EOS Rebel T5 SD Card Reader Replacement: 14 단계, 이미지 3/3
    • Turn the grip side toward you.

    • Remove the rubber grip, using the plastic spudger.

  15. Canon EOS Rebel T5 SD Card Reader Replacement: 15 단계, 이미지 1/1
    • Remove the black 5 mm Phillips #000 screw, located under the grip.

  16. Canon EOS Rebel T5 SD Card Reader Replacement: 16 단계, 이미지 1/1
    • Remove the top panel of the device.

  17. Canon EOS Rebel T5 SD Card Reader Replacement: 17 단계, 이미지 1/2 Canon EOS Rebel T5 SD Card Reader Replacement: 17 단계, 이미지 2/2
    • Remove the front panel of the camera.

  18. Canon EOS Rebel T5 SD Card Reader Replacement: 18 단계, 이미지 1/3 Canon EOS Rebel T5 SD Card Reader Replacement: 18 단계, 이미지 2/3 Canon EOS Rebel T5 SD Card Reader Replacement: 18 단계, 이미지 3/3
    • Remove the five silver 5mm Phillips #000 screws.

    • The motherboard can now be removed.

  19. Canon EOS Rebel T5 SD Card Reader Replacement, Image Sensor: 19 단계, 이미지 1/2 Canon EOS Rebel T5 SD Card Reader Replacement, Image Sensor: 19 단계, 이미지 2/2
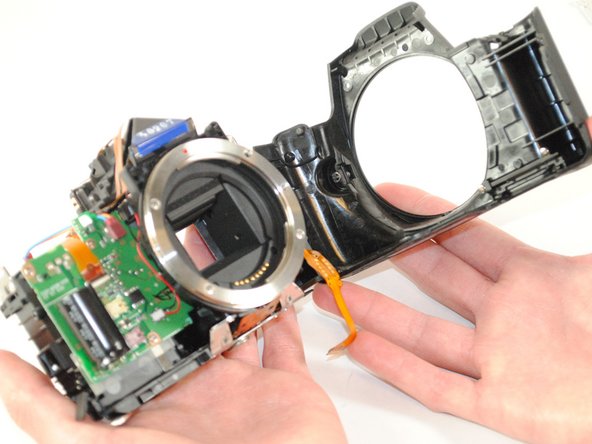
    • Remove the three silver 3mm Philips #000 screws from the image sensor holder.

    • Remove the image sensor holder.

  20. Canon EOS Rebel T5 SD Card Reader Replacement: 20 단계, 이미지 1/3 Canon EOS Rebel T5 SD Card Reader Replacement: 20 단계, 이미지 2/3 Canon EOS Rebel T5 SD Card Reader Replacement: 20 단계, 이미지 3/3
    • Remove the three remaining silver 3mm Philips #000 screws from the image sensor.

    • Be careful not lose the springs underneath the screws on the image sensor

    • Using your fingers, lift the image sensor from the device.

  21. Canon EOS Rebel T5 SD Card Reader Replacement, SD Card Reader: 21 단계, 이미지 1/1
    • Using the plastic spuger, disconnect the wire strips that are attached to the SD card reader.

  22. Canon EOS Rebel T5 SD Card Reader Replacement: 22 단계, 이미지 1/1
    • Remove the three 3nm Phillips #000 screws connecting the SD card reader to the back of the device.

  23. Canon EOS Rebel T5 SD Card Reader Replacement: 23 단계, 이미지 1/2 Canon EOS Rebel T5 SD Card Reader Replacement: 23 단계, 이미지 2/2
    • Using your fingers, remove the SD card reader from the back of the device.

결론

To reassemble your device, follow these instructions in reverse order.

다른 7명이 해당 안내서를 완성하였습니다.

Tyler Brown

회원 가입일: 09/22/14

846 평판

안내서 2개 작성하였습니다

USF Tampa, Team 16-4, Wollert Fall 2015 USF Tampa, Team 16-4, Wollert Fall 2015 회원

USFT-WOLLERT-F15S16G4

4 회원들

안내서 16개 작성하였습니다

댓글 5개

Very comprehensive tutorial but 2 screws forgotten (on both sides of the viewfinder) and the adjustment thumb knob withdrawal before removing the top panel of the device. Good job anyway, tks

igloo - 답글

Is there a video of this?

Hubzilla - 답글

Removal of the sensor is NOT required to take the SD board out of the camera. The sensor needs to be fitted back to exactly the same height, otherwise you WILL not retain autofocus. Why was there no mention of this during the steps above?

Lee Gartside - 답글

Bonjour , ou peut on acheter le lecteur de carte sd , merci , cordialement

d007 Éric d007 - 답글

Step 19 and 20 are only for modifiing or replacing the image sensor

And is not recommended because AF doesn't work without further adjustment

Tom Oos Oss - 답글

댓글 쓰기

조회 통계:

24 시간 전: 4

7일 전: 14

30일 전: 62

전체 시간: 9,733