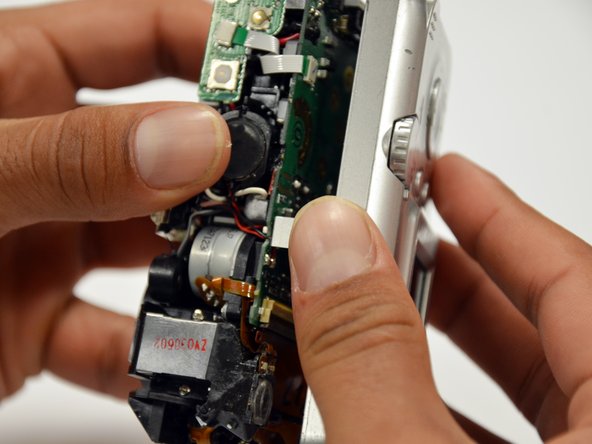
주요 콘텐츠로 건너뛰기

Canon PowerShot A460 Motherboard Replacement

필요한 것

  1. Canon PowerShot A460 Motherboard Replacement, Battery: 1 단계, 이미지 1/1
    • Slide the switch on the battery cover labeled "CARD/BATT. OPEN." to the right.

    • While still holding the switch, pull the cover down, allowing it to release and open.

  2. Canon PowerShot A460 Motherboard Replacement: 2 단계, 이미지 1/1
    • Tilt the camera slightly to allow the batteries to fall out.

  3. Canon PowerShot A460 Motherboard Replacement: 3 단계, 이미지 1/1
    • Press on and release the memory card to eject it.

  4. Canon PowerShot A460 Motherboard Replacement, Front Casing: 4 단계, 이미지 1/1
    • Unscrew the 5mm Phillips #00 screw from the bottom of the camera.

    • Make sure to keep the different size screws organized to make reassembling the camera simpler.

  5. Canon PowerShot A460 Motherboard Replacement: 5 단계, 이미지 1/1
    • Unscrew the three 2mm Phillips #00 screws that are located on the bottom of the camera.

  6. Canon PowerShot A460 Motherboard Replacement: 6 단계, 이미지 1/1
    • Remove the 4mm Phillips #00 screw that is located on the left side of the camera, if the display screen is facing you.

  7. Canon PowerShot A460 Motherboard Replacement: 7 단계, 이미지 1/1
    • Take out the 4mm Phillips #00 screw under the rubber flap on the right end of the camera.

  8. Canon PowerShot A460 Motherboard Replacement: 8 단계, 이미지 1/2 Canon PowerShot A460 Motherboard Replacement: 8 단계, 이미지 2/2
    • Remove the second battery cover on the bottom of camera.

    • Take the silver battery out of the camera.

  9. Canon PowerShot A460 Motherboard Replacement: 9 단계, 이미지 1/3 Canon PowerShot A460 Motherboard Replacement: 9 단계, 이미지 2/3 Canon PowerShot A460 Motherboard Replacement: 9 단계, 이미지 3/3
    • Remove the 4mm Phillips #00 screw on the inside of the flap that hides the battery and memory card slots.

    • Remove the light grey, plastic piece.

    • Remove the plastic portion of the battery flap cover. The metal piece will remain attached.

  10. Canon PowerShot A460 Motherboard Replacement: 10 단계, 이미지 1/3 Canon PowerShot A460 Motherboard Replacement: 10 단계, 이미지 2/3 Canon PowerShot A460 Motherboard Replacement: 10 단계, 이미지 3/3
    • Slightly pull on each side of the camera. It should loosen up and come apart.

    • If it does not pull apart right away, use a little more force.

    • Do not give up!

  11. Canon PowerShot A460 Motherboard Replacement, Back Casing: 11 단계, 이미지 1/1
    • Remove the back case of the camera by pulling from the top.

    • Be careful when pulling off the case. There is a delicate gold ribbon connecting the bottom of the camera to the back case.

  12. Canon PowerShot A460 Motherboard Replacement, LCD Screen: 12 단계, 이미지 1/1
    • Remove the 4mm Phillips #00 screw from above the ribbon.

  13. Canon PowerShot A460 Motherboard Replacement: 13 단계, 이미지 1/1
    • Gently peel off the blue tape on the top of the LCD screen.

  14. Canon PowerShot A460 Motherboard Replacement: 14 단계, 이미지 1/1
    • Remove the 4mm Phillips #00 screw previously concealed by the blue tape.

  15. Canon PowerShot A460 Motherboard Replacement: 15 단계, 이미지 1/1
    • Gently lift the LCD screen off of the front casing by pulling up a tab on the side of the camera.

  16. Canon PowerShot A460 Motherboard Replacement: 16 단계, 이미지 1/1
    • Using a spudger, lift the grey tabs to allow the ribbon to slide out.

  17. Canon PowerShot A460 Motherboard Replacement: 17 단계, 이미지 1/1
    • Since the tabs have been lifted, the ribbon should now slide out out easily.

    • Be careful not to distort the ribbon in any way.

  18. Canon PowerShot A460 Motherboard Replacement, Motherboard: 18 단계, 이미지 1/1
    • Remove the 5mm Phillips #00 screw located above the small black piece on the right side of the mother board.

  19. Canon PowerShot A460 Motherboard Replacement: 19 단계, 이미지 1/2 Canon PowerShot A460 Motherboard Replacement: 19 단계, 이미지 2/2
    • Remove the 4mm Phillips #00 screw at the bottom of the black piece.

    • Detach the black piece that the screws previously held in place.

  20. Canon PowerShot A460 Motherboard Replacement: 20 단계, 이미지 1/1
    • Remove the 5mm Phillips #00 screw in the middle of the motherboard.

  21. Canon PowerShot A460 Motherboard Replacement: 21 단계, 이미지 1/1
    • Remove the 5mm Phillips #00 screw that holds the metal piece to the bottom of the camera .

  22. Canon PowerShot A460 Motherboard Replacement: 22 단계, 이미지 1/1
    • Remove the 5mm Phillips #00 screw that is located on the top of camera.

  23. Canon PowerShot A460 Motherboard Replacement: 23 단계, 이미지 1/1
    • Remove the 2mm Phillips #00 screw that is located on the far left of the motherboard.

    • Be careful not to damage the multiple adjacent orange ribbons.

  24. Canon PowerShot A460 Motherboard Replacement: 24 단계, 이미지 1/1
    • Remove the 5mm Phillips #00 screw near the bottom left of the motherboard.

  25. Canon PowerShot A460 Motherboard Replacement: 25 단계, 이미지 1/2 Canon PowerShot A460 Motherboard Replacement: 25 단계, 이미지 2/2
    • Using a spudger, unlock the locking mechanism that holds the lower orange ribbon in place.

    • Once unlocked, slide out the ribbon.

  26. Canon PowerShot A460 Motherboard Replacement: 26 단계, 이미지 1/1
    • Using a spudger, unlock the locking mechanism that holds the upper orange ribbon in place.

    • Once unlocked, slide out the ribbon.

  27. Canon PowerShot A460 Motherboard Replacement: 27 단계, 이미지 1/1
    • All that is required is to unsolder the few remaining wires. Then, the motherboard will be ready to be replaced!

결론

To reassemble your device, follow these instructions in reverse order.

다른 2명이 해당 안내서를 완성하였습니다.

Tanner Coleman

회원 가입일: 01/18/13

40 평판

안내서 2개 작성하였습니다

Cal Poly, Team 19-42, Regan Winter 2013 Cal Poly, Team 19-42, Regan Winter 2013 회원

CPSU-REGAN-W13S19G42

4 회원들

안내서 12개 작성하였습니다

댓글 0개

댓글 쓰기

조회 통계:

24 시간 전: 0

7일 전: 2

30일 전: 9

전체 시간: 1,574