주요 콘텐츠로 건너뛰기

Canon PowerShot A540 Front Cover Replacement

필요한 것

  1. Canon PowerShot A540 Front Cover Replacement, Back Cover: 1 단계, 이미지 1/2 Canon PowerShot A540 Front Cover Replacement, Back Cover: 1 단계, 이미지 2/2
    • Turn off the camera.

    • Turn the camera upside-down and press the tab to release the battery cover. Remove the batteries.

  2. Canon PowerShot A540 Front Cover Replacement: 2 단계, 이미지 1/1
    • Turn the camera upside down to view the "Card/Batt. Open" Cover.

    • Use a Phillips head #000 screwdriver to remove the three (3) 4.0 mm screws.

  3. Canon PowerShot A540 Front Cover Replacement: 3 단계, 이미지 1/1
    • Open "Card/Batt. Open" Cover.

    • Remove the one (1) 5.0 mm screw with the Phillips head #000 screwdriver.

  4. Canon PowerShot A540 Front Cover Replacement: 4 단계, 이미지 1/1
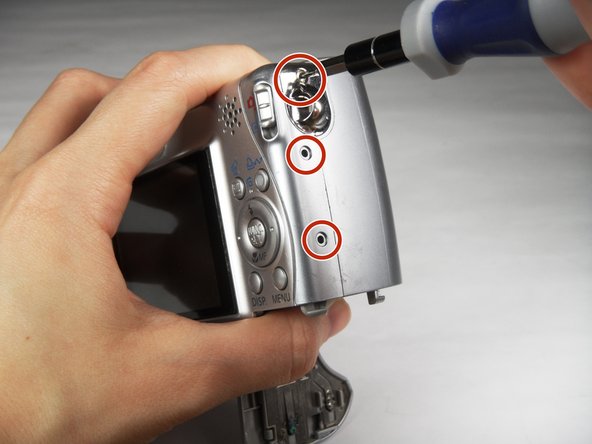
    • Turn the camera to the right side of the LCD screen.

    • Remove the three (3) 4.0 mm screws with the Phillips head #000 screwdriver.

  5. Canon PowerShot A540 Front Cover Replacement: 5 단계, 이미지 1/3 Canon PowerShot A540 Front Cover Replacement: 5 단계, 이미지 2/3 Canon PowerShot A540 Front Cover Replacement: 5 단계, 이미지 3/3
    • Gently remove the back cover.

    • Start at the bottom at the corner of the "Card/Batt. Open" Cover.

    • Then move onto the other edges and the top.

    • It may be tight at the top!

  6. Canon PowerShot A540 Front Cover Replacement, Front Cover: 6 단계, 이미지 1/2 Canon PowerShot A540 Front Cover Replacement, Front Cover: 6 단계, 이미지 2/2
    • Turn the camera to view the front.

    • Remove the lens guard.

    • Press the lens guard's button as you turn the guard counterclockwise.

  7. Canon PowerShot A540 Front Cover Replacement: 7 단계, 이미지 1/1
    • Turn the camera to the side left of the LCD screen.

    • Remove the one (1) 4.0 mm screw with the Phillips head #000 screwdriver.

  8. Canon PowerShot A540 Front Cover Replacement: 8 단계, 이미지 1/1
    • Remove the front cover gently.

    • When removing the front cover, a thin, black rubber washer may fall off the lens. If it does, make sure to put it back on the lens before reassembly.

결론

To reassemble your device, follow these instructions in reverse order.

다른 2명이 해당 안내서를 완성하였습니다.

Carley Fuller

회원 가입일: 03/23/15

434 평판

안내서 3개 작성하였습니다

Baylor, Team 7-12, Williams Spring 2015 Baylor, Team 7-12, Williams Spring 2015 회원

BU-WILLIAMS-S15S7G12

3 회원들

안내서 20개 작성하였습니다

댓글 0개

댓글 쓰기

조회 통계:

24 시간 전: 0

7일 전: 1

30일 전: 17

전체 시간: 1,415