주요 콘텐츠로 건너뛰기

Canon PowerShot A590 IS Flash Assembly Replacement

필요한 것

  1. Canon PowerShot A590 IS Flash Assembly Replacement, Batteries: 1 단계, 이미지 1/2 Canon PowerShot A590 IS Flash Assembly Replacement, Batteries: 1 단계, 이미지 2/2
    • The battery hatch is on the bottom of the camera.

    • CAUTION: Locate the switch to open the hatch and push gently toward the front of the camera. Too much force can break the hatch.

    • While the switch is pushed forward, pull the cover away from the camera.

  2. Canon PowerShot A590 IS Flash Assembly Replacement: 2 단계, 이미지 1/1
    • This camera requires AA batteries.

    • To remove batteries, simply allow them to fall out of the camera.

    • Use a fingernail to lift the clock battery out of the camera.

  3. Canon PowerShot A590 IS Flash Assembly Replacement: 3 단계, 이미지 1/1
    • When replacing the AA batteries, verify they are oriented correctly by following the (+) and (-) signs on the camera.

  4. Canon PowerShot A590 IS Flash Assembly Replacement, Back Cover: 4 단계, 이미지 1/1
    • Remove the screw located under the rubber flap on the left side of the camera using a Phillips #00 screwdriver.

  5. Canon PowerShot A590 IS Flash Assembly Replacement: 5 단계, 이미지 1/1
    • Remove the two screws located on the other side of the camera using a Phillips #00 screwdriver.

  6. Canon PowerShot A590 IS Flash Assembly Replacement: 6 단계, 이미지 1/1
    • Remove the three screws located at the bottom of the camera using a Phillips #00 screwdriver.

  7. Canon PowerShot A590 IS Flash Assembly Replacement: 7 단계, 이미지 1/1
    • Open the battery cover.

    • Using the iFixit opening tool, push up gently around all edges of the camera.

  8. Canon PowerShot A590 IS Flash Assembly Replacement, Remove Lens Cover: 8 단계, 이미지 1/1
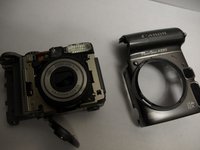
    • Press and hold down the button shown in the blue circle.

    • While pressing the button, rotate the lens cover in a counter-clockwise direction to remove it.

  9. Canon PowerShot A590 IS Flash Assembly Replacement, Remove Front Cover: 9 단계, 이미지 1/2 Canon PowerShot A590 IS Flash Assembly Replacement, Remove Front Cover: 9 단계, 이미지 2/2
    • Remove the front cover of the camera.

    • This may require a bit of force.

  10. Canon PowerShot A590 IS Flash Assembly Replacement, Remove Plastic Covering: 10 단계, 이미지 1/1
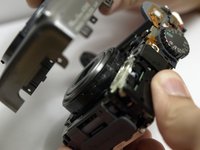
    • Remove the one (1) screw from the top of the camera, on the left side of the flash (looking from the front) using a Phillips #00 screwdriver.

    • Lift the black plastic covering off the circuit board.

  11. Canon PowerShot A590 IS Flash Assembly Replacement, Remove Green Circuit Board: 11 단계, 이미지 1/1
    • Remove the green circuit board from the top. Looking from the front of the camera, first lift the left side up above the black peg. The board should then slide out to the left.

    • The clear flash lens may fall out. Do not worry this will not affect the camera and can easily be placed back in its spot.

  12. Canon PowerShot A590 IS Flash Assembly Replacement, Unsolder Circuit Board Cables: 12 단계, 이미지 1/1
    • Unsolder the cables under the circuit board.

  13. Canon PowerShot A590 IS Flash Assembly Replacement: 13 단계, 이미지 1/1
    • The flash logic board can now be removed from the camera and replaced.

결론

To reassemble your device, follow these instructions in reverse order.

다른 3명이 해당 안내서를 완성하였습니다.

Zach

회원 가입일: 10/11/10

281 평판

안내서 6개 작성하였습니다

Cal Poly, Team 9-19, Regan Fall 2010 Cal Poly, Team 9-19, Regan Fall 2010 회원

CPSU-REGAN-F10S9G19

4 회원들

안내서 14개 작성하였습니다

댓글 2개

Zach, can you show how to replace the Ring Release Button? The release button appears to be fixed to the front cover once it is removed. Can we purchase a replacement release button?

Jae Ennis - 답글

If it is the flash element that needs to be replace, I presume I will see it when I’m there.

Is this correct ?

effitech_structure@yahoo.com

Jean-François Rondeau - 답글

댓글 쓰기

조회 통계:

24 시간 전: 0

7일 전: 3

30일 전: 7

전체 시간: 15,590