소개
Use this guide to replace the motherboard of your camera. Motherboard replacement may be necessary if the buttons on your camera are not working or if there are other major malfunctions with the way your camera is functioning.
필요한 것
-
-
Locate the battery housing cover on the bottom of your camera.
-
Place a finger on the textured portion of the battery housing cover.
-
Slide the cover in the direction that the arrow is pointing.
-
-
-
Remove the two 4mm Hex screws that connect the grip to the camera with a Hex head screwdriver.
-
Remove the two Phillips screws to the left of the hex screws with a Phillips head screwdriver:
-
One 2mm screw
-
One 3mm screw
-
Remove the grip from the front of the camera by pulling it away from the lens and then away from the camera.
-
-
-
-
Use the flat end of the plastic spudger to rotate the black plastic locking tab towards the ribbon cable.
-
Insert the pointed end of the plastic spudger into a small hole on the side of the ribbon cable and pull the ribbon cable out of its housing.
-
Use the flat end of the plastic spudger to pry the ribbon cable connector from the motherboard.
-
-
-
Release the plastic locking tab of the upper ribbon cable with the plastic spudger.
-
Pull the top ribbon cable from its mount with the fine tip metal tweezers.
-
Remove the bottom ribbon cable with the fine tip metal tweezers by pulling it toward the flash switch side of the camera.
-
-
-
Use the plastic spudger to remove the ribbon cable from the motherboard by placing the spudger under the ribbon cable connector and pulling up.
-
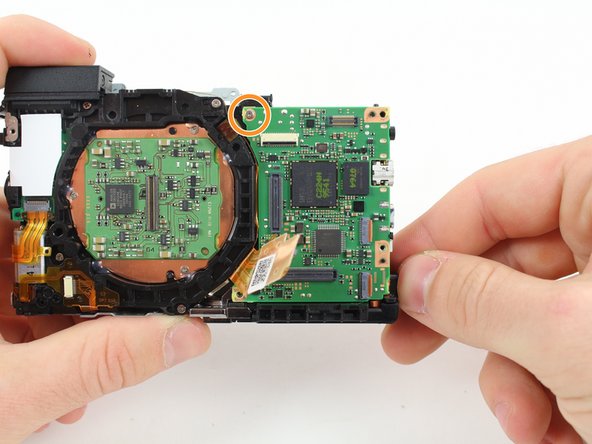
Remove the 2.8mm screw from the motherboard.
-
Carefully rotate the motherboard upward.
-
Use the plastic spudger to remove the ribbon cable from the bottom of the motherboard by placing the spudger under the ribbon cable connector and pulling up.
-


To reassemble your device, follow these instructions in reverse order.
To reassemble your device, follow these instructions in reverse order.
다른 4명이 해당 안내서를 완성하였습니다.
팀

Cal Poly, Team 70-2, Forte Winter 2016 Cal Poly, Team 70-2, Forte Winter 2016 회원
CPSU-FORTE-W16S70G2
4 회원들
안내서 4개 작성하였습니다