주요 콘텐츠로 건너뛰기

Canon PowerShot S110 Lens Replacement

필요한 것

  1. Canon PowerShot S110 Lens Replacement, Battery Removal: 1 단계, 이미지 1/2 Canon PowerShot S110 Lens Replacement, Battery Removal: 1 단계, 이미지 2/2
    • Remove the battery by sliding open the cover on the bottom of the camera.

    • This must be done in order to avoid causing any short circuits, and to continue with disassembly.

  2. Canon PowerShot S110 Lens Replacement: 2 단계, 이미지 1/3 Canon PowerShot S110 Lens Replacement: 2 단계, 이미지 2/3 Canon PowerShot S110 Lens Replacement: 2 단계, 이미지 3/3
    • Removing the following 6 Phillips screws will allow access to the inside of the camera:

    • Remove two screws on the right-side of the camera, near the HDMI port.

    • Remove two screws on the opposite side of the camera.

    • Remove the last two screws on the underside of the camera, near the tripod mounting hole.

  3. Canon PowerShot S110 Lens Replacement: 3 단계, 이미지 1/1
    • Release all clips around the outside plastic shell, and it will lift off.

  4. Canon PowerShot S110 Lens Replacement: 4 단계, 이미지 1/1
    • Remove the Phillips screw near the display holding the bracket in place.

    • Remove the second Phillips screw in the bottom corner, making it easier to remove the bracket.

  5. Canon PowerShot S110 Lens Replacement: 5 단계, 이미지 1/1
    • Lift out the display mounting bracket, and set it aside.

  6. Canon PowerShot S110 Lens Replacement: 6 단계, 이미지 1/3 Canon PowerShot S110 Lens Replacement: 6 단계, 이미지 2/3 Canon PowerShot S110 Lens Replacement: 6 단계, 이미지 3/3
    • Using a plastic spudger, slowly pull out the ribbon using the hole shown in the image. The first of three logic connectors connecting the display to the camera is now removed.

    • The display should now be partially disconnected from the back side of the camera.

  7. Canon PowerShot S110 Lens Replacement: 7 단계, 이미지 1/3 Canon PowerShot S110 Lens Replacement: 7 단계, 이미지 2/3 Canon PowerShot S110 Lens Replacement: 7 단계, 이미지 3/3
    • In order to remove the other two connectors, the front of the case must be removed. Slowly pry around the edges using a plastic prying tool to free the case. A lens-ring piece will fall out from the inside of the camera; set this aside.

    • Remove the two screws that hold the top piece of the plastic case in. One is short, one is long.

    • With a spudger remove the two rubber pads from the top of the camera to prevent pulling on the flex cable.

  8. Canon PowerShot S110 Lens Replacement: 9 단계, 이미지 1/3 Canon PowerShot S110 Lens Replacement: 9 단계, 이미지 2/3 Canon PowerShot S110 Lens Replacement: 9 단계, 이미지 3/3
    • Flip up the tab holding down this logic ribbon.

    • Flip up a second tab holding down this other ribbon; both the cables should be easily removable following this.

  9. Canon PowerShot S110 Lens Replacement: 10 단계, 이미지 1/3 Canon PowerShot S110 Lens Replacement: 10 단계, 이미지 2/3 Canon PowerShot S110 Lens Replacement: 10 단계, 이미지 3/3
    • Flip up the tab and remove the last ribbon.

    • The display can now be lifted off the camera and the logic ribbons attached in the front can slide out.

  10. Canon PowerShot S110 Lens Replacement: 11 단계, 이미지 1/2 Canon PowerShot S110 Lens Replacement: 11 단계, 이미지 2/2
    • Using a Phillips screwdriver, remove the screws on the small circuit board at the top of the camera.

    • This will allow you to finish removing the copper panel with either your hands or a prying tool.

  11. Canon PowerShot S110 Lens Replacement: 12 단계, 이미지 1/1
    • Using a Phillips screwdriver, remove the 8 screws attaching the metal panel to the camera.

    • During reassembly, make sure the screws go back in their specific holes, to avoid damage to the camera.

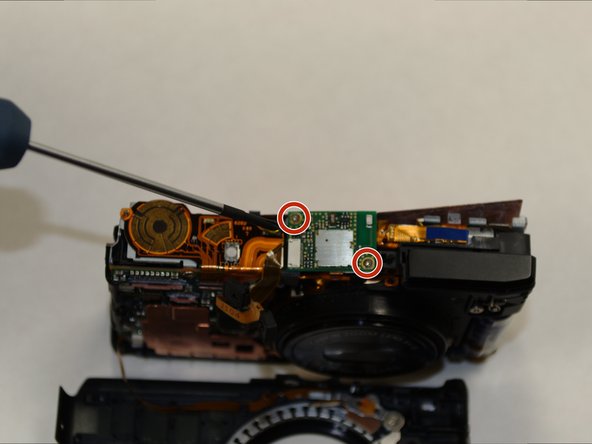
    • To remove the flash assembly, disconnect the flex cable connection, then move the flash unit out of the way.

    • Exercise caution when handling the flash unit, as there is minimal plastic protection preventing an electric shock.

  12. Canon PowerShot S110 Lens Replacement: 14 단계, 이미지 1/1
    • Remove the Phillips screw on the front facing side of the lens.

  13. Canon PowerShot S110 Lens Replacement: 15 단계, 이미지 1/2 Canon PowerShot S110 Lens Replacement: 15 단계, 이미지 2/2
    • Remove the Phillips screw holding the copper plate in place.

    • Use a prying tool to lift off the copper plate.

  14. Canon PowerShot S110 Lens Replacement: 16 단계, 이미지 1/2 Canon PowerShot S110 Lens Replacement: 16 단계, 이미지 2/2
    • Remove the indicated screw on the front facing side of the lens using a Philips screwdriver.

    • Next, remove the small attached ribbon by lifting up the clip and gently pulling the ribbon out.

  15. Canon PowerShot S110 Lens Replacement: 17 단계, 이미지 1/1
    • Lift the lens up to reveal the screws underneath.

    • Remove the 4 Phillips screws connecting the lens to the lens bracket.

  16. Canon PowerShot S110 Lens Replacement: 18 단계, 이미지 1/2 Canon PowerShot S110 Lens Replacement: 18 단계, 이미지 2/2
    • Using a prying tool, remove the lens bracket.

    • Handle your new lens carefully upon reassembly, as it's very fragile.

결론

To reassemble your device, follow these instructions in reverse order.

다른 9명이 해당 안내서를 완성하였습니다.

Pierre

회원 가입일: 07/17/15

401 평판

안내서 1개 작성함

UW Tacoma, Team 1-2, Liner SU 2015 UW Tacoma, Team 1-2, Liner SU 2015 회원

UWT-LINER-SU15S1G2

4 회원들

안내서 3개 작성하였습니다

댓글 9개

Great guide. My camera broke, couple of weeks back. The lens was extended and it won't retract. It just gives the lens error message. Orders a replacement lens from eBay fro $35 and used this guide to replace it.

dhanu802 - 답글

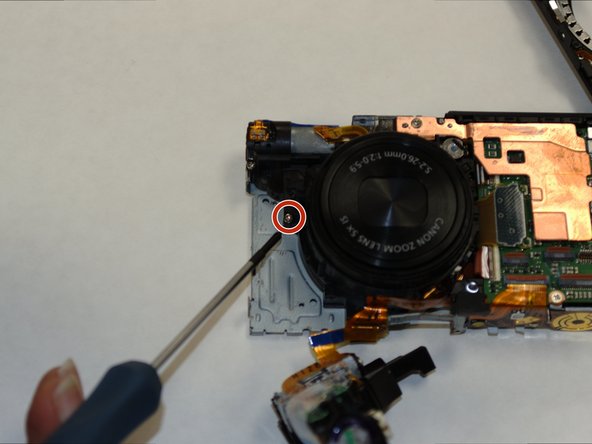
There is a step missing, on removing the flash, one side screw and one front, above the lens, otherwise perfect. thank you so much, just as above I had a lens error and ordered a replacement for 14£ from ebay. all works now. thanks.

Adrian Salariu - 답글

Is there no other 'fix' without replacing the lens assembly on this particular "Lens error "issue?

profeduards - 답글

@profeduards: try to reseat the flexes from the aperture and IS. You can disassemble the lens to reset the position and/or remove sand but make lots of pictures of the process, and mark (with pencil) a line over the rings (from the front) to know what ring goes where when reassembling. It's possible to reassemble without (as I did, lens was extended so i couldnt) but the process is long, arduous and takes a lot of patience.

Mrten - 답글

Thanks, my Lens was bricked, and with a new Lens kit @15$ from china, it was fixed.

jeromemathey - 답글

댓글 쓰기

조회 통계:

24 시간 전: 2

7일 전: 6

30일 전: 95

전체 시간: 11,319