주요 콘텐츠로 건너뛰기
수리 커뮤니티 가입 - 계정 만들기

Canon PowerShot S80 Flash Replacement

필요한 것

  1. Canon PowerShot S80 Flash Replacement, Outer Casing: 1 단계, 이미지 2개 중 1개 Canon PowerShot S80 Flash Replacement, Outer Casing: 1 단계, 이미지 2개 중 2개
    • Remove the knot on the wrist lanyard.

    • Remove the battery and the memory card.

  2. Canon PowerShot S80 Flash Replacement: 2 단계, 이미지 2개 중 1개 Canon PowerShot S80 Flash Replacement: 2 단계, 이미지 2개 중 2개
    • Begin removing the screws on the bottom of the outer casing.

    • Next, remove the rest of the screws from the outer casing.

  3. Canon PowerShot S80 Flash Replacement: 3 단계, 이미지 3개 중 1개 Canon PowerShot S80 Flash Replacement: 3 단계, 이미지 3개 중 2개 Canon PowerShot S80 Flash Replacement: 3 단계, 이미지 3개 중 3개
    • Gently pull the front cover off of the camera.

  4. Canon PowerShot S80 Flash Replacement: 4 단계, 이미지 3개 중 1개 Canon PowerShot S80 Flash Replacement: 4 단계, 이미지 3개 중 2개 Canon PowerShot S80 Flash Replacement: 4 단계, 이미지 3개 중 3개
    • Open the "A/V Out Digital" cover. Remove the screw inside.

    • Gently pull off the back casing.

    • Remove the black "L" shaped piece of metal.

  5. Canon PowerShot S80 Flash Replacement, LCD Screen: 5 단계, 이미지 1개 중 1개
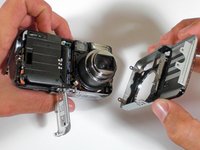
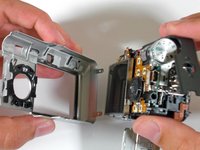
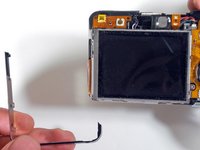
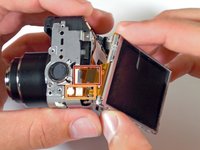
    • Remove the three screws that are holding the screen in place. Free the screen from the underlying components.

    • Be careful with the ribbon wire that is still attached on the left side of the screen.

  6. Canon PowerShot S80 Flash Replacement: 6 단계, 이미지 2개 중 1개 Canon PowerShot S80 Flash Replacement: 6 단계, 이미지 2개 중 2개
    • With the spudger, gently lift the black flap that is holding the wide ribbon cable wire in place.

    • Unplug the wide ribbon cable.

    • Unplug the narrow ribbon cable to free the LCD screen from the camera body.

  7. Canon PowerShot S80 Flash Replacement, Flash: 7 단계, 이미지 1개 중 1개
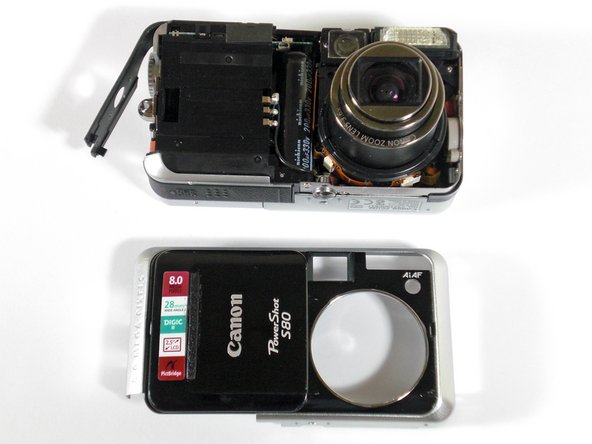
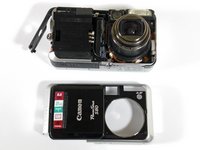
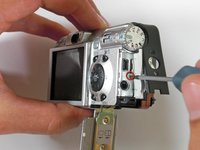
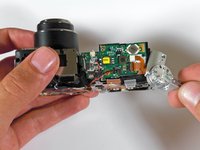
    • Remove the L-shaped corner trim containing the picture button.

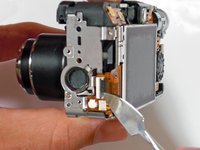
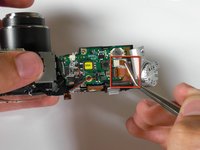
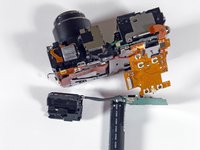
    • Carefully unplug the connection cable that is attached.

  8. Canon PowerShot S80 Flash Replacement: 8 단계, 이미지 2개 중 1개 Canon PowerShot S80 Flash Replacement: 8 단계, 이미지 2개 중 2개
    이 단계에 사용된 도구:
    Tweezers
    $4.99
    • Pull the selector wheel from the top corner of the camera.

    • Carefully remove the ribbon cable connection with a set of tweezers.

  9. Canon PowerShot S80 Flash Replacement: 9 단계, 이미지 1개 중 1개
    • With a Phillips #00 Screwdriver, unscrew the zoom toggle switch and remove it from the camera.

  10. Canon PowerShot S80 Flash Replacement: 10 단계, 이미지 1개 중 1개
    • With a Phillips #00 Screwdriver, unscrew the flash board.

  11. Canon PowerShot S80 Flash Replacement: 11 단계, 이미지 1개 중 1개
    • Remove the cable connection. With a metal spudger, gently pry up.

    • Remove the ribon cable. With a metal spudger, gently lift up the black tab.

  12. Canon PowerShot S80 Flash Replacement: 12 단계, 이미지 1개 중 1개
    • Lift the flash bulb unit upwards from the camera.

  13. Canon PowerShot S80 Flash Replacement: 13 단계, 이미지 2개 중 1개 Canon PowerShot S80 Flash Replacement: 13 단계, 이미지 2개 중 2개
    • Lift the entire three-part flash assembly from the camera.

결론

To reassemble your device, follow these instructions in reverse order.

작성자

7다른 기여자 명과 함께

BrettH

회원 가입일: 10/28/09

219 평판

안내서 5개를 작성함

Cal Poly, Team 19-5, Maness SU 2012 Cal Poly, Team 19-5, Maness SU 2012 회원

CPSU-MANESS-SU12S19G5

1 회원

안내서 5개를 작성함

0가이드 댓글

댓글 쓰기

조회 통계:

지난 24시간: 1

지난 7일: 11

지난 30일: 37

전체 시간: 3,867