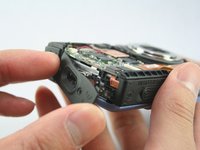
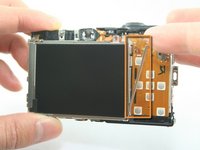
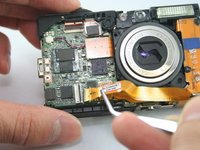
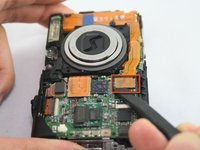
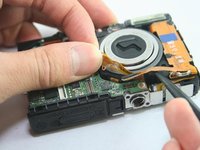
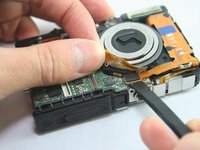
주요 콘텐츠로 건너뛰기

Canon PowerShot SD1100 IS Flash Assembly Replacement

필요한 것

  1. Canon PowerShot SD1100 IS Flash Assembly Replacement, Front and Rear Cover: 1 단계, 이미지 1/2 Canon PowerShot SD1100 IS Flash Assembly Replacement, Front and Rear Cover: 1 단계, 이미지 2/2
    • Remove wrist strap and battery.

  2. Canon PowerShot SD1100 IS Flash Assembly Replacement: 2 단계, 이미지 1/3 Canon PowerShot SD1100 IS Flash Assembly Replacement: 2 단계, 이미지 2/3 Canon PowerShot SD1100 IS Flash Assembly Replacement: 2 단계, 이미지 3/3
    • Remove 2 screws from each side of the camera (4 total, 0.102 in).

    • Remove 2 screws from the bottom on the camera (0.138 in).

    • Do not mix the 4 side screws with the 2 bottoms ones; they are different sizes.

  3. Canon PowerShot SD1100 IS Flash Assembly Replacement: 3 단계, 이미지 1/3 Canon PowerShot SD1100 IS Flash Assembly Replacement: 3 단계, 이미지 2/3 Canon PowerShot SD1100 IS Flash Assembly Replacement: 3 단계, 이미지 3/3
    • Gently pull off the front cover.

    • The plate on the side should come off.

    • Gently pull off the back cover.

  4. Canon PowerShot SD1100 IS Flash Assembly Replacement: 4 단계, 이미지 1/1
    • The cases should now be removed.

  5. Canon PowerShot SD1100 IS Flash Assembly Replacement, LCD screen: 5 단계, 이미지 1/2 Canon PowerShot SD1100 IS Flash Assembly Replacement, LCD screen: 5 단계, 이미지 2/2
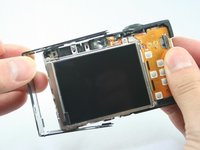
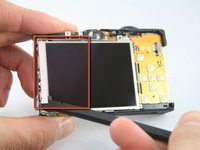
    • Remove the top-left screw above the LCD screen (0.100 in).

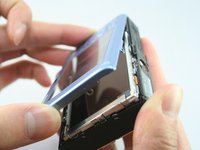
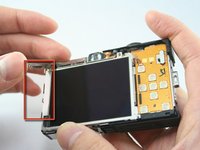
    • Remove the C-shaped plate from the side of the LCD screen.

  6. Canon PowerShot SD1100 IS Flash Assembly Replacement: 6 단계, 이미지 1/2 Canon PowerShot SD1100 IS Flash Assembly Replacement: 6 단계, 이미지 2/2
    • Remove the screw from the top-right of the LCD screen (0.098 in).

    • Remove the L-shaped bar from the right of the LCD screen.

  7. Canon PowerShot SD1100 IS Flash Assembly Replacement: 7 단계, 이미지 1/2 Canon PowerShot SD1100 IS Flash Assembly Replacement: 7 단계, 이미지 2/2
    • Use the spudger to remove the L-shaped bar from the left-side of the LCD screen.

  8. Canon PowerShot SD1100 IS Flash Assembly Replacement: 8 단계, 이미지 1/1
    • Use tweezers to remove the connector ribbon from the top-left corner above the LCD screen.

    • Be gentle. This ribbon should stay attached to the screen.

  9. Canon PowerShot SD1100 IS Flash Assembly Replacement: 9 단계, 이미지 1/3 Canon PowerShot SD1100 IS Flash Assembly Replacement: 9 단계, 이미지 2/3 Canon PowerShot SD1100 IS Flash Assembly Replacement: 9 단계, 이미지 3/3
    • Use a spudger to lift the connector lock (black flap) at the end of the larger LCD connector ribbon on the front side of the camera.

    • Use the tweezers to lift this ribbon.

    • Use the tweezers to gently peel this ribbon from the one underneath it.

  10. Canon PowerShot SD1100 IS Flash Assembly Replacement: 10 단계, 이미지 1/1
    • The LCD screen should now be removed.

  11. Canon PowerShot SD1100 IS Flash Assembly Replacement, Flash Assembly: 11 단계, 이미지 1/1
    • Remove the screw located on the side of the camera (0.072 in).

  12. Canon PowerShot SD1100 IS Flash Assembly Replacement: 12 단계, 이미지 1/2 Canon PowerShot SD1100 IS Flash Assembly Replacement: 12 단계, 이미지 2/2
    • Use the spudger to remove the lens ribbon from the circuit board.

    • Use the spudger to lift the ribbon.

    • This ribbon is connected to the lens, but the flash assembly ribbon is underneath it.

  13. Canon PowerShot SD1100 IS Flash Assembly Replacement: 13 단계, 이미지 1/2 Canon PowerShot SD1100 IS Flash Assembly Replacement: 13 단계, 이미지 2/2
    • Disconnect the flash assembly ribbon.

    • The flash assembly ribbon is located underneath the lens assembly ribbon.

  14. Canon PowerShot SD1100 IS Flash Assembly Replacement: 14 단계, 이미지 1/1
    • Remove the flash assembly, which includes the capacitor. If it resists, note the small hook on the right side near the bottom.

    • Be careful when taking out the capacitor. It could shock you.

  15. Canon PowerShot SD1100 IS Flash Assembly Replacement: 15 단계, 이미지 1/1
    • The capacitor should now be removed.

결론

To reassemble your device, follow these instructions in reverse order.

다른 3명이 해당 안내서를 완성하였습니다.

Tyler Grossheim

회원 가입일: 01/25/11

1,470 평판

안내서 6개 작성하였습니다

Cal Poly, Team 3-32, Regan Winter 2011 Cal Poly, Team 3-32, Regan Winter 2011 회원

CPSU-REGAN-W11S3G32

3 회원들

안내서 8개 작성하였습니다

댓글 한 개

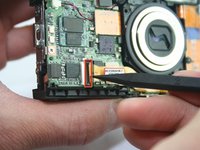
Step 14 The little hook at the bottom that holds the flash assembly in is hard to see. It is part of the bracket that holds the flash in and also forms part of the chassis of the camera. I found that you can gently flex the bracket outward ( away from the flash) to release the hook. After that, the flash unit came right out. Also note, that some flash units you get from electronics scrapers on ebay will have the bracket attached to the flash unit and it needs to be removed before you install the replacement part. It seems obvious but then again...

Jamey - 답글

댓글 쓰기

조회 통계:

24 시간 전: 0

7일 전: 0

30일 전: 2

전체 시간: 3,128