주요 콘텐츠로 건너뛰기

Canon PowerShot SX600 HS Display Screen Replacement

필요한 것

  1. Canon PowerShot SX600 HS Display Screen Replacement, Battery: 1 단계, 이미지 1/1
    • To remove the battery, locate the battery cover on the bottom of the camera.

    • Using your thumb, press down on the cover and slide it outwards.

  2. Canon PowerShot SX600 HS Display Screen Replacement: 2 단계, 이미지 1/1
    • Depress the orange lever holding the battery in place to unlock it.

  3. Canon PowerShot SX600 HS Display Screen Replacement: 3 단계, 이미지 1/2 Canon PowerShot SX600 HS Display Screen Replacement: 3 단계, 이미지 2/2
    • Use your fingers to remove the battery.

    • Be sure to remember the alignment of the nodes for reassembly.

  4. Canon PowerShot SX600 HS Display Screen Replacement, Power and Shutter Buttons: 4 단계, 이미지 1/1
    • Use a #000 Phillips screwdriver to unscrew the four 4mm screws located on the sides of the camera (2 for each side).

  5. Canon PowerShot SX600 HS Display Screen Replacement: 5 단계, 이미지 1/1
    • Unscrew the four 2mm located on the bottom of the camera using a Phillips #000 screwdriver.

  6. Canon PowerShot SX600 HS Display Screen Replacement: 6 단계, 이미지 1/1
    • Use a plastic opening tool to loosen and remove both the front and back plates of the camera, as well as the two side pieces.

  7. Canon PowerShot SX600 HS Display Screen Replacement: 7 단계, 이미지 1/2 Canon PowerShot SX600 HS Display Screen Replacement: 7 단계, 이미지 2/2
    • Unscrew the three 2mm screws attaching the piece to the camera frame with a #000 Phillips screwdriver.

  8. Canon PowerShot SX600 HS Display Screen Replacement: 8 단계, 이미지 1/1
    • Use an opening tool to gently remove the power and shutter button assembly from the frame.

  9. Canon PowerShot SX600 HS Display Screen Replacement, Display Screen: 9 단계, 이미지 1/2 Canon PowerShot SX600 HS Display Screen Replacement, Display Screen: 9 단계, 이미지 2/2
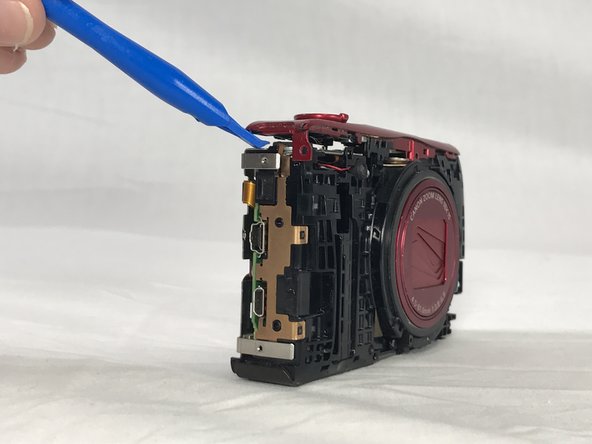
    • Unscrew the 2mm screw connections of the main board protector from the camera frame using a #000 Phillips head screwdriver (2 on front, 1 on top)

  10. Canon PowerShot SX600 HS Display Screen Replacement: 10 단계, 이미지 1/1
    • Use a Phillips #000 screwdriver to unscrew the 4mm screw.

  11. Canon PowerShot SX600 HS Display Screen Replacement: 11 단계, 이미지 1/1
    • Use a pair of tweezers to remove the no-fuss connector from its holder.

  12. Canon PowerShot SX600 HS Display Screen Replacement: 12 단계, 이미지 1/1
    • Gently lift the protector from the frame.

  13. Canon PowerShot SX600 HS Display Screen Replacement: 13 단계, 이미지 1/1
    • Lift the LCD screen ZIF connector tab and remove the ribbon cable.

    • Detach the no-fuss connector.

    • Lift the screen from its holder.

결론

To reassemble your device, follow these instructions in reverse order.

다른 7명이 해당 안내서를 완성하였습니다.

Jennyfer Munoz

회원 가입일: 02/15/17

411 평판

안내서 3개 작성하였습니다

USF Tampa, Team S6-G4, Lacy Spring 2017 USF Tampa, Team S6-G4, Lacy Spring 2017 회원

USFT-LACY-S17S6G4

3 회원들

안내서 9개 작성하였습니다

댓글 2개

Plz I want othe

Gihan - 답글

I did all this with a new LCD. After reassemble the lens has extended out but camera does not turn on. Should I take it apart again and start from beginning. Is there a connector not in place correctly that will cause this to happen?

Bill Graham - 답글

댓글 쓰기

조회 통계:

24 시간 전: 0

7일 전: 7

30일 전: 19

전체 시간: 4,509