주요 콘텐츠로 건너뛰기

Canon Powershot A70 Front Exterior Panel Replacement

필요한 것

  1. Canon Powershot A70 Front Exterior Panel Replacement, Shutter/Speaker Panel: 1 단계, 이미지 1/1
    • Open the battery compartment and remove the batteries.

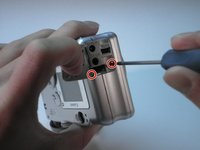
    • Remove the two screws that are deep in the battery compartment with a Phillips #00 screwdriver.

  2. Canon Powershot A70 Front Exterior Panel Replacement: 2 단계, 이미지 1/2 Canon Powershot A70 Front Exterior Panel Replacement: 2 단계, 이미지 2/2
    • Open the CF compartment and remove the top screw with a Phillips #00 screwdriver.

    • The panel that holds the shutter button and zoom will come off.

    • Be careful! There are two small wires connecting the speaker to the body of the camera. These are very delicate so proceed with caution. Do not remove.

  3. Canon Powershot A70 Front Exterior Panel Replacement, Rear Exterior Panel: 3 단계, 이미지 1/1
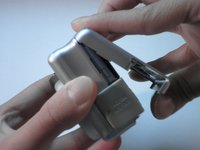
    • Unscrew the three small screws on the bottom of the camera with a Phillips #00 screwdriver.

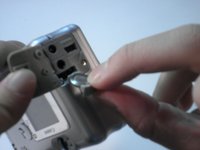
    • Remove the wrist strap.

  4. Canon Powershot A70 Front Exterior Panel Replacement: 4 단계, 이미지 1/1
    • Remove the screw in the CF compartment with a Phillips #00 screwdriver.

  5. Canon Powershot A70 Front Exterior Panel Replacement: 5 단계, 이미지 1/3 Canon Powershot A70 Front Exterior Panel Replacement: 5 단계, 이미지 2/3 Canon Powershot A70 Front Exterior Panel Replacement: 5 단계, 이미지 3/3
    • Open the rubber Digital AV Out compartment flap.

    • Pry the battery with an opening tool.

    • Carefully pull out the battery with two fingers.

    • Remove the two screws that are now visible with a Phillips #00 screwdriver.

  6. Canon Powershot A70 Front Exterior Panel Replacement: 6 단계, 이미지 1/2 Canon Powershot A70 Front Exterior Panel Replacement: 6 단계, 이미지 2/2
    • Starting from the bottom, carefully pull the casing off.

    • The casing will now pivot at the top.

    • There are three catches that hold the back casing to the body.

    • You may have to pull with some force. The rear panel will make a snapping noise when it separates from the body.

  7. Canon Powershot A70 Front Exterior Panel Replacement: 7 단계, 이미지 1/1
    • The interior of the camera should look like this.

  8. Canon Powershot A70 Front Exterior Panel Replacement, Front Exterior Panel: 8 단계, 이미지 1/1
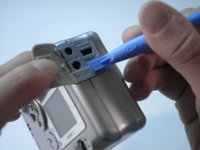
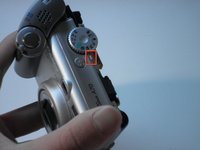
    • Remove the two screws at the top of the battery compartment with a Phillips #00 screwdriver.

  9. Canon Powershot A70 Front Exterior Panel Replacement: 9 단계, 이미지 1/2 Canon Powershot A70 Front Exterior Panel Replacement: 9 단계, 이미지 2/2
    • With your right thumb, pull back on the tab while using your left hand to pull the face of the camera away from the body.

결론

To reassemble your device, follow these instructions in reverse order.

다른 2명이 해당 안내서를 완성하였습니다.

Brian

회원 가입일: 01/26/10

102 평판

안내서 2개 작성하였습니다

Cal Poly, Team 14-40, Regan Winter 2010 Cal Poly, Team 14-40, Regan Winter 2010 회원

CPSU-REGAN-W10S14G40

5 회원들

안내서 15개 작성하였습니다

댓글 0개

댓글 쓰기

조회 통계:

24 시간 전: 0

7일 전: 0

30일 전: 4

전체 시간: 4,392