주요 콘텐츠로 건너뛰기

Canon Vixia HF R500 Zoom Control Replacement

필요한 것

  1. Canon Vixia HF R500 Zoom Control  Replacement, Grip Belt: 1 단계, 이미지 1/3 Canon Vixia HF R500 Zoom Control  Replacement, Grip Belt: 1 단계, 이미지 2/3 Canon Vixia HF R500 Zoom Control  Replacement, Grip Belt: 1 단계, 이미지 3/3
    • On the right side of the camcorder remove the grip belt.

  2. Canon Vixia HF R500 Zoom Control  Replacement, Battery: 2 단계, 이미지 1/1
    • Hold on to the battery.

  3. Canon Vixia HF R500 Zoom Control  Replacement: 3 단계, 이미지 1/1
    • On the bottom of the battery hold the battery release switch.

  4. Canon Vixia HF R500 Zoom Control  Replacement: 4 단계, 이미지 1/1
    • Remove the battery slowly away from the camcorder.

    • Removing the battery quick or in a different angle may cause sparks and damage to device.

  5. Canon Vixia HF R500 Zoom Control  Replacement, Canon Vixia HF R500 Disassembly: 5 단계, 이미지 1/2 Canon Vixia HF R500 Zoom Control  Replacement, Canon Vixia HF R500 Disassembly: 5 단계, 이미지 2/2
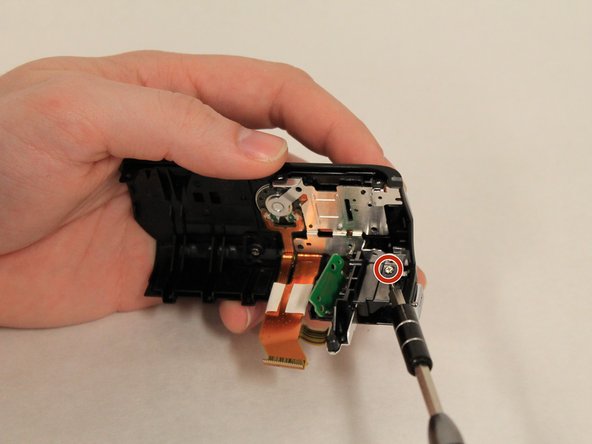
    • Remove the two 8mm Philips #000 screws on the side where the grip belt was located on.

  6. Canon Vixia HF R500 Zoom Control  Replacement: 6 단계, 이미지 1/1
    • Remove the two 4mm Philips #000 head screws from the bottom of the camcorder.

    • A hidden 4mm Philips #000 screw is shown under the black plug shown.

  7. Canon Vixia HF R500 Zoom Control  Replacement: 7 단계, 이미지 1/1
    • Remove the side piece plate.

  8. Canon Vixia HF R500 Zoom Control  Replacement: 8 단계, 이미지 1/1
    • Near the LCD screen, remove the three 7mm Philips #000 screws in the picture shown.

  9. Canon Vixia HF R500 Zoom Control  Replacement: 9 단계, 이미지 1/1
    • Carefully place the camcorder where the inside of the device is facing upwards and remove the 3mm Philips #000 screw shown.

    • Do not use strong magnetic parts on the inside, as they may damage the device.

  10. Canon Vixia HF R500 Zoom Control  Replacement: 10 단계, 이미지 1/1
    • Using the spudger, pull the tab shown to start removing the ribbon cable.

  11. Canon Vixia HF R500 Zoom Control  Replacement: 11 단계, 이미지 1/3 Canon Vixia HF R500 Zoom Control  Replacement: 11 단계, 이미지 2/3 Canon Vixia HF R500 Zoom Control  Replacement: 11 단계, 이미지 3/3
    • Using the Spudger, carefully remove the two ribbon cables that are connected to the top of the device.

  12. Canon Vixia HF R500 Zoom Control  Replacement: 12 단계, 이미지 1/1
    • Remove the top piece.

  13. Canon Vixia HF R500 Zoom Control  Replacement, Speaker: 13 단계, 이미지 1/2 Canon Vixia HF R500 Zoom Control  Replacement, Speaker: 13 단계, 이미지 2/2
    • Remove the three 6mm Philips #000 screws holding the black record piece.

  14. Canon Vixia HF R500 Zoom Control  Replacement: 14 단계, 이미지 1/1
    • Remove the black record piece.

  15. Canon Vixia HF R500 Zoom Control  Replacement: 15 단계, 이미지 1/2 Canon Vixia HF R500 Zoom Control  Replacement: 15 단계, 이미지 2/2
    • Holding the full top piece remove the six 5mm Philips #000 screws holding the metal frame to the top piece.

  16. Canon Vixia HF R500 Zoom Control  Replacement: 16 단계, 이미지 1/1
    • Carefully remove the the whole metal frame out of the device piece.

  17. Canon Vixia HF R500 Zoom Control  Replacement: 17 단계, 이미지 1/1
    • Replace the defective speaker with a functioning one.

  18. Canon Vixia HF R500 Zoom Control  Replacement, Zoom Control: 18 단계, 이미지 1/2 Canon Vixia HF R500 Zoom Control  Replacement, Zoom Control: 18 단계, 이미지 2/2
    • Examine the grey zoom input tab located on copper plate.

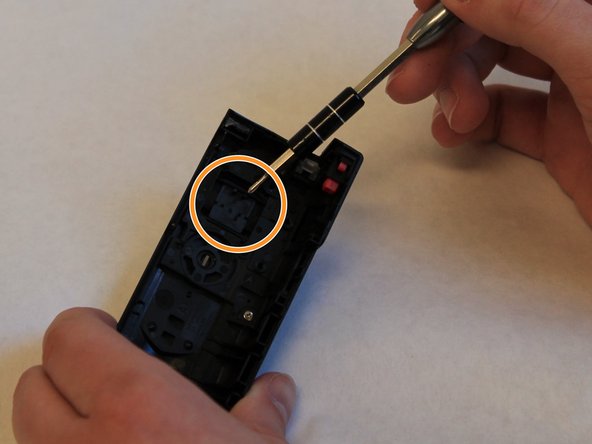
    • Examine the black plastic zoom slider, on the top cover of the camera

    • Repair or replace damaged components and clear all debris from mechanisms.

결론

To reassemble your device, follow these instructions in reverse order.

다른 한 분이 해당 안내서를 완성하였습니다.

James Walker

회원 가입일: 01/29/16

461 평판

안내서 4개 작성하였습니다

댓글 0개

댓글 쓰기

조회 통계:

24 시간 전: 1

7일 전: 1

30일 전: 8

전체 시간: 249