주요 콘텐츠로 건너뛰기

Canon Vixia HF R600 LCD screen Replacement

필요한 것

  1. Canon Vixia HF R600 LCD screen Replacement, Handstrap: 1 단계, 이미지 1/2 Canon Vixia HF R600 LCD screen Replacement, Handstrap: 1 단계, 이미지 2/2
    • Pull up the Velcro strap starting from the front of the camera and working your way towards the back.

    • If you are adjusting the hand-strap, tighten or loosen the Velcro strap accordingly and reattach it.

    • To remove the hand-strap, pull the Velcro strip through the leather pad.

  2. Canon Vixia HF R600 LCD screen Replacement: 2 단계, 이미지 1/2 Canon Vixia HF R600 LCD screen Replacement: 2 단계, 이미지 2/2
    • Remove the strap from the camera body.

  3. Canon Vixia HF R600 LCD screen Replacement, Battery: 3 단계, 이미지 1/2 Canon Vixia HF R600 LCD screen Replacement, Battery: 3 단계, 이미지 2/2
    • Press in the battery release tab located on the bottom of the camera.

    • Slide the battery out from the body.

  4. Canon Vixia HF R600 LCD screen Replacement, Casing: 4 단계, 이미지 1/2 Canon Vixia HF R600 LCD screen Replacement, Casing: 4 단계, 이미지 2/2
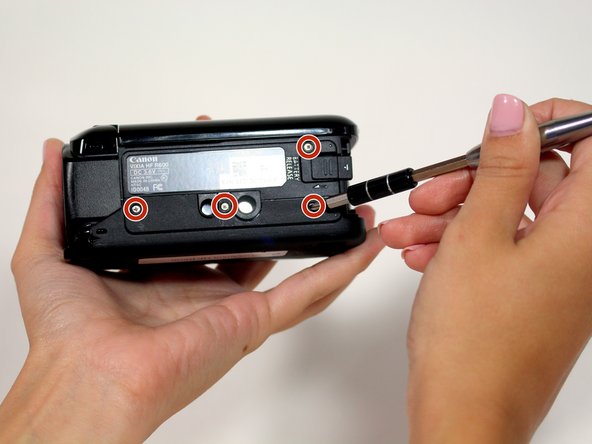
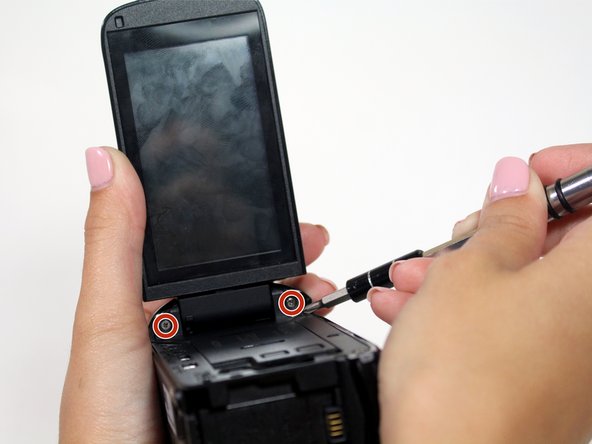
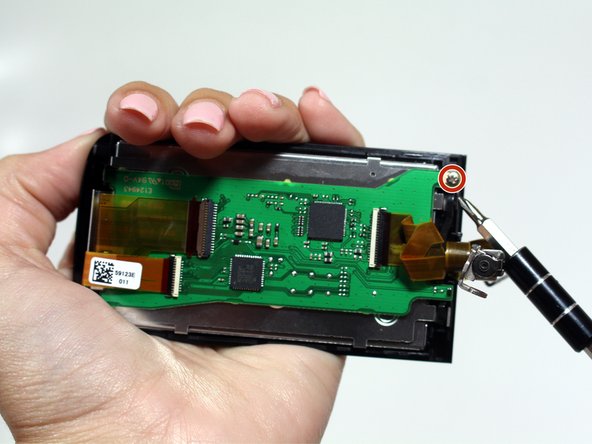
    • Start by removing the two 6mm Phillips #00 screws located on the right side of the camera.

    • Remove four more 6mm Phillips #00 screws found on the bottom of the camera.

  5. Canon Vixia HF R600 LCD screen Replacement: 5 단계, 이미지 1/2 Canon Vixia HF R600 LCD screen Replacement: 5 단계, 이미지 2/2
    • Open the display screen and remove the three 5mm Phillips #00 screws.

    • Look to the swivel point for the screen to find the last two 5mm Phillips #00 screws that must be removed.

  6. Canon Vixia HF R600 LCD screen Replacement: 6 단계, 이미지 1/2 Canon Vixia HF R600 LCD screen Replacement: 6 단계, 이미지 2/2
    • Gently pull the plastic casing away from the camera.

  7. Canon Vixia HF R600 LCD screen Replacement, LCD Screen: 7 단계, 이미지 1/1
    • Remove the LCD display from the camera body.

  8. Canon Vixia HF R600 LCD screen Replacement: 8 단계, 이미지 1/3 Canon Vixia HF R600 LCD screen Replacement: 8 단계, 이미지 2/3 Canon Vixia HF R600 LCD screen Replacement: 8 단계, 이미지 3/3
    • Rotate the display hinge to reveal two 4mm Phillips #00 screws.

    • Before removing, use the plastic opening tool to pry apart the plastic hinge cover.

    • Remove the cover.

  9. Canon Vixia HF R600 LCD screen Replacement: 9 단계, 이미지 1/3 Canon Vixia HF R600 LCD screen Replacement: 9 단계, 이미지 2/3 Canon Vixia HF R600 LCD screen Replacement: 9 단계, 이미지 3/3
    • Remove the two 4mm Phillips #00 screws.

    • Pull the LCD display back cover to reveal the motherboard covering the screen.

    • Remove one more 4mm Phillips #00 screw.

  10. Canon Vixia HF R600 LCD screen Replacement: 10 단계, 이미지 1/3 Canon Vixia HF R600 LCD screen Replacement: 10 단계, 이미지 2/3 Canon Vixia HF R600 LCD screen Replacement: 10 단계, 이미지 3/3
    • Pull the screen protector away from the LCD display.

    • Use a plastic opening tool to lift the ribbon connector tab.

    • The LCD display can now be replaced!

결론

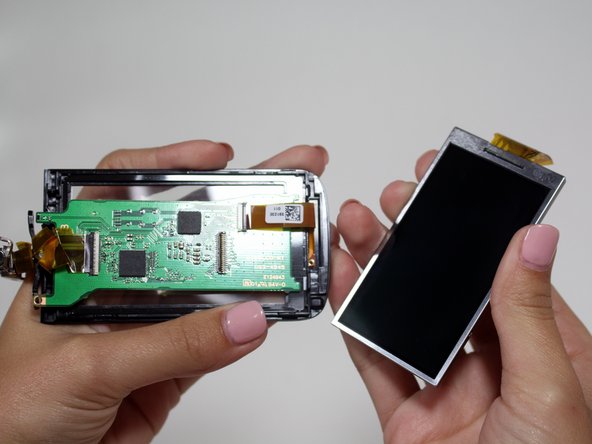
To reassemble your device, follow these instructions in reverse order.

다른 한 분이 해당 안내서를 완성하였습니다.

Brian Luna

회원 가입일: 02/10/16

483 평판

안내서 4개 작성하였습니다

USF Tampa, Team 14-4, Lacy Spring 2016 USF Tampa, Team 14-4, Lacy Spring 2016 회원

USFT-LACY-S16S14G4

3 회원들

안내서 16개 작성하였습니다

댓글 6개

Where did you find the replacement LCD screen at? Specifically I am looking for the Vixia HF M41A version

Jeff Onsrud - 답글

I can’t find the replacement lcd for my model canon vixia hf R600, can you point me in the right direction?

Seth Flake - 답글

Gotta hf r800 and need screen, any ideas where?

Sean - 답글

Very nice step by step guidance. Where can I find the Replacement lcd screen for Canon Vixia HFR 600 camera. Will appreciate that!

Thanks!

shelaindrab - 답글

I have a Canon Vixia HF R52, and with all my research it looks like all of these are the same LCD: HF-R52, HF-R82, HF-R600.....and maybe even the HF-R48, and HF-R406, and HF-R706.

pe.labs - 답글

댓글 쓰기

조회 통계:

24 시간 전: 1

7일 전: 3

30일 전: 21

전체 시간: 2,257