주요 콘텐츠로 건너뛰기

Carburetor Cleaning

필요한 것

  1. Carburetor Cleaning, Air Filter: 1 단계, 이미지 1/3 Carburetor Cleaning, Air Filter: 1 단계, 이미지 2/3 Carburetor Cleaning, Air Filter: 1 단계, 이미지 3/3
    • Before starting, ensure that the engine is not running and is not hot.

    • Pull the tab until the filter cover opens. Remove the filter cover.

    • Note that the bottom of the cover is hinged.

  2. Carburetor Cleaning: 2 단계, 이미지 1/1
    • Remove the air filter.

    • The air filter will be either an oily sponge, or an accordion-folded fabric.

    • Note that the air filter is saturated with oil. Wear gloves and use paper towels to avoid creating a mess.

  3. Carburetor Cleaning, Carburetor Cleaning: 3 단계, 이미지 1/3 Carburetor Cleaning, Carburetor Cleaning: 3 단계, 이미지 2/3 Carburetor Cleaning, Carburetor Cleaning: 3 단계, 이미지 3/3
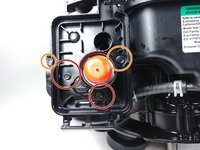
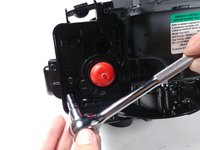
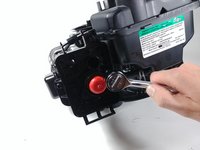
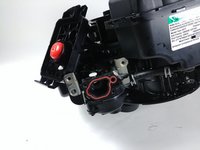
    • Locate the four bolts holding the air filter housing to the engine. Remove these bolts using the ratchet driver and the appropriately sized socket.

    • Remove the 1/4" bolts.

    • Remove the 5/16" bolts.

  4. Carburetor Cleaning: 4 단계, 이미지 1/2 Carburetor Cleaning: 4 단계, 이미지 2/2
    • Lift away the air filter housing.

    • Note that the housing is still attached to the engine via a bendable plastic rod.

  5. Carburetor Cleaning: 5 단계, 이미지 1/1
    • Spray carburetor cleaner into the open carburetor.

    • You may want to wear gloves for this step, as carburetor cleaner is harmful if applied to the skin.

결론

To reassemble your device, follow these instructions in reverse order.

다른 2명이 해당 안내서를 완성하였습니다.

Ethan Narad

회원 가입일: 04/19/18

529 평판

안내서 3개 작성하였습니다

Cal Poly, Team S25-G15, Maness Spring 2018 Cal Poly, Team S25-G15, Maness Spring 2018 회원

CPSU-MANESS-S18S25G15

4 회원들

안내서 7개 작성하였습니다

댓글 0개

댓글 쓰기

조회 통계:

24 시간 전: 0

7일 전: 5

30일 전: 13

전체 시간: 1,559