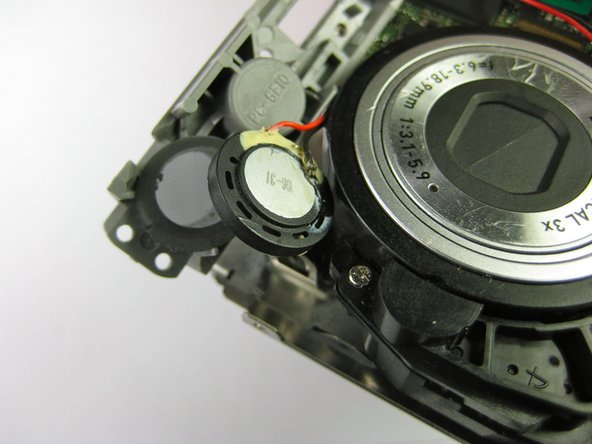
주요 콘텐츠로 건너뛰기

Casio Exilim EX-Z70 Speakers Replacement

필요한 것

  1. Casio Exilim EX-Z70 Speakers Replacement, Camera Casing: 1 단계, 이미지 1/3 Casio Exilim EX-Z70 Speakers Replacement, Camera Casing: 1 단계, 이미지 2/3 Casio Exilim EX-Z70 Speakers Replacement, Camera Casing: 1 단계, 이미지 3/3
    • Remove the strap from the camera by pulling the thin cord out, creating a small loop, then pushing the thicker cord back through this loop.

  2. Casio Exilim EX-Z70 Speakers Replacement: 2 단계, 이미지 1/3 Casio Exilim EX-Z70 Speakers Replacement: 2 단계, 이미지 2/3 Casio Exilim EX-Z70 Speakers Replacement: 2 단계, 이미지 3/3
    • Remove the two Phillips screws (2.83 mm) from the left side panel of the camera casing.

    • The left panel can now be removed. However, one piece of tape attaches it to the camera, so a spudger may be required to ease the panels off.

    • Repeat for the right side panel of the camera.

    • Keep track of which screws go where. There are a couple sets of screws to take out and they are all small and look the same.

  3. Casio Exilim EX-Z70 Speakers Replacement: 3 단계, 이미지 1/3 Casio Exilim EX-Z70 Speakers Replacement: 3 단계, 이미지 2/3 Casio Exilim EX-Z70 Speakers Replacement: 3 단계, 이미지 3/3
    • Remove the six Phillips screws (3.69 mm) from the bottom of the camera casing.

  4. Casio Exilim EX-Z70 Speakers Replacement: 4 단계, 이미지 1/3 Casio Exilim EX-Z70 Speakers Replacement: 4 단계, 이미지 2/3 Casio Exilim EX-Z70 Speakers Replacement: 4 단계, 이미지 3/3
    • Remove the two Phillips screws (2.79 mm) on the left side of the camera where the metal panel used to be.

    • Repeat for the two Phillips screws (2.79 mm) right side of the camera.

  5. Casio Exilim EX-Z70 Speakers Replacement: 5 단계, 이미지 1/2 Casio Exilim EX-Z70 Speakers Replacement: 5 단계, 이미지 2/2
    • With the LCD screen facing up towards you, start at the bottom of the camera and gently pull off the back of the casing.

  6. Casio Exilim EX-Z70 Speakers Replacement: 6 단계, 이미지 1/3 Casio Exilim EX-Z70 Speakers Replacement: 6 단계, 이미지 2/3 Casio Exilim EX-Z70 Speakers Replacement: 6 단계, 이미지 3/3
    • With the front side (with the lens) facing up towards you, start at the bottom of the camera and gently pull off the front of the casing.

    • The nob that previously held the camera strap will no longer be attached to the camera once you remove the camera casing. When putting the camera back together, remember to put the nob back into position before replacing the casing.

  7. Casio Exilim EX-Z70 Speakers Replacement: 7 단계, 이미지 1/2 Casio Exilim EX-Z70 Speakers Replacement: 7 단계, 이미지 2/2
    • Slide the labeled piece toward the LCD screen and release.

    • The tab will spring open.

  8. Casio Exilim EX-Z70 Speakers Replacement: 8 단계, 이미지 1/2 Casio Exilim EX-Z70 Speakers Replacement: 8 단계, 이미지 2/2
    • Look at the bottom of the camera. Take out the Phillips screw (1.77 mm) holding on the bottom plastic piece.

    • The bottom plastic piece is held on to the main frame of the camera only by two thin wires.

  9. Casio Exilim EX-Z70 Speakers Replacement, Speakers: 9 단계, 이미지 1/2 Casio Exilim EX-Z70 Speakers Replacement, Speakers: 9 단계, 이미지 2/2
    • The speaker is attached to the bottom of the camera casing with tape.

    • Use a spudger to gently peel the speaker away from the camera casing.

  10. Casio Exilim EX-Z70 Speakers Replacement: 10 단계, 이미지 1/3 Casio Exilim EX-Z70 Speakers Replacement: 10 단계, 이미지 2/3 Casio Exilim EX-Z70 Speakers Replacement: 10 단계, 이미지 3/3
    • Using a soldering station and a solder wick or other solder removal tool, carefully remove the solder holding the two wires of the speaker to the circuit board.

    • There are two other soldering joints right next to the soldering joints for the speaker. These soldering joints are for the LCD screen only and should not be removed. Remove only the solder holding the speaker to the circuit board.

결론

To reassemble your device, follow these instructions in reverse order.

Paul Fallon

회원 가입일: 04/10/12

141 평판

안내서 6개 작성하였습니다

Cal Poly, Team 17-28, Amido Spring 2012 Cal Poly, Team 17-28, Amido Spring 2012 회원

CPSU-AMIDO-S12S17G28

4 회원들

안내서 14개 작성하였습니다

댓글 0개

댓글 쓰기

조회 통계:

24 시간 전: 0

7일 전: 1

30일 전: 1

전체 시간: 493