주요 콘텐츠로 건너뛰기

Cat5e RJ-45 Keystone Jack Replacement

필요한 것

  1. Cat5e RJ-45 Keystone Jack Replacement, Cat5e RJ-45 Keystone Jack: 1 단계, 이미지 1/3 Cat5e RJ-45 Keystone Jack Replacement, Cat5e RJ-45 Keystone Jack: 1 단계, 이미지 2/3 Cat5e RJ-45 Keystone Jack Replacement, Cat5e RJ-45 Keystone Jack: 1 단계, 이미지 3/3
    • Disconnect the Cat5e ethernet cable from any power source(s) before continuing.

    • Using utility scissors, cut in a circular motion around the jacket of the Cat5e ethernet cable until it is separated from the rest of the cable.

    • Slide the disconnected jacket off of the ethernet cable.

    • Cut around 1-2 inches from the edge of the Cat5e ethernet cable.

  2. Cat5e RJ-45 Keystone Jack Replacement: 2 단계, 이미지 1/3 Cat5e RJ-45 Keystone Jack Replacement: 2 단계, 이미지 2/3 Cat5e RJ-45 Keystone Jack Replacement: 2 단계, 이미지 3/3
    • Using your utility scissors, cut a small inlet into the edge of the remaining ethernet jacket.

    • Avoid damaging internal wires during this process.

    • Using both sides of the cut inlet, peel the jacket around 3-4 inches further into the ethernet cable to expose more wiring.

    • Once the jacket is peeled, cut off the remainder of the peeled jacket with utility scissors.

  3. Cat5e RJ-45 Keystone Jack Replacement: 3 단계, 이미지 1/2 Cat5e RJ-45 Keystone Jack Replacement: 3 단계, 이미지 2/2
    • Turn the RJ-45 Keystone Jack on its side and examine the color coding provided.

    • Align each pair of wires with the designated color coding on the RJ-45 Keystone Jack.

    • There are four pairs of wires twisted together within a Cat5e ethernet cord. Two pairs of wires match the color scheme on one side of the RJ-45 Keystone Jack, and the other two pairs match the color scheme on the opposite side of the jack.

  4. Cat5e RJ-45 Keystone Jack Replacement: 4 단계, 이미지 1/2 Cat5e RJ-45 Keystone Jack Replacement: 4 단계, 이미지 2/2
    • Gently untwist each pair of wires to reveal eight individual wires.

    • Keep the separated wires together according to their colors. For example, keep the solid green wire close to the striped green wire, and so on.

  5. Cat5e RJ-45 Keystone Jack Replacement: 5 단계, 이미지 1/2 Cat5e RJ-45 Keystone Jack Replacement: 5 단계, 이미지 2/2
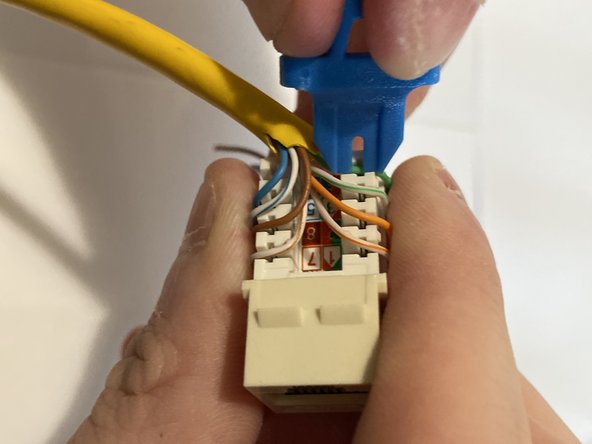
    • Using the appropriate wiring scheme, align each individual wire into the designated slot on the RJ-45 Keystone Jack.

    • There are two different wiring schemes available. These are labeled as scheme A and scheme B on the RJ-45 Keystone Jack. Make sure that the same wiring scheme is used on both ends of the Cat5e ethernet cord. If the other end's scheme is unknown, use wiring scheme B as it is the most common.

    • Striped cords align with the color blocks that have a white line crossing diagonally through the color coding.

  6. Cat5e RJ-45 Keystone Jack Replacement: 6 단계, 이미지 1/2 Cat5e RJ-45 Keystone Jack Replacement: 6 단계, 이미지 2/2
    • Align the other four wires into the designated slots on the other side of the Cat5e RJ-45 Keystone Jack.

    • Make sure that all eight wires are aligned according to the same wiring scheme on both sides of the RJ-45 Keystone Jack.

  7. Cat5e RJ-45 Keystone Jack Replacement: 7 단계, 이미지 1/3 Cat5e RJ-45 Keystone Jack Replacement: 7 단계, 이미지 2/3 Cat5e RJ-45 Keystone Jack Replacement: 7 단계, 이미지 3/3
    • Using a punch down tool, force each individual wire deep into the base of the appropriate slots on the RJ-45 Keystone Jack.

    • When using a metal punch down tool, make sure to have the long edge of the tool on the exterior of the RJ-45 Keystone Jack. This part of metal punch down tools act as a cutting function to automatically remove excess wiring.

  8. Cat5e RJ-45 Keystone Jack Replacement: 8 단계, 이미지 1/2 Cat5e RJ-45 Keystone Jack Replacement: 8 단계, 이미지 2/2
    • Once each wire is placed into the correct slots, use your punch down tool a second time in order to ensure that each wire is connected securely to the RJ-45 Keystone Jack.

  9. Cat5e RJ-45 Keystone Jack Replacement: 9 단계, 이미지 1/3 Cat5e RJ-45 Keystone Jack Replacement: 9 단계, 이미지 2/3 Cat5e RJ-45 Keystone Jack Replacement: 9 단계, 이미지 3/3
    • Using utility scissors, cut off any external wiring on the outside of the RJ-45 Keystone Jack.

    • Cut as close to the RJ-45 Keystone Jack as possible.

  10. Cat5e RJ-45 Keystone Jack Replacement: 10 단계, 이미지 1/3 Cat5e RJ-45 Keystone Jack Replacement: 10 단계, 이미지 2/3 Cat5e RJ-45 Keystone Jack Replacement: 10 단계, 이미지 3/3
    • Align the plastic covering over the exposed wiring within the RJ-45 Keystone Jack.

    • Push the plastic covering against the RJ-45 Keystone Jack until it clicks into place.

결론

Your device is now ready for use.

다른 5명이 해당 안내서를 완성하였습니다.

Austin Olin

회원 가입일: 10/08/20

536 평판

안내서 1개 작성함

댓글 0개

댓글 쓰기

조회 통계:

24 시간 전: 6

7일 전: 45

30일 전: 128

전체 시간: 5,491