주요 콘텐츠로 건너뛰기

Changing motherboard why! N131WU

필요한 것

  1. Changing motherboard why! N131WU, Remove the Screws: 1 단계, 이미지 1/1
    • Remove the case screws (red) and the keyboard screws (green).

    • Be sure not to lose these screws. You will need them to reassemble your laptop.

  2. Changing motherboard why! N131WU, Remove the Keyboard: 2 단계, 이미지 1/3 Changing motherboard why! N131WU, Remove the Keyboard: 2 단계, 이미지 2/3 Changing motherboard why! N131WU, Remove the Keyboard: 2 단계, 이미지 3/3
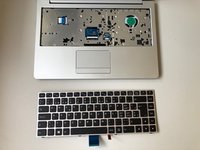
    • Using the hole provided under the case (see picture), push the keyboard out using a thin screwdriver or some other solid object.

    • Hold onto the keyboard as you push the keyboard so as not to damage the two cables still attached.

  3. Changing motherboard why! N131WU, Remove Keyboard Connections: 3 단계, 이미지 1/3 Changing motherboard why! N131WU, Remove Keyboard Connections: 3 단계, 이미지 2/3 Changing motherboard why! N131WU, Remove Keyboard Connections: 3 단계, 이미지 3/3
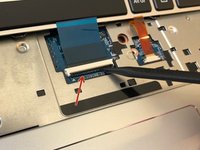
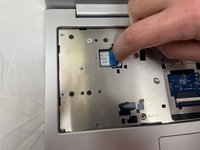
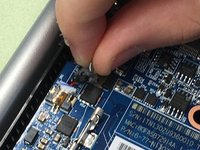
    • (Blue Cable) Push up on the thin black portion on the connector and gently pull out the blue ribbon cable until it comes out.

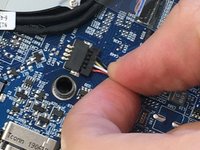
    • (Orange Cable) Remove the orange cable by sliding the gray part of the connector towards the screen, then gently pull on the ribbon cable.

  4. Changing motherboard why! N131WU, Remove the upper screws: 4 단계, 이미지 1/2 Changing motherboard why! N131WU, Remove the upper screws: 4 단계, 이미지 2/2
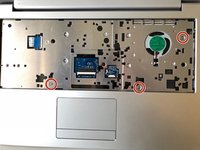
    • Unscrew the three screws that were under the keyboard. Be sure to hold onto these.

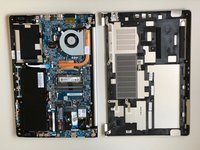
    • After these are removed, you can now remove the lower part of the case from the rest of the computer.

  5. Changing motherboard why! N131WU, Remove the SSD: 5 단계, 이미지 1/3 Changing motherboard why! N131WU, Remove the SSD: 5 단계, 이미지 2/3 Changing motherboard why! N131WU, Remove the SSD: 5 단계, 이미지 3/3
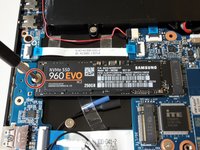
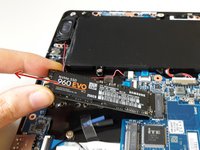
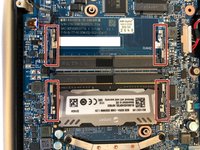
    • Remove the screw holding in the ssd.

    • Carefully remove the SSD from the connector.

  6. Changing motherboard why! N131WU, RAM (Memory): 6 단계, 이미지 1/3 Changing motherboard why! N131WU, RAM (Memory): 6 단계, 이미지 2/3 Changing motherboard why! N131WU, RAM (Memory): 6 단계, 이미지 3/3
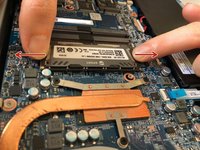
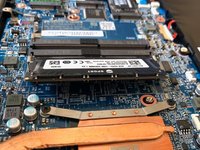
    • Gently pull outwards on the clips to free the RAM stick.

    • Remove the RAM Stick from its slot.

  7. Changing motherboard why! N131WU, Battery: 7 단계, 이미지 1/2 Changing motherboard why! N131WU, Battery: 7 단계, 이미지 2/2
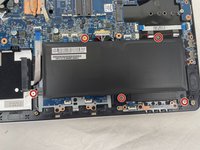
    • Remove the five Phillips screws securing the battery.

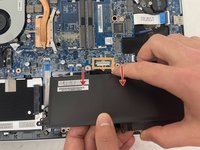
    • Unplug the power connector and lift the battery out in the direction of the arrows to remove it.

  8. Changing motherboard why! N131WU, Motherboard: 8 단계, 이미지 1/3 Changing motherboard why! N131WU, Motherboard: 8 단계, 이미지 2/3 Changing motherboard why! N131WU, Motherboard: 8 단계, 이미지 3/3
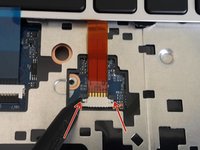
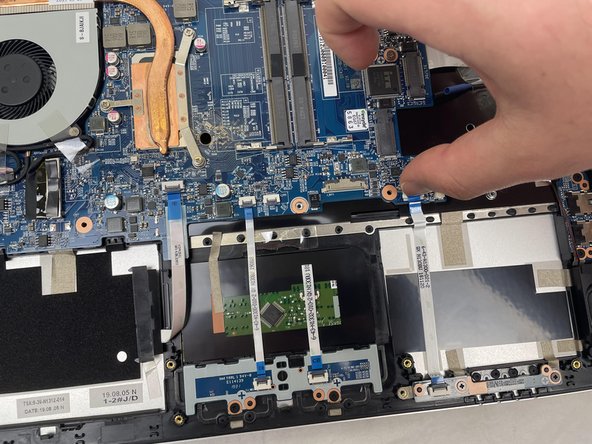
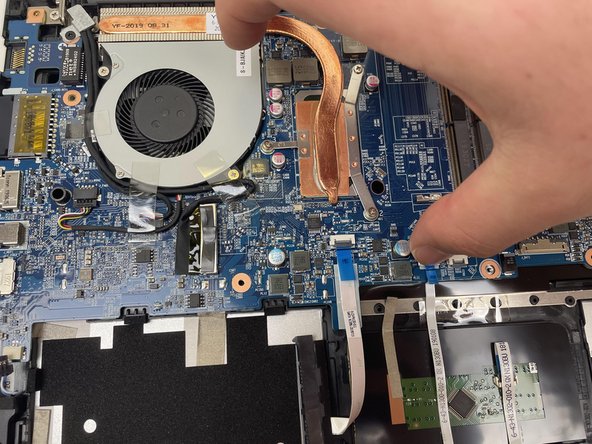
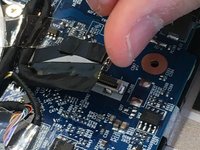
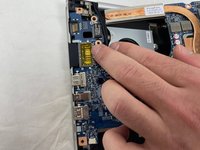
    • Lift the retaining latch and unplug the ZIF cable found under the keyboard.

    • Disconnect the nine marked cables as detailed in the following steps.

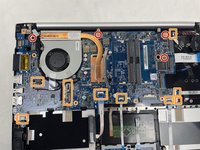
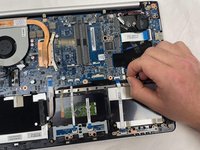
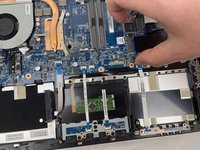
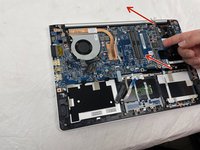
    • Remove the four screws securing the motherboard to the case.

  9. Changing motherboard why! N131WU, ZIF Connectors: 9 단계, 이미지 1/3 Changing motherboard why! N131WU, ZIF Connectors: 9 단계, 이미지 2/3 Changing motherboard why! N131WU, ZIF Connectors: 9 단계, 이미지 3/3
    • The cables with the blue reinforcing tabs are ZIF connectors that require you to lift the retaining lever before removing the cable.

  10. Changing motherboard why! N131WU, SATA Cable: 10 단계, 이미지 1/3 Changing motherboard why! N131WU, SATA Cable: 10 단계, 이미지 2/3 Changing motherboard why! N131WU, SATA Cable: 10 단계, 이미지 3/3
    • Remove the SATA3 cable from the motherboard after disconnecting it.

  11. Changing motherboard why! N131WU, Motherboard (continued): 11 단계, 이미지 1/2 Changing motherboard why! N131WU, Motherboard (continued): 11 단계, 이미지 2/2
    • Don't forget to remove these cables.

  12. Changing motherboard why! N131WU, Display Connector: 12 단계, 이미지 1/2 Changing motherboard why! N131WU, Display Connector: 12 단계, 이미지 2/2
    • Note: The original instructions call for inserting your thumbnail firmly under the base of the display connector

    • However, the proper way to remove the display connector is to grasp the plastic strap on top of the connector and use it to pull the connector straight up.

  13. Changing motherboard why! N131WU, Remove the Motherboard: 13 단계, 이미지 1/3 Changing motherboard why! N131WU, Remove the Motherboard: 13 단계, 이미지 2/3 Changing motherboard why! N131WU, Remove the Motherboard: 13 단계, 이미지 3/3
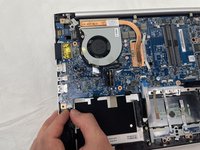
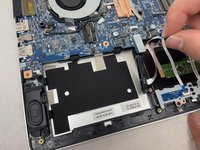
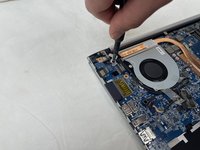
    • Once the screws have been removed, carefully lift the motherboard from the end indicated by the arrows.

    • Remember to disconnect the cables near the fan.

  14. Changing motherboard why! N131WU, Motherboard (continued): 14 단계, 이미지 1/1
    • The motherboard has been successfully removed.

결론

To reassemble your device, follow these instructions in reverse order.

다음 번역가들에게 특별히 감사 드립니다:

fr en

100%

이 번역자 분들은 저희가 세상을 수리하는데 동참해 주시는 분입니다! 기여하시겠습니까?
번역 시작하기 ›

Felice Suglia

회원 가입일: 06/15/13

30,908 평판

안내서 264개 작성하였습니다

댓글 0개

댓글 쓰기

조회 통계:

24 시간 전: 1

7일 전: 5

30일 전: 9

전체 시간: 330