주요 콘텐츠로 건너뛰기

이 안내서에는 최근 변경 사항이 더 있습니다. 최신 비검증 버전으로 전환하십시오.

ChefsChoice M677 Control Switch Replacement

필요한 것

  1. ChefsChoice M677 Control Switch Replacement, Power Supply: 1 단계, 이미지 1/2 ChefsChoice M677 Control Switch Replacement, Power Supply: 1 단계, 이미지 2/2
    • Remove the five 3/8" screws from the base of the kettle using a Phillips #1 screwdriver.

  2. ChefsChoice M677 Control Switch Replacement: 2 단계, 이미지 1/2 ChefsChoice M677 Control Switch Replacement: 2 단계, 이미지 2/2
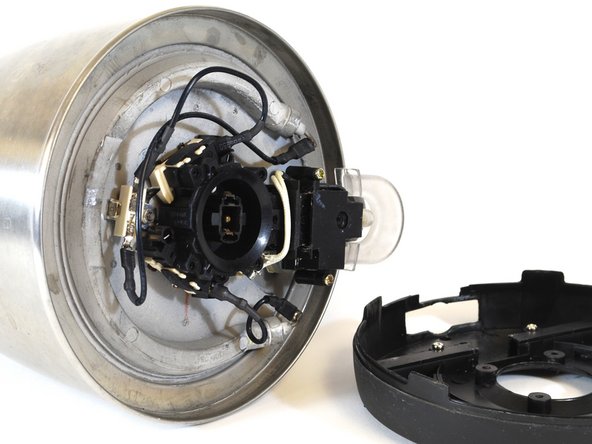
    • Using your hands, pry the base off the kettle.

    • Open the kettle like a clamshell; the ON/OFF switch will be the hinge point.

  3. ChefsChoice M677 Control Switch Replacement: 3 단계, 이미지 1/3 ChefsChoice M677 Control Switch Replacement: 3 단계, 이미지 2/3 ChefsChoice M677 Control Switch Replacement: 3 단계, 이미지 3/3
    • Using your hands, remove the kettle base by sliding it over the switch.

  4. ChefsChoice M677 Control Switch Replacement: 4 단계, 이미지 1/1
    • Now that you have removed the bottom from the kettle, identify all of the parts. The ORANGE arrows point to the posts for mounting the control circuit components. The RED arrows point to the following parts:

    • A: The power supply.

    • B: The two boil-dry protection switches, one on either side of the central black ring.

    • C: The power coupling. This fits into the baseplate when you place the kettle on it.

    • D: The thermostat. This is a little metal ring, half hidden by the switch cover.

    • E: The manual ON/OFF switch.

    • F: The indicator light.

    • G: The steam chamber. This heats the thermostat, which turns off the kettle automatically.

  5. ChefsChoice M677 Control Switch Replacement: 5 단계, 이미지 1/3 ChefsChoice M677 Control Switch Replacement: 5 단계, 이미지 2/3 ChefsChoice M677 Control Switch Replacement: 5 단계, 이미지 3/3
    • Take note of how the wires connect to the components to aid reassembly.

    • Remove the connectors (spaded lugs) from the circuit components as shown in the second image.

    • DO NOT pull on the wires, as you might pull them out of the connectors.

    • You should be able to remove each connector easily by hand. Pinch the lug between your fingers and pull in the direction of the attached wire.

    • If necessary, use needle-nose pliers to grasp the lug shank firmly. Gently pull the lug in the direction of the attached wire.

    • Gently bend the disconnected wires back and out of the work area.

  6. ChefsChoice M677 Control Switch Replacement: 6 단계, 이미지 1/2 ChefsChoice M677 Control Switch Replacement: 6 단계, 이미지 2/2
    • Using a 7/32" nut driver, remove the hex nut that secures the power supply to the base of the kettle.

    • Using a pair of tweezers, remove the split-ring lock washer located under the nut. (It may be hard to see in low light.)

  7. ChefsChoice M677 Control Switch Replacement: 7 단계, 이미지 1/2 ChefsChoice M677 Control Switch Replacement: 7 단계, 이미지 2/2
    • Using your hands, grasp the wire that is still connected to the power supply. Carefully lift the power supply off the threaded stud to which it was coupled.

    • At this point you will have removed the following parts from the kettle:

    • Five (5) screws.

    • The kettle base.

    • One (1) 7/32'' hex nut.

    • One (1) 7/32" split-ring lock washer.

    • One (1) power supply unit.

  8. ChefsChoice M677 Control Switch Replacement, Control Switch: 8 단계, 이미지 1/2 ChefsChoice M677 Control Switch Replacement, Control Switch: 8 단계, 이미지 2/2
    • FIRST IMAGE: Remove the power supply. Align the kettle as shown, with the handle to your right. Use the 7/32" nut driver to remove the 7/32" nut from the stud that is located clockwise from where the power supply was attached.

    • Use tweezers to remove the split-ring lock washer located under the nut.

    • SECOND IMAGE: Roll the kettle over so the handle is now on your left. Use the 7/32" nut driver to remove the 7/32" nut from the final stud, which is now located counter-clockwise from where the power supply was attached.

    • Use tweezers to remove the split-ring lock washer located under the nut.

  9. ChefsChoice M677 Control Switch Replacement: 9 단계, 이미지 1/3 ChefsChoice M677 Control Switch Replacement: 9 단계, 이미지 2/3 ChefsChoice M677 Control Switch Replacement: 9 단계, 이미지 3/3
    • Grasp the control switch with one hand and the kettle with the other.

    • Gently rock the control switch while simultaneously pulling it away from the bottom of the kettle.

    • Pull the switch completely off the kettle.

  10. ChefsChoice M677 Control Switch Replacement: 10 단계, 이미지 1/1
    • This image shows the alignment of various kettle parts.

    • The yellow arrows show how the studs align with the switch brackets.

    • The blue arrow shows how the steam tube aligns with the steam chamber on the switch thermostat.

결론

To reassemble your device, follow these instructions in reverse order.

다른 8명이 해당 안내서를 완성하였습니다.

Randy Fromm

회원 가입일: 01/22/14

565 평판

안내서 3개 작성하였습니다

New Mexico State, Team 1-1, Sheppard Spring 2014 New Mexico State, Team 1-1, Sheppard Spring 2014 회원

NMSU-SHEPPARD-S14S1G1

4 회원들

안내서 3개 작성하였습니다

댓글 한 개

OK, now I can look from the bottom. But why the switch does not keep down when I press it down I can not see or repair.

Robert

Robert Wallnig - 답글

댓글 쓰기

조회 통계:

24 시간 전: 1

7일 전: 15

30일 전: 47

전체 시간: 5,686