이 버전에는 잘못된 편집 사항이 있을 수 있습니다. 최신 확인된 스냅샷으로 전환하십시오.
필요한 것
-
이 단계는 번역되지 않았습니다. 번역을 도와주십시오
-
Remove the five 3/8" screws from the base of the kettle using a Phillips #1 screwdriver.
-
-
이 단계는 번역되지 않았습니다. 번역을 도와주십시오
-
Using your hands, pry the base off the kettle.
-
Open the kettle like a clamshell; the ON/OFF switch will be the hinge point.
-
-
이 단계는 번역되지 않았습니다. 번역을 도와주십시오
-
Using your hands, remove the kettle base by sliding it over the switch.
-
-
-
이 단계는 번역되지 않았습니다. 번역을 도와주십시오
-
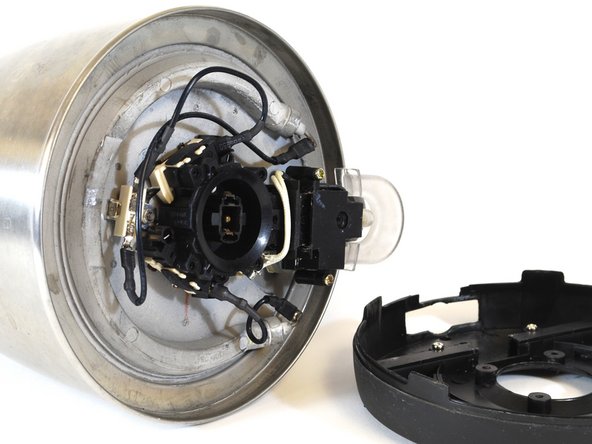
A: The power supply.
-
B: The two boil-dry protection switches, one on either side of the central black ring.
-
C: The power coupling. This fits into the baseplate when you place the kettle on it.
-
D: The thermostat. This is a little metal ring, half hidden by the switch cover.
-
E: The manual ON/OFF switch.
-
F: The indicator light.
-
G: The steam chamber. This heats the thermostat, which turns off the kettle automatically.
-
-
이 단계는 번역되지 않았습니다. 번역을 도와주십시오
-
Remove the connectors (spaded lugs) from the circuit components as shown in the second image.
-
You should be able to remove each connector easily by hand. Pinch the lug between your fingers and pull in the direction of the attached wire.
-
If necessary, use needle-nose pliers to grasp the lug shank firmly. Gently pull the lug in the direction of the attached wire.
-
Gently bend the disconnected wires back and out of the work area.
-
-
이 단계는 번역되지 않았습니다. 번역을 도와주십시오
-
Using a 7/32" nut driver, remove the hex nut that secures the power supply to the base of the kettle.
-
Using a pair of tweezers, remove the split-ring lock washer located under the nut. (It may be hard to see in low light.)
-
-
이 단계는 번역되지 않았습니다. 번역을 도와주십시오
-
Using your hands, grasp the wire that is still connected to the power supply. Carefully lift the power supply off the threaded stud to which it was coupled.
-
Five (5) screws.
-
The kettle base.
-
One (1) 7/32'' hex nut.
-
One (1) 7/32" split-ring lock washer.
-
One (1) power supply unit.
-


다른 4명이 해당 안내서를 완성하였습니다.
첨부 문서
팀

New Mexico State, Team 1-1, Sheppard Spring 2014 New Mexico State, Team 1-1, Sheppard Spring 2014 회원
NMSU-SHEPPARD-S14S1G1
4 회원들
안내서 3개 작성하였습니다
댓글 2개
The photographs and schematic were very helpful, but the problem was not with the Power Supply; the on-off switch lit up. I needed to remove the two other nuts at the yellow arrows and look more closely at the Boil Dry Protection Switches. I removed and replaced the metal plates and noticed that two white plastic pieces swung out into the space around the Power Coupling. Had I reset something? Regardless, after reconnecting wires and reattaching nuts and screws, the pot is back to working order. Thank you so much for posting this Fix It!