주요 콘텐츠로 건너뛰기

Christmas Battery Box USB Port Repair

필요한 것

  1. Christmas Battery Box USB Port Repair, Christmas Battery Box USB Port Repair: 1 단계, 이미지 1/3 Christmas Battery Box USB Port Repair, Christmas Battery Box USB Port Repair: 1 단계, 이미지 2/3 Christmas Battery Box USB Port Repair, Christmas Battery Box USB Port Repair: 1 단계, 이미지 3/3
    • Place both thumbs, one on each side of the front cover of the battery box, and push the plastic cover upwards until it slides off the box.

    • Place the cover to the side.

  2. Christmas Battery Box USB Port Repair: 2 단계, 이미지 1/2 Christmas Battery Box USB Port Repair: 2 단계, 이미지 2/2
    • Pry each battery out with your fingernails, or use any flathead tool like a spudger or flathead screwdriver to remove batteries.

    • Place batteries to the side.

  3. Christmas Battery Box USB Port Repair: 3 단계, 이미지 1/3 Christmas Battery Box USB Port Repair: 3 단계, 이미지 2/3 Christmas Battery Box USB Port Repair: 3 단계, 이미지 3/3
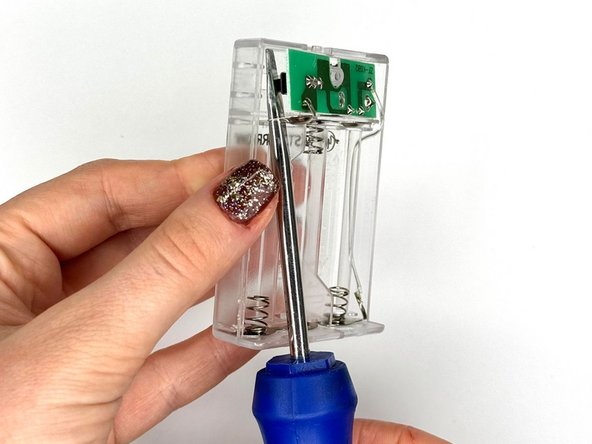
    • There will be a plastic cover over a green circuit board. Use a spudger or appropriate size screwdriver to wedge in between the cover and the board. Lift up the plastic cover with your tool of choice until the cover is pried off gently.

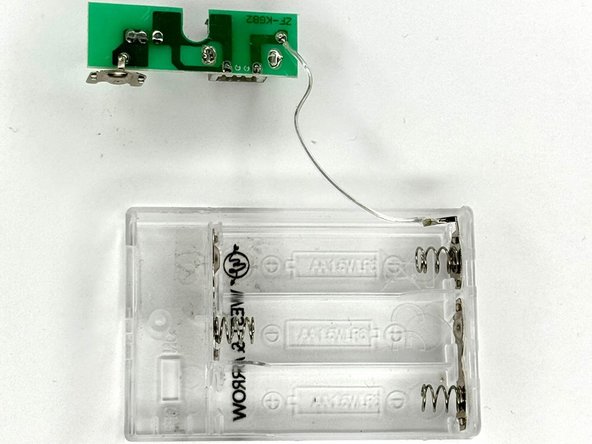
    • There will be a wire connecting the circuit board to the battery port. Use a spudger or screwdriver to pry the circuit board out of the box and place it to the side with the wire still intact.

  4. Christmas Battery Box USB Port Repair: 4 단계, 이미지 1/1
    • Put on safety glasses while soldering. This will protect your eyes from any potential tiny particles of soldered metal that may break off during the soldering process.

    • When handling the soldering kit, be careful not to touch the hot iron with your hands to avoid any burns.

    • Take out the soldering metal kit. Follow closely the instructions of your soldering kit and solder the USB port.

    • Heat the soldering iron and melt some solder onto the tip. Touch the tip to the wire end and the battery terminal at the same time and let the solder flow into the joint. Be careful not to overheat the battery or damage it.

    • Repeat for the other wire and terminal.

  5. Christmas Battery Box USB Port Repair: 5 단계, 이미지 1/2 Christmas Battery Box USB Port Repair: 5 단계, 이미지 2/2
    • Return the circuit board to the battery box.

    • Grab the circuit board. Place it inside the box and press down.

    • Place the plastic cover over the circuit board and snap back into place.

  6. Christmas Battery Box USB Port Repair: 6 단계, 이미지 1/3 Christmas Battery Box USB Port Repair: 6 단계, 이미지 2/3 Christmas Battery Box USB Port Repair: 6 단계, 이미지 3/3
    • Return all 3 batteries back into their correct places.

    • Make sure the positive ends on the batteries are aligned opposite the springs and the negative ends are aligned to the springs for correct electrical connectivity.

    • Place the plastic cover over the box and slide it down until it snaps closed with your thumbs.

    • After this step, the repair is done. Try turning the on switch of your lights, and test out your working lights.

    • If the lights are still lagging or not lighting, double-check if the batteries are placed in their correct placements. Another option is to follow steps 1 through 6 again.

결승점

다른 한 분이 해당 안내서를 완성하였습니다.

Eleonora Polovina

회원 가입일: 02/19/24

149 평판

안내서 1개 작성함

CSU Sacramento, Team 1-11, Laflen Spring 2024 CSU Sacramento, Team 1-11, Laflen Spring 2024 회원

CSUSAC-LAFLEN-S24S1G11

1 회원

안내서 1개 작성하였습니다

댓글 0개

댓글 쓰기

조회 통계:

24 시간 전: 0

7일 전: 1

30일 전: 9

전체 시간: 74