주요 콘텐츠로 건너뛰기

Coby DVD209 Power Port and AVI Port Replacement

필요한 것

  1. Coby DVD209 Power Port and AVI Port Replacement, The bottom portion of the DVD player: 1 단계, 이미지 1/3 Coby DVD209 Power Port and AVI Port Replacement, The bottom portion of the DVD player: 1 단계, 이미지 2/3 Coby DVD209 Power Port and AVI Port Replacement, The bottom portion of the DVD player: 1 단계, 이미지 3/3
    • Press the eject button to view the laser inside.

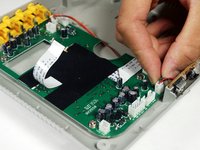
    • Using the blue plastic tool and the tweezers, remove the ribbon cable.

  2. Coby DVD209 Power Port and AVI Port Replacement: 2 단계, 이미지 1/3 Coby DVD209 Power Port and AVI Port Replacement: 2 단계, 이미지 2/3 Coby DVD209 Power Port and AVI Port Replacement: 2 단계, 이미지 3/3
    • Remove the six 1cm screws on the bottom of the device with the Phillips #1 screwdriver.

    • Do not lift the top of the DVD player too quickly because there are wires attached on the inside.

    • Pry the top of the device open from the right side where the buttons are located.

  3. Coby DVD209 Power Port and AVI Port Replacement: 3 단계, 이미지 1/3 Coby DVD209 Power Port and AVI Port Replacement: 3 단계, 이미지 2/3 Coby DVD209 Power Port and AVI Port Replacement: 3 단계, 이미지 3/3
    • When pulling the ribbon cables out, make sure not to pull by the wires, as this can cause damage to them.

    • Pinch the plastic adapter with two fingers to remove the wires circled in red from the circuit board.

  4. Coby DVD209 Power Port and AVI Port Replacement, 4-Pin Ribbon Cable: 4 단계, 이미지 1/3 Coby DVD209 Power Port and AVI Port Replacement, 4-Pin Ribbon Cable: 4 단계, 이미지 2/3 Coby DVD209 Power Port and AVI Port Replacement, 4-Pin Ribbon Cable: 4 단계, 이미지 3/3
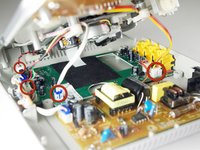
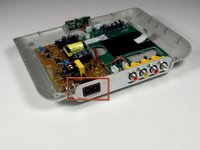
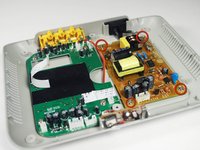
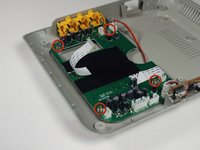
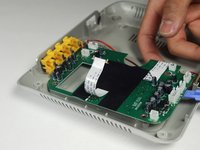
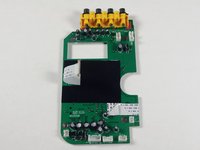
    • Position the DVD player so that the power and AVI ports are facing you.

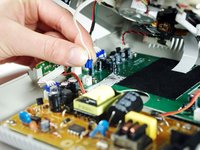
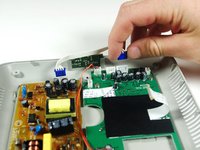
    • Pull the white cable with the blue adapters off of the circuit boards.

  5. Coby DVD209 Power Port and AVI Port Replacement, Circuitboards: 5 단계, 이미지 1/3 Coby DVD209 Power Port and AVI Port Replacement, Circuitboards: 5 단계, 이미지 2/3 Coby DVD209 Power Port and AVI Port Replacement, Circuitboards: 5 단계, 이미지 3/3
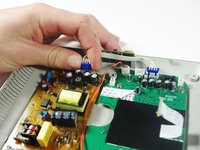
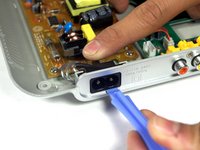
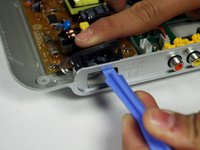
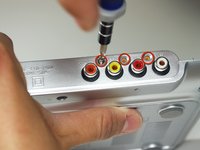
    • Using the plastic opening tool and your finger, push on the black tab on the inner part of the power port and lift the bottom outer portion of the power port with the plastic opening tool simultaneously.

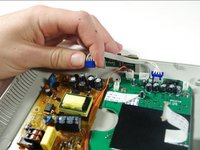
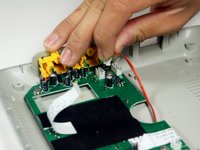
    • Lift the power port out of the its slot.

  6. Coby DVD209 Power Port and AVI Port Replacement: 6 단계, 이미지 1/3 Coby DVD209 Power Port and AVI Port Replacement: 6 단계, 이미지 2/3 Coby DVD209 Power Port and AVI Port Replacement: 6 단계, 이미지 3/3
    • Remove the four 5mm screws circled in red.

    • Place the blue plastic tool opener underneath the circuitboard and lift up gently.

  7. Coby DVD209 Power Port and AVI Port Replacement: 7 단계, 이미지 1/3 Coby DVD209 Power Port and AVI Port Replacement: 7 단계, 이미지 2/3 Coby DVD209 Power Port and AVI Port Replacement: 7 단계, 이미지 3/3
    • Unplug the two, 3-pin ribbon cables, which are attached to the circuitboard.

    • For the other circuit board (the one connected to the AVI ports) there are three 6.35mm screws to remove on the outside of the device.

  8. Coby DVD209 Power Port and AVI Port Replacement: 8 단계, 이미지 1/3 Coby DVD209 Power Port and AVI Port Replacement: 8 단계, 이미지 2/3 Coby DVD209 Power Port and AVI Port Replacement: 8 단계, 이미지 3/3
    • Remove the four 5mm screws circled in red.

    • Place the plastic opening tool underneath the circuit board, and lift up genttly. As you lift up, slide the circuitboard in a direction away from the AVI ports.

  9. Coby DVD209 Power Port and AVI Port Replacement, Power Port and AVI Port: 9 단계, 이미지 1/2 Coby DVD209 Power Port and AVI Port Replacement, Power Port and AVI Port: 9 단계, 이미지 2/2
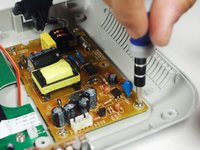
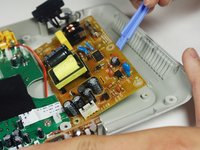
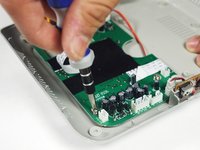
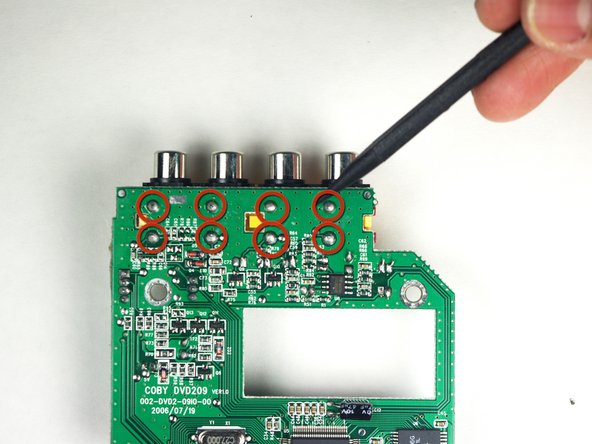
    • On the circuit board with the Power Port, de-solder the circled areas on the back to remove the Power port.

  10. Coby DVD209 Power Port and AVI Port Replacement: 10 단계, 이미지 1/2 Coby DVD209 Power Port and AVI Port Replacement: 10 단계, 이미지 2/2
    • On the circuit board with the AVI Port, de-solder the circled areas on the back to remove the AVI Port.

결론

To reassemble your device, follow these instructions in reverse order.

다른 한 분이 해당 안내서를 완성하였습니다.

Yufay Chow

회원 가입일: 01/23/12

92 평판

안내서 4개 작성하였습니다

Cal Poly, Team 10-36, Amido Winter 2012 Cal Poly, Team 10-36, Amido Winter 2012 회원

CPSU-AMIDO-W12S10G36

4 회원들

안내서 7개 작성하였습니다

댓글 0개

댓글 쓰기

조회 통계:

24 시간 전: 0

7일 전: 0

30일 전: 0

전체 시간: 475