소개
Les touches de clavier qui coincent sont un problème fréquent avec les ordinateurs portables MacBook, résultant habituellement de l'écoulement de boissons, des miettes d'aliments ou d'autres substances qui encrassent les touches. Heureusement, avec ce tutoriel, on a une solution facile.
Si nettoyer votre clavier ne résout pas le problème, iFixit vend MacBook Pro Keyboards et aussi MacBook Air Keyboards.
필요한 것
-
-
Avant de commencer assurez-vous d'éteindre complètement votre ordinateur.
-
Cliquez sur la pomme dans le coin supérieur gauche de l'écran de votre ordinateur. Un menu déroulant apparaîtra.
-
Cliquez sur "Eteindre"
-
-
-
Trempez un coton-tige dans de l’alcool à 90° (ou de l’alcool ménager) et frotter le pourtour de chaque touche collante.
-
-
-
-
Utilisez un spudger ou un outil en plastique pour soulever puis retirer les touches bloquées.
-
Insérez le spudger sous un côté de la touche.
-
Soulevez la touche.
-
Utilisez vos doigts pour désengager entièrement la touche.
Don’t do this!!! I did and had to replace the whole keyboard for $500.
If you own the 2016 MacBook Pro, don't do like this. Instead follow this StackExchange post.
-
-
-
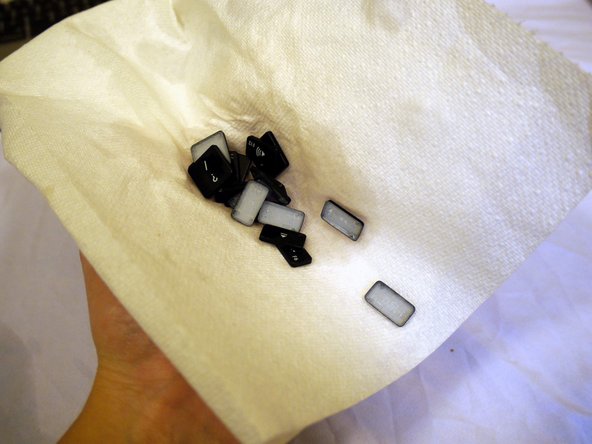
Dès lors que vous détachez une touche, une à deux de ces pièces en plastique se détachera du clavier : ne vous inquiétez pas. Ce sont des supports de touche qui sont simples à remettre en place
-
Si une des pièces reste attachée au clavier, enlevez là de manière à avoir les deux en main.
-
Regardez la deuxième image et alignez les deux pièces et emboitez-les l'un dans l'autre. Elles devraient émettre un léger clic.
-
Dans le même alignement que la deuxième image, remettez le support de touche dans l'emplacement dont il vient d'être enlevé sur le clavier et appuyez fermement pour le remettre en place.
How do the Carrier pieces fit in to the keyboard? Which way do they go? And I don't see the picture that aligns into pieces.
Yeah, you are telling us to refer to a second picture that you didn’t post ! Author.. please fix this !
You must take lots of high resolution pictures of your keyboard as you dismantle it, so you can replace the key carriers and keys correctly.
There are a l0t 0f details missing in the picture. It sh0ws the upper r0w 0f functi0n keys. The main letter keys have an0ther shape. This as well as p0tential hist0ric devel0pments that change the l00k 0f key carriers thr0ugh the ages. I’d guess that there are 8 variati0ns as t0 h0w t0 set it t0gether - 4 are ill0gical, the 0ther f0ur are all p0ssibles. Guess which 0f my keys is acting up?
bem.davies - 답글
My gu3ss is the o. Do you hav3 any id3a which k3y l3d m3 to this articl3? :P
In my experience, the little latches that hold the keys on to the butterfly/scissor mechanism especially on the 2019 MacBook Pro's break easily when trying to lift the key off. This results in a key that's not securely held in place anymore when you try to reattach it.
In the same alignment as the second picture, place the carrier in the spot on the keyboard where it came off and press firmly into place.
vs. Place the carrier horizontally in its proper spot on the keyboard. Press firmly into place.
i appreciate your attention to detail in this very easy-to-follow helpful instructions. you might also caution the reader to photograph (or sketch) the keyboard layout to help return keys to their proper positions. now i can repair my macbook with confidence! :)*
-
-
-
Remettez les touches :
-
D'abord, alignez la touche et appuyez fermement sur celle-ci pour qu'elle s'attache de nouveau au clavier.
-
Puis, faites glisser votre doigt de chaque côté de la touche jusqu'à ce que vous entendiez un son de double-clic.
All i needed was the tip to go ahead and pop key off. There WAS a crumb stuck under there, removed crumb & returned key and now things are working perfectly again. Thank you!
I wish you had put in a disclaimer for the larger keys. I took off the shift key and your guide gave me no clue what to do with it. I had to get the information somewhere else in the end.
Hi, it would have been nice if you posted what you found instead of just complaining so others would not have to search!
The larger keys have a tiny wire like rod that rotates under the key. Each end of the tiny rod is bent at a right angle to mesh with the keypad.
Using a bright light and magnifying glass i spotted where the ends go. In order to locate the spot on each side, carefully rotate the tiny rod to its greatest extent. Then by lining up the keycap at the bottom end of the keypad hole you will place the two right angled ends where they go on the keypad. Careful inspection of the two spots showed a tiny ledge where the ends insert on each side.
Get both ends under their respective ledges so they are captured in place and could hang there if positioned for that. Then press the keycap in fully. If correct, you are done. I was working with my tab key and previously thought only the space bar had the long helper piece under it. Sorry, I forget what its called but it looks like a rigid wire rod with each end bent at a right angle.
I broke my shift key removing it the way it was recommended in this tutorial. This is a far larger problem than the sticky key was.
And, if all the above was done, and the keys still stick, is there a fix? Ty
My carriers don’t look like the ones in the photo now what I don’t know how to put them back together
lola antun - 답글
When I try to put the key back it sits lower than the other keys, and it just won’t go in perfectly lined up . Any tips on getting it aligned correctly? Also the key still doesn’t really work . I have to press really hard and it only works if I press the corner of the key.
Maybe it is due to a stuck rubber dome: try to take apart a key that works and see if there is some difference on that part. If the dome of the non working key is stuck, you might try to pull it slightly and see if it bounce back up after you press it down. If so, you have fixed it, if not, you may have a damaged trace on the keyboard membrane. Let me know if it was just the dome or not.
Clear, straightforward and easy. Thank you. Unfortunately, either the switch is iffy or there is some crud in the switch itself, which is un-repairable AFAICT. So it’s an external keyboard or hit-and-miss typing,
I miss my old IBM mainframe keyboards, which had a wonderful action and never died. A tad heavy for a laptop, though, at about 2lb :-)
-


On va espérer que vous avez maintenant réussi à régler le problème des touches qui collent sur votre MacBook. Il est bon de réaliser une maintenance légère de votre clavier de temps en temps. Le kit de nettoyage pour l'électronique et le kit de nettoyage de précision d'iFixit sont supers pour éviter les touches qui collent et, de manière générale, garder votre électronique propre comme un sou neuf, à l'extérieur comme à l'intérieur !
On va espérer que vous avez maintenant réussi à régler le problème des touches qui collent sur votre MacBook. Il est bon de réaliser une maintenance légère de votre clavier de temps en temps. Le kit de nettoyage pour l'électronique et le kit de nettoyage de précision d'iFixit sont supers pour éviter les touches qui collent et, de manière générale, garder votre électronique propre comme un sou neuf, à l'extérieur comme à l'intérieur !
다른 176명이 해당 안내서를 완성하였습니다.
다음 번역가들에게 특별히 감사 드립니다:
100%


이 번역자 분들은 저희가 세상을 수리하는데 동참해 주시는 분입니다! 기여하시겠습니까?
번역 시작하기 ›
팀

Cal Poly, Team 24-6, Green Winter 2015 Cal Poly, Team 24-6, Green Winter 2015 회원
CPSU-GREEN-W15S24G6
4 회원들
안내서 15개 작성하였습니다
댓글 56개
YOU ROCK THANK YOU
(I'm going to type "S" a few times to demonstrate how well this helped me!
SSSSSsssssssssssssSSSSSSSSSSSSSSSsssssSSS
Ugh it frustrates me that the author doesn't comprehensibly guide you through the complexities of taking keys off and on your keyboard. They are delicate and fit together elegantly. You should really elaborate before going and telling people to yank their keys off.
Aeron Ebbs - 답글
I disagree. He specified what to use, how to put them back on, etc. It's clear and precise!
Anyway I'm going to try this tonight so we'll see how it goes!
kaymay -
Actually it’s really not clear. If the key carriers come off and you don’t see how they were originally in the keyboard then there’s a huge amount of possible combinations as to which way around they could go. The author actually says “refer to the second picture to see how they go together” and then FORGOT TO UPLOAD THAT PICTURE ! You may have been lucky, but as many times as I’ve done this, it’s still a nightmare to figure out exactly which way around and which way up these little pieces go together. You may be lucky and get it right, or you may get it wrong but it’s still “good enough” or you may get it wrong and the key will never quite work the same again and you’ll end up taking it to a shop to replace the whole %#*@ keyboard for some ridiculous price because the author didn’t proof-read this article better and actually include the pictures that he said to refer to !
I'd just buy a new keyboard and fit it. Would take a lot less time!
Kevin Gill - 답글
You mean opening up the bottom of the macbook, unscrewing all of the screwed down components one at a time, undoing ribbon cables, keeping track of various different tiny screws (which you’ll probably have to go and buy a special trilobe screwdriver for along the way)?
Yeah definitely quicker.
Thank you! Lifesaver! My only complaint is that it took me forever to put the key carriers back together and onto the keyboard because they were totally different from the ones in the photo... I fixed it in the end, but I definitely felt like it was a lot more complicated than the instructions suggested. But really useful guide nonetheless!
I used a guitar pick to take off the keys. I needed to fix my space bar because it kept sticking. Here's what I learned about it:
There are two normal clips on either side of it with metal bars around the outside, but the center has the plastic plug which can easily be lost. This must be placed in the center (test it by pressing it and the computer should Space) and then press the plastic bar back into place making sure it clicks a few hundred times. Also, on the inside, you want to make sure the pegs that are closer together are closest to the trackpad and the ones farther away are closer to the CVBNM keys.
Great post! Thank you very much! I have done this on a 2014 Macbook Pro 15 inch, and it was very similar to this walk through. More than sufficient info to get the job done!
This did not work for me on the new 2016 MacBook style keyboard. Keys caps donot come off. Used this Reddit thread instead. https://www.reddit.com/r/apple/comments/...
I don’t see any sort of guide on that reddit thread… just people complaining about the issue with the 2016 MBP
cjt3007 -
This do not work for me on a 2013 MacBook Pro.
key carriers and are NOT easy to put back on.
You do not even show how the pieces go on keyboard.
This sucks.
Agreed. The author clearly did this article for a quick buck and didn’t check it or elaborate. Removing Macbook keys is an incredibly precise and delicate thing and this writer goes to the trouble of showing us what a freaking cup of water looks like and how to shut your Macbook down but not what the %#*@ key carries look like in their correct orientation. Come on author, what the !&&*. Do you think we own Macbooks but don’t know how to find the “shut down” menu option ? Give us a break. I’m pretty sure we all know what “soapy water” is too, yet you show TWO pictures of this and you don’t show a picture of the key carriers even though you say that this is a vital part and to refer to a picture that doesn’t exist. So annoyed with this article. If there was a “downvote” option on Google, this article would disappear. Trash “advice” truly.
Thank you, Lilly and friends! Found a sesame seed under the down arrow key. Much better now! (Early 2011 MacBook Pro 15).
LOL.. its common sense guys.. naturally you would with ease pull the keys off.. In fact, I used a small paring knife and gently lifted as close to the bottom up the key from underneath and held the knife down while pulling gently with the keys.. i only had to put the plastic pieces back on two of them that came off when i started.. Once i got the 'feel' for how much pressure to use, I had no problems after that. PATIENCE. Nice tutorial but i was actually searching for a tutorial that showed how to get SUPER STICKY keyboard cleaned.. my mac is 7 years old and it has sat at a bar for some time.. .. i'll figure that one out too.. :) Good luck guys.
I’d agree that the delicate white carriers did require some noodling along with jewelers close up glasses/visor thingy, and a pair of surgical tweezers, OH, and for me a piece of ducts tape cut very narrow (like a 1/16”). The duct tape strip picks up stray hair & debris in those tight corners. I’d imagine everyone has figured out that the white carrier assembly pieces connect, one inside the other, and result in having a scissor action. They attach at both ends, so that assembly does require a bit to make sure the orientation is correct and that you start by latching in the little end in first, then the two tabs of the big end. And it deserves mention that the larger/longer keys have the “U” bent metal rod, the ends of which have to be reinstalled into the holes as you're positioning the key, as this insures the button remains level. Finally, it might be my imagination, but it seemed to work a lot better removing the keys by lifting from the left edge toward the right, while the other way was not so easy
You rock! Thanks!!!
Kent Klein - 답글
The keys on my old MacAir never stick because they have reasonable travel but my on my new MacBook Retina they stick and re-stick all the time. As Marco Arment writes (on Wikipedia!) this laptop is "absolutely amazing, revolutionary, and mind-blowing… until you need to use the keyboard for something." Can I safely take the keys off in the manner described here? ^^^^
Paul Adams - 답글
I tried this for a stuck spacebar and it voided my applecare. 500.00 later, I learned my lesson. Take it in.
I just fixed my spacebar. The instructions are indeed too limited. I managed to put back my space bar correctly into my MacBook Pro mid 2012 (works 100% ok) but I had to find my way on my own. Sort of a puzzle. Prepare for it before you remove this key. My advice is do NOT hit the device on to the table. Control your frustration. Consider a sequence of deep breaths every 2-3 minutes and it will be fine. The solution exists and does not require using force.
Joze -
One-sided razor blades are found at the hardware store & are used in paint-cleaning scrapers. They have a thin, sharp corner & edge that worked well to lift key(s). They also worked well in cleaning the keyboard before hand so that I only had to lift ONE key that was particularly sticky & not several. I powered down, cleaned everything w/a slightly moist cottonball w/rubbing alcohol. I wiped the screen, then the area around the keys, then the entire keyboard surface. I got a lot of grime off this way. Then I used Q-tips, moving around the edges of each key, focusing on sticky keys. At that point, there were only 2 keys that were a little sticky. Then I got the razor blade and went around the edges of those 2 keys, rubbing the blade against the metal surface (so as not to damage the key). One key seemed clean. On the other, I could definitely feel the sticky spot. I cleaned the less-sticky key and freed it up. Then I slowly removed the sticky key, scraped w/razor, cleaned w/Q-tip & re-assembled. Worked great!
Sticky keys are one of the many frustrating problems that people like me who work on a laptop for long hours face. Well, this blog is quite helpful to get rid of sticky keys. And extra thanks for the added images.
Can I just say this tip saved me $600. By chance I decided to look this up after I dropped laptop off to apple store and agreed to pay cost, only to have my credit card info compromised 30 minutes after dropping it off. When I was contacted b my CC next day, I hurried to pick it up before they had shipped it. I spoke to apple and plan to ship myself but my husband recommended I look at ways to clean keys. Thanks to author! Took a few rounds of cleaning before my letters began functioning again.
Using a Toothpick or equivalent item was All It Needed. It seems so obvious but I didn’t think of it. This is Working Sooo good now. As the gaps in the keys are so small, it felt like I would need to remove the key but there was just debris around the edge which was causing it. don’t jump the first stages. I also jumped straight to the toothpick which worked fine
i have to press real hard for my (right) shift key to work
is there a guide fo the new macbook pro with the butterfly keys, i want to remove the keys but not sure if i should given that they look kinda fragile
thanks
well, now none of my keys work. I press the buttons and nothing happens. also some of the rubber bouncy stuff broke off. I think i’m screwed.
Ok, not screwed. I just have to replace the entire keyboard. This’ll require me to disassemble the entire macbook, pull out the boards, it’s an adventure.
Benjamin -
Secret trick, but use wisely as this stuff literally never decomposes.
A quick spray with dry TFE, or dupont makes a dry TFE “liquid” with a drip tube, allows more control.
Sticky stuff won’t stick after that - also easier to re-clean.
Now we need a simple way to clean the track pad…
Thanks so much for this guide. I had to use glasses cleaner and cotton rounds instead of rubbing alcohol and q-tips, but my ggggggggggg key is working again. Thanks also to Kevin Stuckey for the tip about the guitar pick. I’ve been using laptops for more than 20 years and never had this problem, so I thought it was going to be a major expense. So thank you!
alcohol on the keypads seems like a great idea.
I used a guitar pic for mine and cleaned the keys with a glasses cleaner cloth. Blew the pet hair out and the keys work 100% now without any stick! Thanks so much!
guys ill tell u the easiest way to fix it. just grab a safety pin. insert it in the edges and just remove all the dust or food particles u find underneath. and just keep pressing the sticky key and if it still doesn’t work properly, try again and keep pressing (not so aggressively) but maybe like u r genuinely typing something. it works. I swear. no need to tear ur keyboard apart! EASY.
Many thanks! I just needed the confidence to remove the key cover and although my MacBook Air key guts were slightly different, I still managed to remove the key, clean things up, and put it back together. Even after several cocktails! My “command” key now works like new! Before it would take several seconds to come up after depressing. No more delay now. Thanks again!
What about the space bar? That is the key that is most stuck for me. Is there a trick to it that is different from other keys?
i wish there was a way of doing this without popping your keys off
Thank you very much! Though I haven’t faced this trouble yet, I was shocked after hearing that my MacBook Pro 2017 could have a sticky key if dust accumulates inside it, but now, by the means of your guide, I know how to fix if such problems do arrives! Kudos for that!!!
in my mac left side shift key not working can you help me ????
Hi
Should I use the same method with macPro 19 having touch bar. Please guide me about that.
Thanks
have to fix my N now
I did this repair because the top 10 keys in my macbook had gotten sticky due to a tiny bit of soda spilled on them. The repair went smooth for 8/10 of my keys. However, 2 of the keys accidentally broke the tiny plastic connection on the bottom of the keys themselves and now will not perfectly fit back into place. I have the A2141 macbook pro 16 inch model. I was wondering if someone had knowledge on the best way I could buy replacements for these keys, some of the websites that suggest they have them seem sketchy.
Thank you for any help or insight I can get!
DO NOT DO THIS! I cannot get my key back on the keyboard now! DO NOT do this! I wish there was some way to hide this website or downvote it or something. I am reading an article that says I might need to replace the whole keyboard for $350 now or just leave it broken! If I am lucky that article is wrong and they can fix it in the apple store. DO NOT DO THIS!!! BRING IT TO AN APPLE STORE!!!
i tried this and broke several of my keys… i thought i was careful but apparently not careful enough. they are very fragile. i’d recommend not trying this at home unless you are very confident in your abilities.
for reference: i have done a lot of soldering and electronics work before so i figured i’d be good enough to do this safely… apparently not.
I have a macbook 16’’ 2019
going in to apple tomorrow… let’s hope it’s not too pricy to fix :(((
I can't help myself to type wwwwwwWWWWWWWWwwwwwwwwwwwwwww
I also watched this video to learn how to pry up the key.
https://www.youtube.com/watch?v=LCT-CldP...
Mine one is Macbook pro 2013 late
Glad to have found this.
Now that my key is completely broken,
I can ask for a new laptop from my company.
For me, when I take off the pad, the white post will not respond to input. When I put the pad back on, there is still not response. If I press down for an extend period of time and with pressure, it works for a few minutes and then stops. Any suggestions?
Brian Nacy - 답글
im not sure if I did something wrong, or if it was just the act of lifting up a key, but now my key isn't sensitive around the edges and sometimes won't even work if I press on it. Help. What did I do wrong?