주요 콘텐츠로 건너뛰기

Conair Cord-Keeper 169XR Cool Down Button Replacement

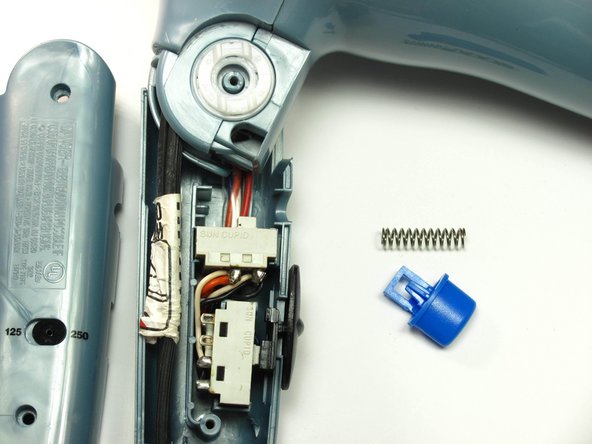
필요한 것

  1. Conair Cord-Keeper 169XR Cool Down Button Replacement, Handle Cover: 1 단계, 이미지 1/2 Conair Cord-Keeper 169XR Cool Down Button Replacement, Handle Cover: 1 단계, 이미지 2/2
    • Unscrew the two 18 mm long Phillips #2 screws on the side of the hair dryer.

  2. Conair Cord-Keeper 169XR Cool Down Button Replacement: 2 단계, 이미지 1/1
    • Be cautious of pieces that can possibly fall out when removing the face of the handle.

    • Once you have taken the screws out, take the top half of the handle off by lifting it off of the dryer.

  3. Conair Cord-Keeper 169XR Cool Down Button Replacement, Cool Down Button: 3 단계, 이미지 1/2 Conair Cord-Keeper 169XR Cool Down Button Replacement, Cool Down Button: 3 단계, 이미지 2/2
    • Take out the cool down button and the spring behind it by gently lifting the button up toward you and pushing it to the right out of its groove.

    • You may need to replace the button and spring depending on which one is broken.

결론

To reassemble your device, follow these instructions in reverse order.

다른 한 분이 해당 안내서를 완성하였습니다.

Candace

회원 가입일: 01/23/14

992 평판

안내서 7개 작성하였습니다

Cal Poly, Team 10-33, Maness Winter 2014 Cal Poly, Team 10-33, Maness Winter 2014 회원

CPSU-MANESS-W14S10G33

3 회원들

안내서 7개 작성하였습니다

댓글 0개

댓글 쓰기

조회 통계:

24 시간 전: 0

7일 전: 0

30일 전: 3

전체 시간: 1,246