소개
In this guide I will show you how to replace a faulty left-click switch in your Corsair Dark Core RGB mouse. In my particular mouse, holding left-click would randomly release, known as “bouncing”. Usually the switch is to blame, requiring replacement. Before attempting this guide you should have some experience with soldering small electrical parts.
필요한 것
-
-
Using a heat gun on low, apply heat evenly to the bottom slider pad, then gently slide an opening pick under the pad
-
Remove the two T5 Torx screws that were under the slider pad
-
-
-
Using a plastic spudger, carefully pry underneath the top shell where indicated
-
Once the right side is unlatched, slide an opening pick under the left side of the top shell to release the remaining two latches, then remove the top shell
-
-
-
Underneath the left and right click buttons are two screws. To access these we need to remove the buttons, starting with the left
-
Gently pull up on the front of the the left-click button with your fingertips. It will hinge upwards. Remove the left-click button.
-
-
-
To remove the right-click button, squeeze the hinge point together with tweezers and pull it up and out
-
Make sure that the tweezers have a good grip when squeezing the hinge together
-
With the hinge out, push the right-click button forward slightly and remove it
-
-
-
-
Slide an opening pick under the back of the bottom shell, releasing the plastic latches holding it on
-
To remove, pull the top shell back slightly in order to slide it out from the clips at the front
-
-
-
Remove the round head Phillips screw, then remove the rear DPI button
-
Once the rear DPI button is removed we can remove the revealed second round head Phillips screw and then remove the front DPI button
-
-
-
Remove the two pan head Phillips screws holding the profile switch button in
-
Unclip the palm RGB zone board; these clips are rather flexible so it should come out easily
-
Unplug the profile switch button and rear RGB zone board from the plug near the scroll wheel
-
-
-
Remove the pan head Phillips screw securing the scroll wheel RGB zone board
-
Slide the scroll wheel RGB zone board out of its slot. The LED and other components may catch on the top of the slot; take your time and work the board out carefully
-
Unplug the scroll wheel RGB zone board at the indicated plug
-
-
-
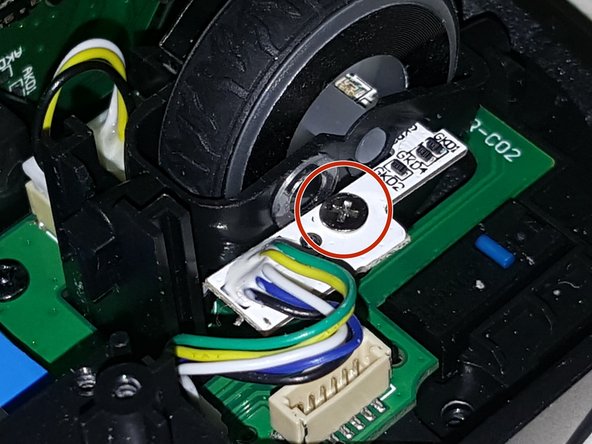
Disconnect the mouse wheel sensor cable from the main board
-
Insert the flat end of a plastic spudger underneath the rear clip of the mouse wheel
-
Using the spudger as a lever, push up on the rear clip to release it from the assembly
-
-
-
Remove the black round head Phillips screw holding the top board
-
Lift the top board straight off of the bottom board
-
-
-
There are a number of replacement mouse micro switches available for replacing a faulty one. The quality control on these is not the greatest so buying in at least pairs is advisable
-
The original micro switch is an Omron D2FC-F-K(50M), the 50M referring to its lifetime click expectancy
-
The replacement switches here are from a Lenovo mouse that was bundled in with a new computer. These switches are the right-click (black) and middle-click (black/white)
-
-
-
Apply flux to where the faulty micro switch is soldered to the board
-
Using a solder sucker pump in conjunction with your soldering iron, heat up the solder and then use the sucker to remove the molten solder
-
Remove the faulty micro switch once desoldered. You may need to heat up the pads while doing so
-
-
-
Fit the new micro switch in place, noting the proper orientation
-
Heat up one pad at a time with your soldering iron, adding fresh solder to the pin and pad
-
Once the solder has cooled, clean the flux residue off with isopropyl alcohol
-


To reassemble your device, follow these instructions in reverse order, taking care when closing up the plastic shells and noting which screws go where.
To reassemble your device, follow these instructions in reverse order, taking care when closing up the plastic shells and noting which screws go where.
다른 5명이 해당 안내서를 완성하였습니다.

댓글 4개
Excellent guide! Was super easy to follow.
I commented above with a couple differences I found, but I'm not sure if that was maybe due to a different release version of the mouse.
My left button works again (although I took the switch from a Logitech MX1100 that had the exact same Omron switch and the same fault with the other switch in that mouse).
Solid guide thanks. I also replaced the right click since I had it open, that is on the main board so only recommended for the confident, it's fiddley but not any harder.
1. Replace the magnetic side on the mouse. This will hold the inside magnets in place in later steps
2. Unplug battery! Pull the connector, not the wires
3. Unplug the ribbon, the black part is a tiny lift-up latch to unlock the cable, gently pull
4. Remove all screws holding the plastic inner frame & battery (battery can stay glued to that)
4a. Note there's a tiny wedge light-pipe by the magnets that's now loose. remember to put that back
5. Gently unstick 2 silver tapes connecting the thumb circuit board to main. You need to put those back to reassemble
6. Remove screws in main board. Gently lift out sidewise and up.
6a. Note the bottom on/off & 2.5/BLE switches may or may not stay in place.
Reassembly == reverse steps. Take your time lining up the pieces slotting the mainboard back in.
Tip: Cut the microswitch apart if de-soldering is being a pain
I'm having issues with my forward side button, do you happen to know what type of switchs they are and how can I replace them?
I'm experiencing the same issue with my side button, and Corsair support told me I was out of luck. I'd like to know what the side switches are as well so I can do a full refurb on mine.