주요 콘텐츠로 건너뛰기

Cuisinart DCC-1100 Selection Knob Replacement

필요한 것

  1. Cuisinart DCC-1100 Selection Knob Replacement, Selection Knob: 1 단계, 이미지 1/2 Cuisinart DCC-1100 Selection Knob Replacement, Selection Knob: 1 단계, 이미지 2/2
    • Remove the coffee pot.

  2. Cuisinart DCC-1100 Selection Knob Replacement: 2 단계, 이미지 1/2 Cuisinart DCC-1100 Selection Knob Replacement: 2 단계, 이미지 2/2
    • Open the lid.

    • Remove the two 1.6mm Phillips #1 screws from the lid.

  3. Cuisinart DCC-1100 Selection Knob Replacement: 3 단계, 이미지 1/1
    • Remove the lid from the coffee maker.

  4. Cuisinart DCC-1100 Selection Knob Replacement: 4 단계, 이미지 1/1
    • Remove the two 1.3mm screws from the display.

  5. Cuisinart DCC-1100 Selection Knob Replacement: 5 단계, 이미지 1/2 Cuisinart DCC-1100 Selection Knob Replacement: 5 단계, 이미지 2/2
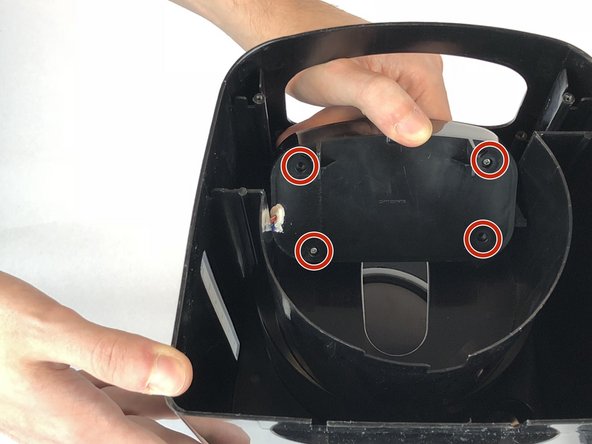
    • Push the display into the maker so that way you can access the screws in the back.

    • Remove the four 1mm Phillips #0 screws from the back.

  6. Cuisinart DCC-1100 Selection Knob Replacement: 6 단계, 이미지 1/2 Cuisinart DCC-1100 Selection Knob Replacement: 6 단계, 이미지 2/2
    • Remove the back panel.

    • Remove the front panel from the display.

  7. Cuisinart DCC-1100 Selection Knob Replacement: 7 단계, 이미지 1/1
    • Remove the three 1mm Phillips #0 screws from the knob.

  8. Cuisinart DCC-1100 Selection Knob Replacement: 8 단계, 이미지 1/1
    • Remove the knob from the front panel.

  9. Cuisinart DCC-1100 Selection Knob Replacement: 9 단계, 이미지 1/1
    • Remove the plastic ring from the knob.

결론

To reassemble your device, follow these instructions in reverse order.

Josh Harvey

회원 가입일: 01/25/18

886 평판

안내서 4개 작성하였습니다

USF Tampa, Team S20-G4, Passmore Spring 2018 USF Tampa, Team S20-G4, Passmore Spring 2018 회원

USFT-PASSMORE-S18S20G4

4 회원들

안내서 7개 작성하였습니다

댓글 0개

댓글 쓰기

조회 통계:

24 시간 전: 0

7일 전: 4

30일 전: 6

전체 시간: 877