주요 콘텐츠로 건너뛰기

DeLonghi ESAM xxxx - (Different Types) Pressure Regulator Installation

필요한 것

  1. DeLonghi ESAM xxxx - (Different Types) Pressure Regulator Installation, Preparations: 1 단계, 이미지 1/1
    • Pull the plug!

    • Remove the drip tray, the water tank and the pulp container.

  2. DeLonghi ESAM xxxx - (Different Types) Pressure Regulator Installation, Unscrew the rear panel: 2 단계, 이미지 1/2 DeLonghi ESAM xxxx - (Different Types) Pressure Regulator Installation, Unscrew the rear panel: 2 단계, 이미지 2/2
    • The rear panel and side panels are attached with six phillips screws #2. Screw them out.

  3. DeLonghi ESAM xxxx - (Different Types) Pressure Regulator Installation, Remove right side panel: 3 단계, 이미지 1/2 DeLonghi ESAM xxxx - (Different Types) Pressure Regulator Installation, Remove right side panel: 3 단계, 이미지 2/2
    • Slide the right side panel about 2 cm to the back.

    • Then solve it.

  4. DeLonghi ESAM xxxx - (Different Types) Pressure Regulator Installation, Remove left side panel: 4 단계, 이미지 1/3 DeLonghi ESAM xxxx - (Different Types) Pressure Regulator Installation, Remove left side panel: 4 단계, 이미지 2/3 DeLonghi ESAM xxxx - (Different Types) Pressure Regulator Installation, Remove left side panel: 4 단계, 이미지 3/3
    • The left side is a bit stuck. Place a plastic opening tool in the gap between the front and left side panel above the opening for the water tank. Lift the gap slightly larger.

    • Then place the tool in the gap between the front and left side panel under the opening for the water tank. Increase the gap and push the side part about 2 cm to the rear.

    • Lift out the left side piece.

  5. DeLonghi ESAM xxxx - (Different Types) Pressure Regulator Installation, Remove rear panel: 5 단계, 이미지 1/1
    • Take out the rear panel.

  6. DeLonghi ESAM xxxx - (Different Types) Pressure Regulator Installation, Unscrew top cover: 6 단계, 이미지 1/3 DeLonghi ESAM xxxx - (Different Types) Pressure Regulator Installation, Unscrew top cover: 6 단계, 이미지 2/3 DeLonghi ESAM xxxx - (Different Types) Pressure Regulator Installation, Unscrew top cover: 6 단계, 이미지 3/3
    • The front panel is secured with four PH2 Phillips screws, two left and one right each. Turn it out.

    • Use a plastic opening tool to lever off the steam tap.

    • Carefully pull the front panel about 1 cm forward so that there is a gap between the top cover and the front panel,

    • Do not pull the front panel too far, it is still attached with different hoses and cables.

  7. DeLonghi ESAM xxxx - (Different Types) Pressure Regulator Installation, Remove top cover: 7 단계, 이미지 1/3 DeLonghi ESAM xxxx - (Different Types) Pressure Regulator Installation, Remove top cover: 7 단계, 이미지 2/3 DeLonghi ESAM xxxx - (Different Types) Pressure Regulator Installation, Remove top cover: 7 단계, 이미지 3/3
    • Two Phillips screws PH2 hold the lid at the back. Turn it out.

    • Lift the lid upwards.

  8. DeLonghi ESAM xxxx - (Different Types) Pressure Regulator Installation, pressure regulator: 8 단계, 이미지 1/2 DeLonghi ESAM xxxx - (Different Types) Pressure Regulator Installation, pressure regulator: 8 단계, 이미지 2/2
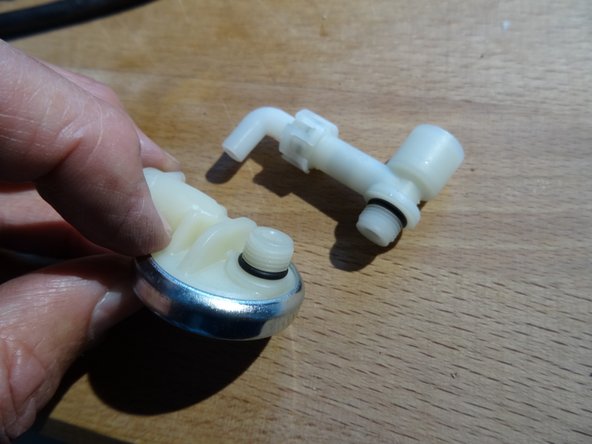
    • The old safety valve - seen in the first photo already expanded - is screwed on the pump. It is replaced by a combination of safety valve and pressure balance valve. The diaphragm valve dampens the shocks of the pump, making the flow of water quieter and quieter.

  9. DeLonghi ESAM xxxx - (Different Types) Pressure Regulator Installation: 9 단계, 이미지 1/2 DeLonghi ESAM xxxx - (Different Types) Pressure Regulator Installation: 9 단계, 이미지 2/2
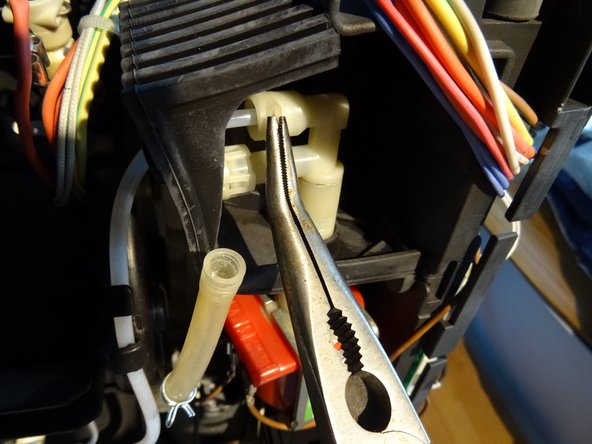
    • Remove the two hoses from the valve. For the thicker hose you have to squeeze the hose clamp with pliers, push it away and you can pull off the hose.

    • With the thinner pressure hose above you have to pull out first a clamp, then the hose comes out easily. There may be a gasket on the hose or it may stick in the valve.

  10. DeLonghi ESAM xxxx - (Different Types) Pressure Regulator Installation: 10 단계, 이미지 1/1
    • Pull the pump slightly out of the housing in its rubber mount. Place a fork wrench SW 12 on the pump tube.

    • Then turn out the old valve.

  11. DeLonghi ESAM xxxx - (Different Types) Pressure Regulator Installation: 11 단계, 이미지 1/2 DeLonghi ESAM xxxx - (Different Types) Pressure Regulator Installation: 11 단계, 이미지 2/2
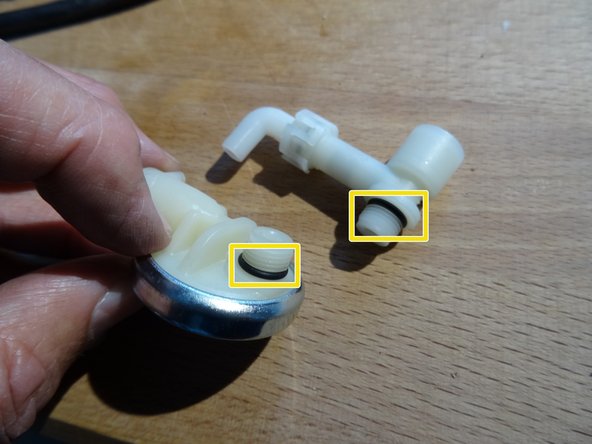
    • Make sure that there is a sealing ring above the thread on the valves, marked yellow in the photo.

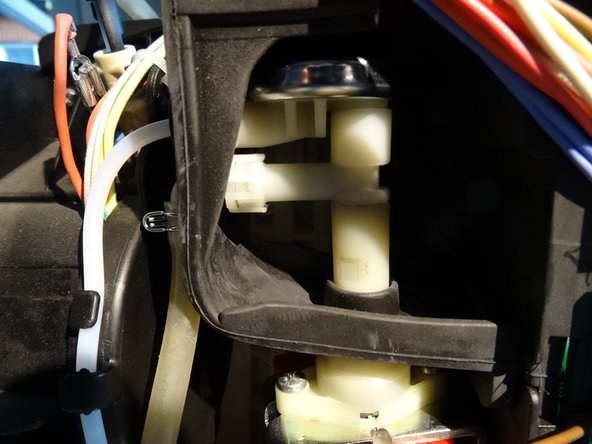
    • First screw the safety valve into the pump tube. Do not turn too hard.

    • then screw the pressure regulating valve into the safety valve.

    • Place the two outputs on top of each other.

    • Put the two hoses back on. Also pay attention here to the thinner tube on the sealing ring, if possible, a new one.

결론

Repeat the steps in order to reassemble your device.

다른 2명이 해당 안내서를 완성하였습니다.

다음 번역가들에게 특별히 감사 드립니다:

de en

100%

이 번역자 분들은 저희가 세상을 수리하는데 동참해 주시는 분입니다! 기여하시겠습니까?
번역 시작하기 ›

VauWeh

회원 가입일: 10/19/15

201,668 평판

안내서 246개 작성하였습니다

Repair is War on Entropy Repair is War on Entropy 회원

Community

25 회원들

안내서 1,097개 작성하였습니다

댓글 2개

Sehr gute Anleitung.

Den Deckel abzunehmen fand ich nicht notwendig.

Sehr hilfreich die Ersatzteil Bezugsquellen.

Maschine ist jetzt um einiges leiser.

Danke

SCHLUMPF - 답글

Gern geschehen. Stimmt, bei dieser Reparatur muss der Deckel nicht unbedingt ab, liegt halt an der Logik dieser aufeinander aufbauenden Anleitungen.

VauWeh - 답글

댓글 쓰기

조회 통계:

24 시간 전: 1

7일 전: 8

30일 전: 41

전체 시간: 3,295