주요 콘텐츠로 건너뛰기

DeLonghi ESAM xxxx - (Different Types) Replace timing belt

필요한 것

  1. DeLonghi ESAM xxxx - (Different Types) Replace timing belt, Preparations: 1 단계, 이미지 1/1
    • Pull the plug!

    • Remove the drip tray, the water tank and the pulp container.

  2. DeLonghi ESAM xxxx - (Different Types) Replace timing belt, Unscrew the rear panel: 2 단계, 이미지 1/2 DeLonghi ESAM xxxx - (Different Types) Replace timing belt, Unscrew the rear panel: 2 단계, 이미지 2/2
    • The rear panel and side panels are attached with six phillips screws #2. Screw them out.

  3. DeLonghi ESAM xxxx - (Different Types) Replace timing belt, Remove right side panel: 3 단계, 이미지 1/2 DeLonghi ESAM xxxx - (Different Types) Replace timing belt, Remove right side panel: 3 단계, 이미지 2/2
    • Slide the right side panel about 2 cm to the back.

    • Then solve it.

  4. DeLonghi ESAM xxxx - (Different Types) Replace timing belt, Remove left side panel: 4 단계, 이미지 1/3 DeLonghi ESAM xxxx - (Different Types) Replace timing belt, Remove left side panel: 4 단계, 이미지 2/3 DeLonghi ESAM xxxx - (Different Types) Replace timing belt, Remove left side panel: 4 단계, 이미지 3/3
    • The left side is a bit stuck. Place a plastic opening tool in the gap between the front and left side panel above the opening for the water tank. Lift the gap slightly larger.

    • Then place the tool in the gap between the front and left side panel under the opening for the water tank. Increase the gap and push the side part about 2 cm to the rear.

    • Lift out the left side piece.

  5. DeLonghi ESAM xxxx - (Different Types) Replace timing belt, Remove rear panel: 5 단계, 이미지 1/1
    • Take out the rear panel.

  6. DeLonghi ESAM xxxx - (Different Types) Replace timing belt, Unscrew top cover: 6 단계, 이미지 1/3 DeLonghi ESAM xxxx - (Different Types) Replace timing belt, Unscrew top cover: 6 단계, 이미지 2/3 DeLonghi ESAM xxxx - (Different Types) Replace timing belt, Unscrew top cover: 6 단계, 이미지 3/3
    • The front panel is secured with four PH2 Phillips screws, two left and one right each. Turn it out.

    • Use a plastic opening tool to lever off the steam tap.

    • Carefully pull the front panel about 1 cm forward so that there is a gap between the top cover and the front panel,

    • Do not pull the front panel too far, it is still attached with different hoses and cables.

  7. DeLonghi ESAM xxxx - (Different Types) Replace timing belt, Remove top cover: 7 단계, 이미지 1/3 DeLonghi ESAM xxxx - (Different Types) Replace timing belt, Remove top cover: 7 단계, 이미지 2/3 DeLonghi ESAM xxxx - (Different Types) Replace timing belt, Remove top cover: 7 단계, 이미지 3/3
    • Two Phillips screws PH2 hold the lid at the back. Turn it out.

    • Lift the lid upwards.

  8. DeLonghi ESAM xxxx - (Different Types) Replace timing belt, timing belt: 8 단계, 이미지 1/3 DeLonghi ESAM xxxx - (Different Types) Replace timing belt, timing belt: 8 단계, 이미지 2/3 DeLonghi ESAM xxxx - (Different Types) Replace timing belt, timing belt: 8 단계, 이미지 3/3
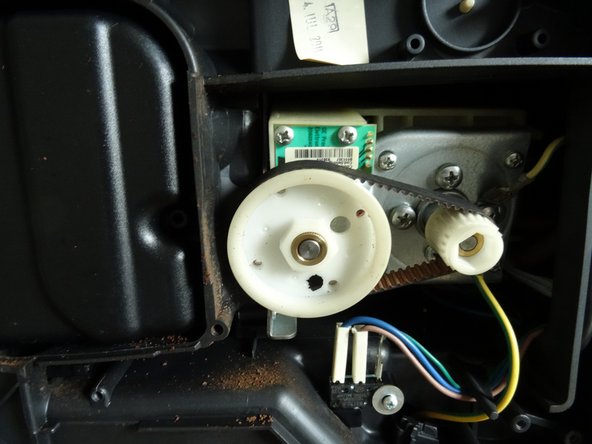
    • This is what the timing belt looks like.

    • Lay the machine on its side.

    • The bottom panel is secured with five Torx TR15 security screws. turn them out.

    • Take off the bottom plate. The toothed belt becomes visible.

  9. DeLonghi ESAM xxxx - (Different Types) Replace timing belt: 9 단계, 이미지 1/2 DeLonghi ESAM xxxx - (Different Types) Replace timing belt: 9 단계, 이미지 2/2
    • It's easier if you loosen the motor.

    • Remove the four Phillips screws securing the motor. (Two are obscured in the picture). Loosen the motor and push it up a little.

    • Lift off the timing belt.

결론

Work the steps in reverse order to reassemble your device.

다음 번역가들에게 특별히 감사 드립니다:

de en

100%

HelloMacOS님은 저희가 세상을 수리하는데 동참하신 분입니다! 기여하시겠습니까?
번역 시작하기 ›

VauWeh

회원 가입일: 10/19/15

203,705 평판

안내서 246개 작성하였습니다

Repair is War on Entropy Repair is War on Entropy 회원

Community

25 회원들

안내서 1,126개 작성하였습니다

댓글 0개

댓글 쓰기

조회 통계:

24 시간 전: 0

7일 전: 2

30일 전: 14

전체 시간: 378