주요 콘텐츠로 건너뛰기

Definitive Technology W7 Access Panel Replacement

필요한 것

  1. Definitive Technology W7 Access Panel Replacement, Access Panel: 1 단계, 이미지 1개 중 1개
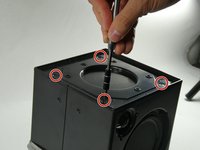
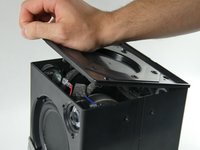
    • Wedge the spudger in any of the four corners of the panel and apply downward pressure on the spudgers handle to pry the panel away from the speaker housing.

    • Repeat this procedure around the perimeter until the panel releases, then lift the panel up by hand.

  2. Definitive Technology W7 Access Panel Replacement: 2 단계, 이미지 2개 중 1개 Definitive Technology W7 Access Panel Replacement: 2 단계, 이미지 2개 중 2개
    • Remove the thirteen 5 mm Phillips #0 screws.

    • Once all screws have been removed, gently pull up on the black panel to remove it from the top of the speaker.

  3. Definitive Technology W7 Access Panel Replacement: 3 단계, 이미지 3개 중 1개 Definitive Technology W7 Access Panel Replacement: 3 단계, 이미지 3개 중 2개 Definitive Technology W7 Access Panel Replacement: 3 단계, 이미지 3개 중 3개
    • The gray mesh bag covering the speaker will now be exposed.

    • Flick the switch on the middle of the lock down to loosen the sack.

    • Pull upwards on the locking mechanism to loosen the drawstring. Stop pulling when the mesh bag is loose enough that it can be pulled downwards.

  4. Definitive Technology W7 Access Panel Replacement: 4 단계, 이미지 2개 중 1개 Definitive Technology W7 Access Panel Replacement: 4 단계, 이미지 2개 중 2개
    • Remove the four screws on top of the device on each corner with a Phillips #0 screwdriver.

    • Remove the black panel.

결론

To reassemble your device, follow these instructions in reverse order.

작성자

2다른 기여자 명과 함께

Brendan Thibault

회원 가입일: 10/26/22

339 평판

안내서 3개를 작성함

UMass Dartmouth, Team 2-5, Petersen Fall 2022 UMass Dartmouth, Team 2-5, Petersen Fall 2022 회원

UMASSD-PETERSEN-F22S2G5

4 회원들

안내서 6개를 작성함

0가이드 댓글

댓글 쓰기

조회 통계:

지난 24시간: 0

지난 7일: 14

지난 30일: 28

전체 시간: 365