주요 콘텐츠로 건너뛰기

Dell Alienware 13 Memory Module Replacement

  1. Dell Alienware 13 Memory Module Replacement, Popping out the Memory Modules: 1 단계, 이미지 1/3 Dell Alienware 13 Memory Module Replacement, Popping out the Memory Modules: 1 단계, 이미지 2/3 Dell Alienware 13 Memory Module Replacement, Popping out the Memory Modules: 1 단계, 이미지 3/3
    • WARNING: Before working inside your computer, read the safety information that shipped with your computer and follow the steps in Before Working Inside Your Computer. After working inside your computer, follow the instructions in After Working Inside Your Computer.

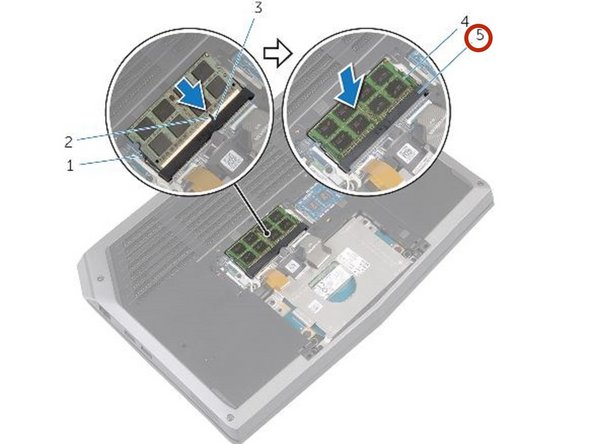
    • Using your fingertips, carefully spread apart the securing clips on each end of the memory-module slot until the memory module pops up.

  2. Dell Alienware 13 Memory Module Replacement, Removing the Memory Module: 2 단계, 이미지 1/1
    • Slide and remove the memory module from the memory-module slot.

  3. Dell Alienware 13 Memory Module Replacement, Aligning the new Memory Module: 3 단계, 이미지 1/2 Dell Alienware 13 Memory Module Replacement, Aligning the new Memory Module: 3 단계, 이미지 2/2
    • Align the notch on the NEW memory module with the tab on the memory-module slot.

결론

To reassemble your device, follow these instructions in reverse order.

Terrence15

회원 가입일: 12/18/17

79,121 평판

안내서 441개 작성하였습니다

RampUP America, Inc. RampUP America, Inc. 회원

Community

42 회원들

안내서 1,985개 작성하였습니다

댓글 0개

댓글 쓰기

조회 통계:

24 시간 전: 0

7일 전: 4

30일 전: 4

전체 시간: 163