주요 콘텐츠로 건너뛰기

Dell Alienware 18 Hard Drive Replacement

필요한 것

  1. Dell Alienware 18 Hard Drive Replacement, Disconnecting the Hard-Drive Cable: 1 단계, 이미지 1/1
    • WARNING: Before working inside your computer, read the safety information that shipped with your computer and follow the steps in Before You Begin.

    • CAUTION: To avoid data loss, do not remove the hard drive while the computer is in Sleep or On state.

    • CAUTION: Hard drives are extremely fragile. Exercise care when handling the hard drive.

    • Disconnect the hard-drive cable from its connector on the system board.

  2. Dell Alienware 18 Hard Drive Replacement, Loosen the Screws: 2 단계, 이미지 1/1
    • Loosen the captive screws that secure the hard-drive assembly to the computer base.

  3. Dell Alienware 18 Hard Drive Replacement, Lifting the Hard-Drive Assembly: 3 단계, 이미지 1/1
    • Using the pull-tab, lift the hard-drive assembly out of the computer base.

  4. Dell Alienware 18 Hard Drive Replacement, Disconnecting the Interposer: 4 단계, 이미지 1/2 Dell Alienware 18 Hard Drive Replacement, Disconnecting the Interposer: 4 단계, 이미지 2/2
    • Disconnect the interposer from the hard drives.

    • NOTE: Your computer supports up to three drives.

  5. Dell Alienware 18 Hard Drive Replacement, Remove the Screws: 5 단계, 이미지 1/1
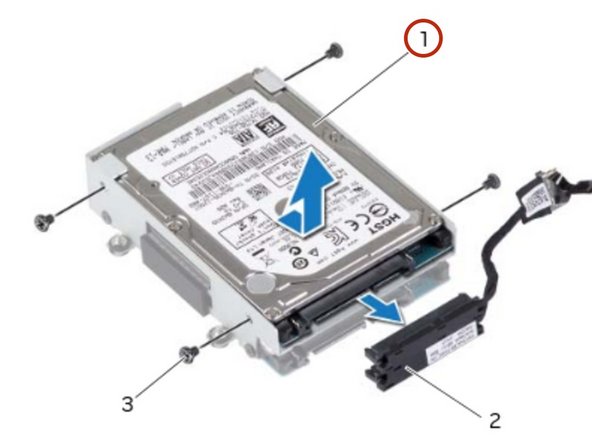
    • Remove the screws that secure the hard drive(s) to the hard-drive bracket and slide the hard drive(s) out of the hard-drive bracket.

  6. Dell Alienware 18 Hard Drive Replacement, Placing the Hard-Drive: 6 단계, 이미지 1/1
    • Place the NEW primary hard drive in the hard-drive bracket.

  7. Dell Alienware 18 Hard Drive Replacement, Sliding the Secondary Hard-Drive: 7 단계, 이미지 1/1
    • If applicable, slide the secondary hard drive into the hard-drive bracket.

  8. Dell Alienware 18 Hard Drive Replacement, Secure the Screws: 8 단계, 이미지 1/1
    • Replace the screws that secure the primary hard drive to the hard-drive bracket.

  9. Dell Alienware 18 Hard Drive Replacement, Replace the Screws: 9 단계, 이미지 1/1
    • If applicable, replace the screws that secure the secondary hard drive to the hard-drive bracket.

  10. Dell Alienware 18 Hard Drive Replacement, Connecting the Interposer: 10 단계, 이미지 1/1
    • Connect the interposer to the hard drives.

  11. Dell Alienware 18 Hard Drive Replacement, Placing the Hard-Drive Assembly: 11 단계, 이미지 1/1
    • Place the hard-drive assembly in the computer base.

  12. Dell Alienware 18 Hard Drive Replacement, Tightening the Screws: 12 단계, 이미지 1/1
    • Tighten the captive screws that secure the hard-drive assembly to the computer base.

  13. Dell Alienware 18 Hard Drive Replacement, Connecting the Hard-Drive: 13 단계, 이미지 1/1
    • Connect the hard-drive cable to its connector on the system board.

결승점

다른 2명이 해당 안내서를 완성하였습니다.

darrius

회원 가입일: 03/26/18

5,213 평판

안내서 30개 작성하였습니다

RampUP America, Inc. RampUP America, Inc. 회원

Community

42 회원들

안내서 1,985개 작성하였습니다

댓글 0개

댓글 쓰기

조회 통계:

24 시간 전: 0

7일 전: 0

30일 전: 10

전체 시간: 760