주요 콘텐츠로 건너뛰기

Dell Alienware M18x R2 Hard Drive Replacement

필요한 것

  1. Dell Alienware M18x R2 Hard Drive Replacement, Lifting the Connector Latch: 1 단계, 이미지 1/2 Dell Alienware M18x R2 Hard Drive Replacement, Lifting the Connector Latch: 1 단계, 이미지 2/2
    • WARNING: Before working inside your computer, read the safety information that shipped with your computer and follow the steps in Before You Begin.

    • CAUTION: Hard drives are extremely fragile. Exercise care when handling the hard drive

    • Lift the connector latch that secures the hard-drive cable to the connector on the system board, and then disconnect the hard-drive cable from the connector on the system board.

  2. Dell Alienware M18x R2 Hard Drive Replacement, Lifting the Hard-Drive Assembly: 2 단계, 이미지 1/1
    • Using the pull-tab, lift the hard-drive assembly out of the computer base.

  3. Dell Alienware M18x R2 Hard Drive Replacement, Disconnecting the Interposer: 3 단계, 이미지 1/2 Dell Alienware M18x R2 Hard Drive Replacement, Disconnecting the Interposer: 3 단계, 이미지 2/2
    • Disconnect the interposer from the hard drives.

  4. Dell Alienware M18x R2 Hard Drive Replacement, Remove the Screws: 4 단계, 이미지 1/1
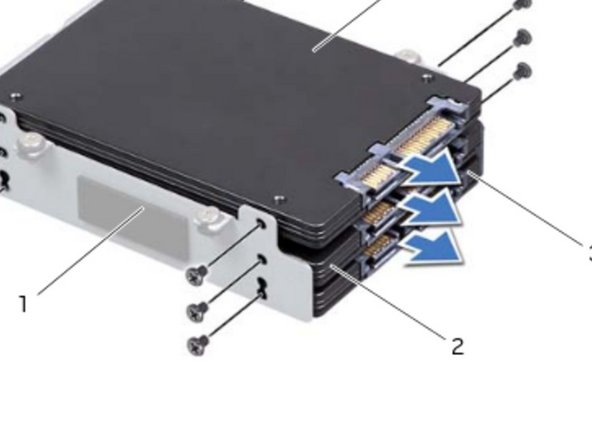
    • Remove the screws that secure the hard drive(s) and slide the hard drive(s) out of the hard-drive bracket.

  5. Dell Alienware M18x R2 Hard Drive Replacement, Placing the Hard Drive: 5 단계, 이미지 1/1
    • Place the NEW primary hard drive (HDD 0) in the hard-drive bracket.

  6. Dell Alienware M18x R2 Hard Drive Replacement, Sliding the Hard Drives: 6 단계, 이미지 1/1
    • If applicable, slide the secondary and tertiary hard drive(s) into the hard-drive bracket.

  7. Dell Alienware M18x R2 Hard Drive Replacement, Replace the Screws: 7 단계, 이미지 1/1
    • Replace the screws that secure the primary hard drive (HDD 0).

  8. Dell Alienware M18x R2 Hard Drive Replacement, Connecting the Interposer: 8 단계, 이미지 1/1
    • If applicable, replace the screws that secure the secondary hard drive (HDD 1) and tertiary hard drive (HDD 2) to the hard-drive bracket.

    • Connect the interposer to the hard drive(s).

  9. Dell Alienware M18x R2 Hard Drive Replacement, Placing the Hard-Drive Assembly: 9 단계, 이미지 1/1
    • Place the hard-drive assembly in the computer base.

  10. Dell Alienware M18x R2 Hard Drive Replacement, Tighten the Captive Screws: 10 단계, 이미지 1/1
    • Tighten the captive screws that secure the hard-drive assembly to the computer base.

  11. Dell Alienware M18x R2 Hard Drive Replacement, Sliding the Hard-Drive Cable: 11 단계, 이미지 1/1
    • Slide the hard-drive cable into the connector on the system board and press down on the connector latch to secure the cable.

결론

To reassemble your device, follow these instructions in reverse order.

Terrence15

회원 가입일: 12/18/17

79,161 평판

안내서 441개 작성하였습니다

RampUP America, Inc. RampUP America, Inc. 회원

Community

42 회원들

안내서 1,989개 작성하였습니다

댓글 0개

댓글 쓰기

조회 통계:

24 시간 전: 1

7일 전: 3

30일 전: 27

전체 시간: 1,029