주요 콘텐츠로 건너뛰기

Dell Chromebook 3100 2-in-1 Display Replacement

필요한 것

  1. Dell Chromebook 3100 2-in-1 Display Replacement, Back Cover: 1 단계, 이미지 1/2 Dell Chromebook 3100 2-in-1 Display Replacement, Back Cover: 1 단계, 이미지 2/2
    • Using a Phillips #1 screwdriver, remove all nine of the 5 mm screws from the back cover.

  2. Dell Chromebook 3100 2-in-1 Display Replacement: 2 단계, 이미지 1/2 Dell Chromebook 3100 2-in-1 Display Replacement: 2 단계, 이미지 2/2
    • Use the opening tool to pry the back cover off of the device.

  3. Dell Chromebook 3100 2-in-1 Display Replacement, Battery: 3 단계, 이미지 1/2 Dell Chromebook 3100 2-in-1 Display Replacement, Battery: 3 단계, 이미지 2/2
    • Disconnect the battery cable from the connector on the system board.

  4. Dell Chromebook 3100 2-in-1 Display Replacement: 4 단계, 이미지 1/3 Dell Chromebook 3100 2-in-1 Display Replacement: 4 단계, 이미지 2/3 Dell Chromebook 3100 2-in-1 Display Replacement: 4 단계, 이미지 3/3
    • Using a Phillips #1 screwdriver, remove the three 4 mm screws that secure the battery.

    • Remove the adhesive tape that secures the battery in place.

  5. Dell Chromebook 3100 2-in-1 Display Replacement: 5 단계, 이미지 1/2 Dell Chromebook 3100 2-in-1 Display Replacement: 5 단계, 이미지 2/2
    • Carefully remove the battery from the device.

  6. Dell Chromebook 3100 2-in-1 Display Replacement, Display: 6 단계, 이미지 1/2 Dell Chromebook 3100 2-in-1 Display Replacement, Display: 6 단계, 이미지 2/2
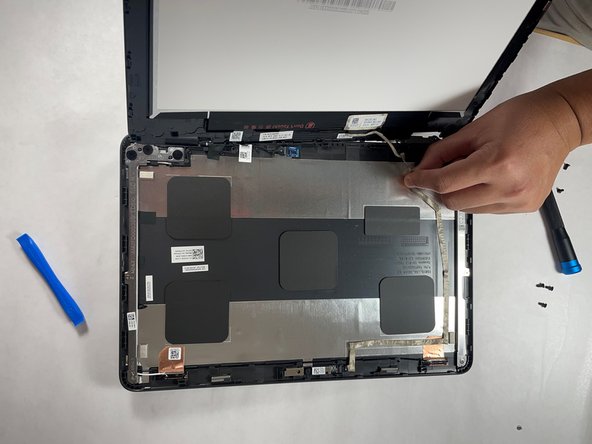
    • Remove the single 3 mm screw that secures the WLAN bracket to the system board using a Phillips #1 screwdriver.

    • Lift the WLAN bracket from the system board.

    • After lifting the bracket, carefully unplug the two coaxial cables.

  7. Dell Chromebook 3100 2-in-1 Display Replacement: 7 단계, 이미지 1/1
    • Remove the single 4 mm screw that secures the eDP bracket to the motherboard using a Phillips #1 screwdriver.

    • Remove the eDP bracket.

  8. Dell Chromebook 3100 2-in-1 Display Replacement: 8 단계, 이미지 1/2 Dell Chromebook 3100 2-in-1 Display Replacement: 8 단계, 이미지 2/2
    • Disconnect the display cable from the motherboard by using a plastic opening pick.

  9. Dell Chromebook 3100 2-in-1 Display Replacement: 9 단계, 이미지 1/1
    • Open the system to 180 degrees and place the computer on a flat surface, with the display hinges facing up.

  10. Dell Chromebook 3100 2-in-1 Display Replacement: 10 단계, 이미지 1/3 Dell Chromebook 3100 2-in-1 Display Replacement: 10 단계, 이미지 2/3 Dell Chromebook 3100 2-in-1 Display Replacement: 10 단계, 이미지 3/3
    • Remove the three (on both hinges) 5 mm display hinge bracket screws that secure the display assembly to the system using a Phillips #1 screwdriver.

  11. Dell Chromebook 3100 2-in-1 Display Replacement: 11 단계, 이미지 1/1
    • Remove the display assembly from the system.

  12. Dell Chromebook 3100 2-in-1 Display Replacement: 12 단계, 이미지 1/2 Dell Chromebook 3100 2-in-1 Display Replacement: 12 단계, 이미지 2/2
    • Use the opening tool to open the display panel starting from the pry points located above the left and right hinges.

    • Work your way around, through the left and right side of the panel, and carefully flip the display panel over.

  13. Dell Chromebook 3100 2-in-1 Display Replacement: 13 단계, 이미지 1/2 Dell Chromebook 3100 2-in-1 Display Replacement: 13 단계, 이미지 2/2
    • Peel back the adhesive tape securing the display cable on the back of the display panel and separate the display.

결론

To reassemble your device, follow these instructions in reverse order.

다른 한 분이 해당 안내서를 완성하였습니다.

M Ali

회원 가입일: 11/03/21

301 평판

안내서 2개 작성하였습니다

Gateway, Team 1-1, Pee Fall 2021 Gateway, Team 1-1, Pee Fall 2021 회원

GCC-PEE-F21S1G1

5 회원들

안내서 5개 작성하였습니다

댓글 0개

댓글 쓰기

조회 통계:

24 시간 전: 0

7일 전: 8

30일 전: 41

전체 시간: 1,592