주요 콘텐츠로 건너뛰기

Dell Desktop XPS 420 CD/DVD Drive Replacement

필요한 것

  1. Dell Desktop XPS 420 CD/DVD Drive Replacement, Stand the case upright, and remove the side panel.: 1 단계, 이미지 1/1
    • Ensure that your computer is unplugged. Also be sure you are grounded against static discharge

    • Stand your case upright in an area with some space.

    • Remove the side panel by pushing the release on the top of the case outwards. Once the side panel is released, remove it and set it aside.

  2. Dell Desktop XPS 420 CD/DVD Drive Replacement, Remove the drive panel.: 2 단계, 이미지 1/2 Dell Desktop XPS 420 CD/DVD Drive Replacement, Remove the drive panel.: 2 단계, 이미지 2/2
    • Remove the power cable for the CD/DVD drive you wish to remove/replace, located on the rear of the drive.

    • This is the drive release mechanism, adjacent to the drive panel and the drive bay.

    • Release the drive panel by pulling down on the drive release mechanism.

  3. Dell Desktop XPS 420 CD/DVD Drive Replacement, Pull down on the drive release mechanism to release the drive.: 3 단계, 이미지 1/2 Dell Desktop XPS 420 CD/DVD Drive Replacement, Pull down on the drive release mechanism to release the drive.: 3 단계, 이미지 2/2
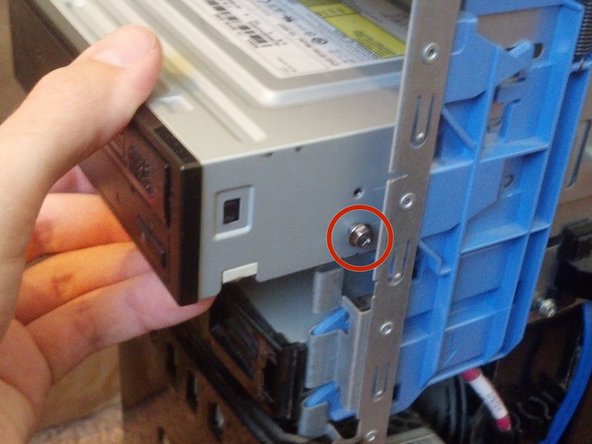
    • There is a single screw on the right-hand side of the drive that fits into the drive release mechanism.

    • Simultaneously pull down on the drive release mechanism and pull the drive gently out of the drive bay.

  4. Dell Desktop XPS 420 CD/DVD Drive Replacement, If you're adding a different drive, make sure it has screws in these places.: 4 단계, 이미지 1/3 Dell Desktop XPS 420 CD/DVD Drive Replacement, If you're adding a different drive, make sure it has screws in these places.: 4 단계, 이미지 2/3 Dell Desktop XPS 420 CD/DVD Drive Replacement, If you're adding a different drive, make sure it has screws in these places.: 4 단계, 이미지 3/3
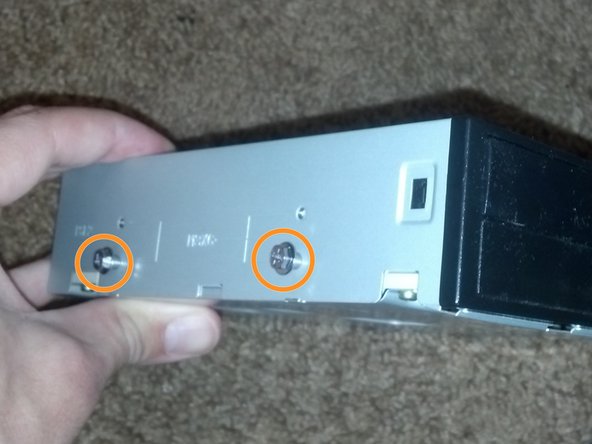
    • If you wish to insert a different CD/DVD drive, make sure the screws are set in this orientation:

    • One screw on the right-hand side.

    • Two screws on the left-hand side.

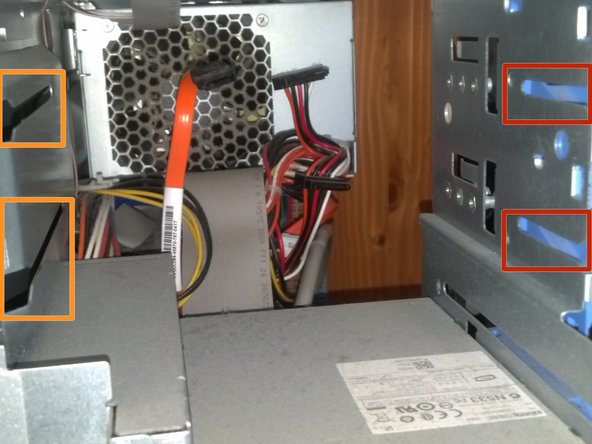
    • The screws will slide into these slits in the drive bay interior.

결론

To reassemble your device, follow these instructions in reverse order.

다른 6명이 해당 안내서를 완성하였습니다.

CrichtonMichael

회원 가입일: 11/02/14

337 평판

안내서 2개 작성하였습니다

댓글 0개

댓글 쓰기

조회 통계:

24 시간 전: 0

7일 전: 4

30일 전: 12

전체 시간: 4,730