주요 콘텐츠로 건너뛰기

Dell Inspiron 11-3152 Screen Replacement

필요한 것

  1. Dell Inspiron 11-3152 Screen Replacement, Back Panel: 1 단계, 이미지 1/2 Dell Inspiron 11-3152 Screen Replacement, Back Panel: 1 단계, 이미지 2/2
    • Flip the computer over.

  2. Dell Inspiron 11-3152 Screen Replacement: 2 단계, 이미지 1/2 Dell Inspiron 11-3152 Screen Replacement: 2 단계, 이미지 2/2
    • Remove all nine 5mm Phillips head screws from the back cover using #0 Phillips head.

  3. Dell Inspiron 11-3152 Screen Replacement: 3 단계, 이미지 1/1
    • Gently use a spudger to pull the cover away from the rest of the laptop. The cover will come off after you use the tool on two or three sides.

  4. Dell Inspiron 11-3152 Screen Replacement, Battery: 4 단계, 이미지 1/1
    • Make sure that the power is off.

    • After taking off the back panel, you will see the battery located at the bottom of the computer system. It's black and is clearly labeled "dell battery".

  5. Dell Inspiron 11-3152 Screen Replacement: 5 단계, 이미지 1/2 Dell Inspiron 11-3152 Screen Replacement: 5 단계, 이미지 2/2
    • Locate the battery at the bottom of the computer and remove the four 3mm screws with a Phillips #0 head that hold the battery down.

  6. Dell Inspiron 11-3152 Screen Replacement: 6 단계, 이미지 1/1
    • Remove the Solid State Drive wire from the battery clip by detaching the wire.

    • This can be done by gently pulling the connector away from the battery clip.

  7. Dell Inspiron 11-3152 Screen Replacement: 7 단계, 이미지 1/1
    • Remove the battery from the computer system by gently lifting it from the side.

  8. Dell Inspiron 11-3152 Screen Replacement, Screen: 8 단계, 이미지 1/1
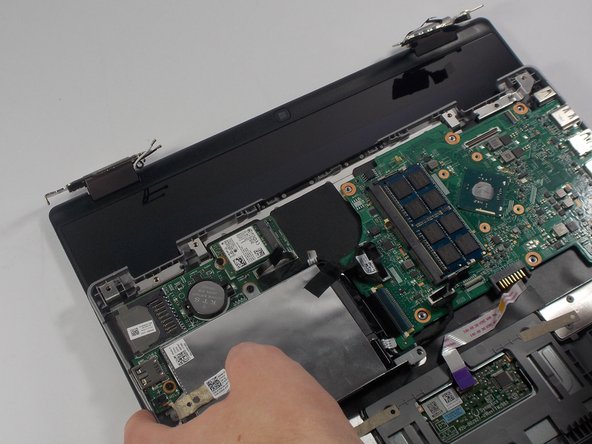
    • Unscrew the brackets in the top right and top left of the laptop. Unscrew the two 1mm screw from both of the brackets on both sides with #0 phillips head.

  9. Dell Inspiron 11-3152 Screen Replacement: 9 단계, 이미지 1/1
    • Disconnect the aerial cables from the wireless controller by pulling them away from the laptop.

  10. Dell Inspiron 11-3152 Screen Replacement: 10 단계, 이미지 1/1
    • Push the brackets up on both sides with your hands or spudger.

  11. Dell Inspiron 11-3152 Screen Replacement: 11 단계, 이미지 1/2 Dell Inspiron 11-3152 Screen Replacement: 11 단계, 이미지 2/2
    • At this point you can pull the bottom half of the computer away from the screen.

    • The screen is now fully detached and ready to be replaced!

결론

To reassemble your device, follow these instructions in reverse order.

다른 한 분이 해당 안내서를 완성하였습니다.

Matthew Duncan

회원 가입일: 03/10/16

481 평판

안내서 4개 작성하였습니다

UMass Dartmouth, Team 4-6, Catania Spring 2016 UMass Dartmouth, Team 4-6, Catania Spring 2016 회원

UMASSD-CATANIA-S16S4G6

3 회원들

안내서 6개 작성하였습니다

댓글 0개

댓글 쓰기

조회 통계:

24 시간 전: 0

7일 전: 0

30일 전: 0

전체 시간: 499