주요 콘텐츠로 건너뛰기

Dell Inspiron 11z 1120 Display Assembly Replacement

필요한 것

  1. Dell Inspiron 11z 1120 Display Assembly Replacement, Disconnecting the Antenna Cables: 1 단계, 이미지 1/1
    • WARNING: Before working inside your computer, read the safety information that shipped with your computer. Follow the instructions in Before You Begin.

    • Disconnect the Mini-Card antenna cables from the Mini-Card(s).

  2. Dell Inspiron 11z 1120 Display Assembly Replacement, Remove the Screws: 2 단계, 이미지 1/1
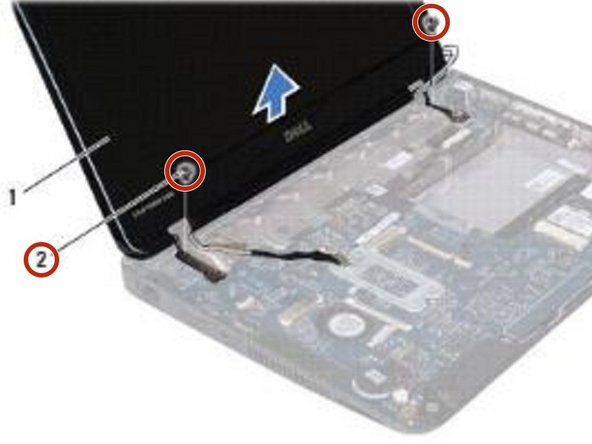
    • Remove the two screws (one on each side) that secure the display assembly to the computer base.

  3. Dell Inspiron 11z 1120 Display Assembly Replacement, Lifting the Display Assembly: 3 단계, 이미지 1/1
    • Lift and remove the display assembly off the computer base.

  4. Dell Inspiron 11z 1120 Display Assembly Replacement, Place the Display Assembly: 4 단계, 이미지 1/2 Dell Inspiron 11z 1120 Display Assembly Replacement, Place the Display Assembly: 4 단계, 이미지 2/2
    • Place the NEW display assembly in position and replace the two screws (one on each side) that secure the display assembly to the computer base.

  5. Dell Inspiron 11z 1120 Display Assembly Replacement, Connect the Display Cable: 5 단계, 이미지 1/1
    • Connect the display cable to the system board connector.

  6. Dell Inspiron 11z 1120 Display Assembly Replacement, Routing the Antenna Cables: 6 단계, 이미지 1/1
    • Route the Mini-Card antenna cables through the routing guides on the computer base.

  7. Dell Inspiron 11z 1120 Display Assembly Replacement, Connecting the Mini-Card Cables: 7 단계, 이미지 1/1
    • Connect the Mini-Card antenna cables to the Mini-Card(s).

결론

To reassemble your device, follow these instructions in reverse order.

Terrence15

회원 가입일: 12/18/17

79,231 평판

안내서 441개 작성하였습니다

RampUP America, Inc. RampUP America, Inc. 회원

Community

42 회원들

안내서 1,989개 작성하였습니다

댓글 0개

댓글 쓰기

조회 통계:

24 시간 전: 1

7일 전: 2

30일 전: 7

전체 시간: 155