주요 콘텐츠로 건너뛰기

Dell Inspiron 1320 Hard Drive Replacement

필요한 것

  1. Dell Inspiron 1320 Hard Drive Replacement, Remove the Four Screws: 1 단계, 이미지 1/1
    • WARNING: Before working inside your computer, read the safety information that shipped with your computer. Follow the procedures in Before You Begin.

    • CAUTION: To avoid electrostatic discharge, ground yourself by using a wrist grounding strap or by periodically touching an unpainted metal surface (such as a connector on your computer).

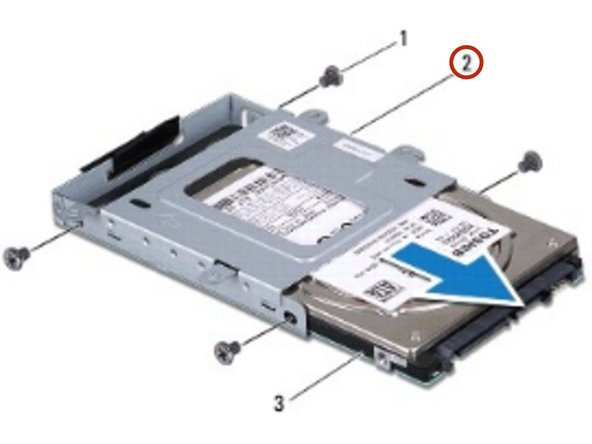
    • Remove the four screws that secure the hard drive assembly to the computer base.

  2. Dell Inspiron 1320 Hard Drive Replacement, Sliding the Hard Drive Assembly: 2 단계, 이미지 1/1
    • Slide the hard drive assembly to disconnect it from the system board connector.

  3. Dell Inspiron 1320 Hard Drive Replacement, Pull the Black Pull-Tab: 3 단계, 이미지 1/1
    • Pull the black pull-tab and lift the hard drive assembly out of the computer base.

  4. Dell Inspiron 1320 Hard Drive Replacement, Remove the Screws: 4 단계, 이미지 1/1
    • Remove the four screws that secure the hard drive to the hard drive cage.

  5. Dell Inspiron 1320 Hard Drive Replacement, Sliding the Hard Drive: 5 단계, 이미지 1/1
    • Slide the hard drive out of the hard drive cage.

  6. Dell Inspiron 1320 Hard Drive Replacement, Sliding the Hard Drive: 6 단계, 이미지 1/2 Dell Inspiron 1320 Hard Drive Replacement, Sliding the Hard Drive: 6 단계, 이미지 2/2
    • Slide the NEW hard drive into the hard drive cage.

  7. Dell Inspiron 1320 Hard Drive Replacement, Replace the Screws: 7 단계, 이미지 1/1
    • Replace the four screws that secure the hard drive to the hard drive cage.

  8. Dell Inspiron 1320 Hard Drive Replacement, Placing the Hard Drive Assembly: 8 단계, 이미지 1/1
    • Place the hard drive assembly in the computer base.

  9. Dell Inspiron 1320 Hard Drive Replacement, Connecting the Hard Drive Assembly: 9 단계, 이미지 1/1
    • Slide and connect the hard drive assembly to the system board connector.

  10. Dell Inspiron 1320 Hard Drive Replacement, Replace the Screws: 10 단계, 이미지 1/1
    • Replace the four screws that secure the hard drive assembly to the computer base.

결승점

Terrence15

회원 가입일: 12/18/17

79,121 평판

안내서 441개 작성하였습니다

RampUP America, Inc. RampUP America, Inc. 회원

Community

42 회원들

안내서 1,985개 작성하였습니다

댓글 0개

댓글 쓰기

조회 통계:

24 시간 전: 0

7일 전: 1

30일 전: 1

전체 시간: 371