주요 콘텐츠로 건너뛰기

Dell Inspiron 14 5100 Touch Pad Replacement

필요한 것

  1. Dell Inspiron 14 5100 Touch Pad Replacement, Dell Inspiron 14 5100 Disassembly: 1 단계, 이미지 1/3 Dell Inspiron 14 5100 Touch Pad Replacement, Dell Inspiron 14 5100 Disassembly: 1 단계, 이미지 2/3 Dell Inspiron 14 5100 Touch Pad Replacement, Dell Inspiron 14 5100 Disassembly: 1 단계, 이미지 3/3
    • Make sure to disconnect the power source to the device.

    • Remove nine screws securing the base cover of the laptop's keyboard assembly using the Phillips #0 screwdriver.

    • There are 2 sets of screws.

    • Remove the 3 captive screws.

    • Remove the 6M2*6 screws.

  2. Dell Inspiron 14 5100 Touch Pad Replacement: 2 단계, 이미지 1/2 Dell Inspiron 14 5100 Touch Pad Replacement: 2 단계, 이미지 2/2
    • Pry open the laptop to separate the base cover from the keyboard assembly.

    • You may use your fingertips or use plastic opening tools.

  3. Dell Inspiron 14 5100 Touch Pad Replacement, Battery: 3 단계, 이미지 1/2 Dell Inspiron 14 5100 Touch Pad Replacement, Battery: 3 단계, 이미지 2/2
    • Remove the four Phillips #0 screws securing the battery to the keyboard assembly.

  4. Dell Inspiron 14 5100 Touch Pad Replacement: 4 단계, 이미지 1/3 Dell Inspiron 14 5100 Touch Pad Replacement: 4 단계, 이미지 2/3 Dell Inspiron 14 5100 Touch Pad Replacement: 4 단계, 이미지 3/3
    • Peel off the tape securing the battery cable to the battery cable connector.

    • Disconnect and remove the old battery.

  5. Dell Inspiron 14 5100 Touch Pad Replacement, Touch Pad: 5 단계, 이미지 1/3 Dell Inspiron 14 5100 Touch Pad Replacement, Touch Pad: 5 단계, 이미지 2/3 Dell Inspiron 14 5100 Touch Pad Replacement, Touch Pad: 5 단계, 이미지 3/3
    • Disconnect the touchpad cable attached to the motherboard.

    • Be careful lifting the Flat Flex Cable (FFC) connector as it is quite fragile.

  6. Dell Inspiron 14 5100 Touch Pad Replacement: 6 단계, 이미지 1/2 Dell Inspiron 14 5100 Touch Pad Replacement: 6 단계, 이미지 2/2
    • Peel off the tapes securing the touchpad to the keyboard assembly.

  7. Dell Inspiron 14 5100 Touch Pad Replacement: 7 단계, 이미지 1/1
    • Remove the four screws securing the touchpad to the keyboard assembly using the Phillips #0 screwdriver.

  8. Dell Inspiron 14 5100 Touch Pad Replacement: 8 단계, 이미지 1/3 Dell Inspiron 14 5100 Touch Pad Replacement: 8 단계, 이미지 2/3 Dell Inspiron 14 5100 Touch Pad Replacement: 8 단계, 이미지 3/3
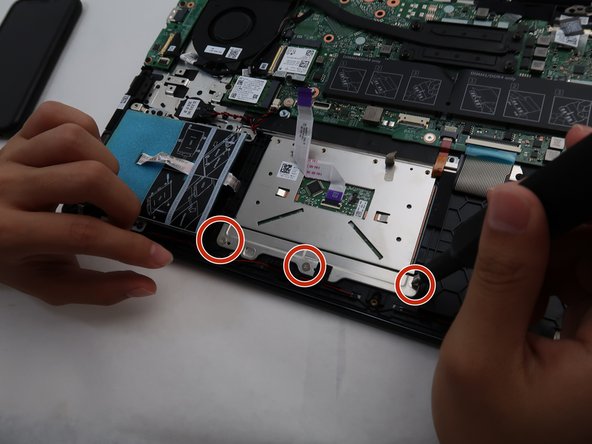
    • Remove the three screws securing the touchpad bracket to the keyboard assembly using the Phillips #0 screwdriver.

    • Lift the touchpad bracket.

  9. Dell Inspiron 14 5100 Touch Pad Replacement: 9 단계, 이미지 1/2 Dell Inspiron 14 5100 Touch Pad Replacement: 9 단계, 이미지 2/2
    • Lif tthe touchpad and replace with the new touchpad.

    • Make sure to guide the touchpad cable along with the touchpad to avoid damaging the parts.

    • Lift the touchpad at an angle from under the touchpad bracket to avoid damaging the touchpad or the touchpad bracket.

결론

To reassemble your device, follow these instructions in reverse order.

다른 한 분이 해당 안내서를 완성하였습니다.

Jonn Ross Olofernes

회원 가입일: 09/24/19

217 평판

안내서 1개 작성함

댓글 0개

댓글 쓰기

조회 통계:

24 시간 전: 2

7일 전: 5

30일 전: 18

전체 시간: 1,038