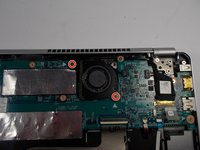
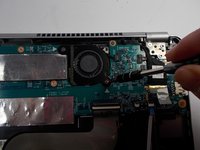
주요 콘텐츠로 건너뛰기

Dell Inspiron 14-7437 Cooling Fan Replacement

필요한 것

  1. Dell Inspiron 14-7437 Cooling Fan Replacement, Base Cover: 1 단계, 이미지 1/2 Dell Inspiron 14-7437 Cooling Fan Replacement, Base Cover: 1 단계, 이미지 2/2
    • Power off your Dell Inspiron 14-7437 before disassembling.

    • Remove the eight 4.5 mm screws on the back panel of the device using the Phillips 1 Screwdriver.

    • The two 4.5 mm screws in the center under the rubber mount cannot be removed, but can be loosened.

  2. Dell Inspiron 14-7437 Cooling Fan Replacement: 2 단계, 이미지 1/2 Dell Inspiron 14-7437 Cooling Fan Replacement: 2 단계, 이미지 2/2
    • Pry open the back cover using a spudger and slide it along the under the cover.

  3. Dell Inspiron 14-7437 Cooling Fan Replacement, Battery: 3 단계, 이미지 1/2 Dell Inspiron 14-7437 Cooling Fan Replacement, Battery: 3 단계, 이미지 2/2
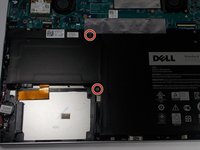
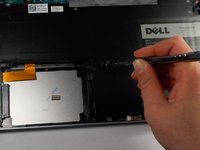
    • Remove the two 2.5 mm screws holding the battery in place using the J000 Phillips Head Screwdriver.

  4. Dell Inspiron 14-7437 Cooling Fan Replacement: 4 단계, 이미지 1/1
    • Disconnect the ribbon cables from the motherboard.

  5. Dell Inspiron 14-7437 Cooling Fan Replacement: 5 단계, 이미지 1/1
    • Lift up and remove the Lithium-Polymer Battery.

  6. Dell Inspiron 14-7437 Cooling Fan Replacement, Cooling Fan: 6 단계, 이미지 1/2 Dell Inspiron 14-7437 Cooling Fan Replacement, Cooling Fan: 6 단계, 이미지 2/2
    • Remove the two 2.5 mm screws using a J000 Phillips Head Screwdriver.

  7. Dell Inspiron 14-7437 Cooling Fan Replacement: 7 단계, 이미지 1/2 Dell Inspiron 14-7437 Cooling Fan Replacement: 7 단계, 이미지 2/2
    • Pull up on the wire and remove the Cooling Fan.

결론

To reassemble your device, follow these instructions in reverse order.

다른 한 분이 해당 안내서를 완성하였습니다.

Katelyn Remy

회원 가입일: 03/10/16

449 평판

안내서 4개 작성하였습니다

UMass Dartmouth, Team 7-8, Catania Spring 2016 UMass Dartmouth, Team 7-8, Catania Spring 2016 회원

UMASSD-CATANIA-S16S7G8

3 회원들

안내서 12개 작성하였습니다

댓글 0개

댓글 쓰기

조회 통계:

24 시간 전: 0

7일 전: 0

30일 전: 5

전체 시간: 741