주요 콘텐츠로 건너뛰기

Dell Inspiron 15 3541 Screen Replacement

필요한 것

  1. Dell Inspiron 15 3541 Screen Replacement, Battery: 1 단계, 이미지 1/2 Dell Inspiron 15 3541 Screen Replacement, Battery: 1 단계, 이미지 2/2
    • Make sure your laptop is powered off completely and is not connected to the charger.

    • Close the laptop and place it so that the back of the screen is lying flat on your work surface.

    • Slide both of the battery-release latches towards the outer edges of the laptop to unlock the battery flap.

  2. Dell Inspiron 15 3541 Screen Replacement: 2 단계, 이미지 1/1
    • Lift the battery at an angle using your fingertips and remove it from the laptop.

    • Press and hold the power button for 5 seconds. This ensures that any remaining power will drain out of the computer.

  3. Dell Inspiron 15 3541 Screen Replacement, Hard Drive: 3 단계, 이미지 1/3 Dell Inspiron 15 3541 Screen Replacement, Hard Drive: 3 단계, 이미지 2/3 Dell Inspiron 15 3541 Screen Replacement, Hard Drive: 3 단계, 이미지 3/3
    • When choosing a replacement hard drive, make sure you are choosing one which is 7mm in height, and not the more traditional 9.5mm laptop drive, as it will not fit given the limited space inside of the laptop.

    • Using a PH0 sized screw driver, carefully remove the 4mm screw from the bottom cover.

    • Using the plastic opening tool carefully pry open the bottom cover

    • Slide the bottom cover towards you and remove it from the laptop base. Put the cover aside.

  4. Dell Inspiron 15 3541 Screen Replacement: 4 단계, 이미지 1/3 Dell Inspiron 15 3541 Screen Replacement: 4 단계, 이미지 2/3 Dell Inspiron 15 3541 Screen Replacement: 4 단계, 이미지 3/3
    • Remove the 1 screw 4mm long on the left that is holding in the hard drive using a PH0 screwdriver.

    • Carefully pull on the tab on the hard drive to slide it out away from the connector.

    • Lift up and remove the hard drive from the computer.

  5. Dell Inspiron 15 3541 Screen Replacement: 5 단계, 이미지 1/3 Dell Inspiron 15 3541 Screen Replacement: 5 단계, 이미지 2/3 Dell Inspiron 15 3541 Screen Replacement: 5 단계, 이미지 3/3
    • You can skip this step if you are not replacing the Hard Drive, but still need to remove it to replace a different part.

    • Remove the two screws (3mm long) using a PH0 screwdriver that are holding the hard drive into the mounting bracket.

    • Pull up on the black Mylar sheet and remove it from the existing hard drive, it has some adhesive, but will simply pull off with just a small amount of force.

  6. Dell Inspiron 15 3541 Screen Replacement, Optical Drive: 6 단계, 이미지 1/2 Dell Inspiron 15 3541 Screen Replacement, Optical Drive: 6 단계, 이미지 2/2
    • Remove the 5mm long Phillips #0 screw that is holding the optical drive in place, as pictured.

    • You can now slide the optical disk drive out of the computer.

    • You do not have to remove the base cover or the Hard Drive if you want to remove just the optical drive.

  7. Dell Inspiron 15 3541 Screen Replacement, Keyboard: 7 단계, 이미지 1/2 Dell Inspiron 15 3541 Screen Replacement, Keyboard: 7 단계, 이미지 2/2
    • Open the laptop and fully extend the screen.

    • Using the nylon spudger, pry the keyboard off the laptop body.

    • Using your hands, remove the keyboard from the body and place it facedown on the track pad. There will be a cord connecting the laptop and the keyboard: keep this cord intact.

  8. Dell Inspiron 15 3541 Screen Replacement: 8 단계, 이미지 1/2 Dell Inspiron 15 3541 Screen Replacement: 8 단계, 이미지 2/2
    • Unhook the connector and you can now remove the keyboard from the laptop

    • If your version of this laptop has a backlit keyboard, there will be two connectors; the one highlighted orange will also have to be removed.

  9. Dell Inspiron 15 3541 Screen Replacement, Screen: 9 단계, 이미지 1/3 Dell Inspiron 15 3541 Screen Replacement, Screen: 9 단계, 이미지 2/3 Dell Inspiron 15 3541 Screen Replacement, Screen: 9 단계, 이미지 3/3
    • Remove the three 4mm PH0 phillips screws holding the palm rest cover.

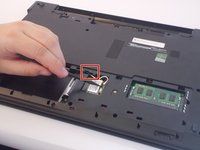
    • Carefully disconnect all of the connectors with the blue tabs

  10. Dell Inspiron 15 3541 Screen Replacement: 10 단계, 이미지 1/2 Dell Inspiron 15 3541 Screen Replacement: 10 단계, 이미지 2/2
    • Close the display and turn the computer over.

    • Disconnect the antenna cables from the wireless card using a spudger.

    • Remove the antenna cables from the routing guide on the computer base, and feed it through the opening towards the other side.

  11. Dell Inspiron 15 3541 Screen Replacement: 11 단계, 이미지 1/3 Dell Inspiron 15 3541 Screen Replacement: 11 단계, 이미지 2/3 Dell Inspiron 15 3541 Screen Replacement: 11 단계, 이미지 3/3
    • Remove the 10 PH0 Phillips screws that secure the palm rest to the computer base. 8 of which are 6mm long.

    • There are two screws which are longer (9mm) these are the orange highlighed screws in the picture

    • Using a spudger, pry along the edge of the palm rest to begin removing it.

    • The palm rest is held in with plastic clips all of the way around, so you will have to carefully pry all the way around it.

  12. Dell Inspiron 15 3541 Screen Replacement: 12 단계, 이미지 1/2 Dell Inspiron 15 3541 Screen Replacement: 12 단계, 이미지 2/2
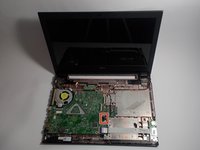
    • Turn the computer back over and open the display as far as possible.

    • You may have to adjust the display so that it is not fully open in order to balance it and prevent it from falling over backwards.

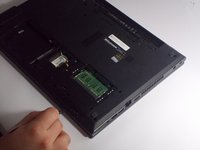
    • Lift up and towards the left to carefully remove the palm rest and reveal the motherboard.

    • Move the antenna cables through the slot on the computer base, and move them off to the side of the computer.

    • Peel off the tape that secures the display cable to the system board.

    • Lift the connector latch and disconnect the display cable from the system board.

  13. Dell Inspiron 15 3541 Screen Replacement: 13 단계, 이미지 1/1
    • Disconnect the connector for the charging adapter port.

    • Lift up to remove the charging adapter port from the computer.

  14. Dell Inspiron 15 3541 Screen Replacement: 14 단계, 이미지 1/1
    • Remove the four 5mm PH0 phillips screws that are securing the display hinges to the case.

    • There will be two screws on each hinge.

    • Lift up and forward and you will remove the entire display assembly.

결론

To reassemble your device, follow these instructions in reverse order.

다른 8명이 해당 안내서를 완성하였습니다.

Nick Lowney

회원 가입일: 03/08/16

194 평판

안내서 1개 작성함

UMass Dartmouth, Team 5-8, Landers Spring 2016 UMass Dartmouth, Team 5-8, Landers Spring 2016 회원

UMASSD-LANDERS-S16S5G8

3 회원들

안내서 6개 작성하였습니다

댓글 0개

댓글 쓰기

조회 통계:

24 시간 전: 1

7일 전: 1

30일 전: 6

전체 시간: 4,079