주요 콘텐츠로 건너뛰기
Dell Inspiron 15 5584 SSD Replacement

Dell Inspiron 15 5584 SSD Replacement

Sam Vorn

Sam Vorn3 다른 기여자

최종 수정일 November 18, 2022

8 - 10 분
조정

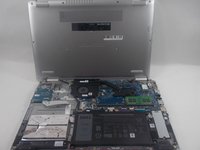
Use this guide to replace the SSD within your Dell Inspiron 15 5584 laptop.

The SSD, like the hard drive, is a piece of hardware that contains data within the device. A faulty SSD may cause slower operation or process crashing as well as errors.

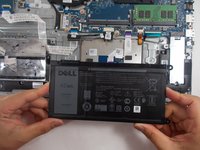
Before operating on the SSD, ensure that the issue is not related to another component or software. If you are sure the issue is your SSD, make sure to save your files to an external storage device before any tampering in order to save data that could be lost otherwise. Be sure to drain the battery and shut down the device as removing the battery is necessary to remove the hard drive. A live battery serves as a fire hazard and can cause personal injury or component damage.

필요한 것

수리 키트

이 키트는 이 안내서를 완료하는데 필요한 모든 부품과 도구를 포함하고 있습니다.

부품

도구

더보기...

  1. Dell Inspiron 15 5584 SSD Replacement, Bottom Cover: 1 단계, 이미지 1개 중 1개
    • Make sure to turn off and unplug your laptop before starting.

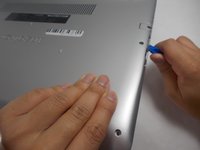
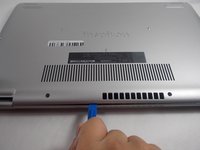
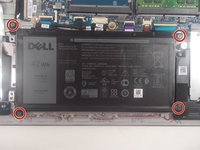
    • Turn over the laptop so that the bottom is facing upwards, and the Inspiron logo is upside-down.

  2. Dell Inspiron 15 5584 SSD Replacement: 2 단계, 이미지 3개 중 1개 Dell Inspiron 15 5584 SSD Replacement: 2 단계, 이미지 3개 중 2개 Dell Inspiron 15 5584 SSD Replacement: 2 단계, 이미지 3개 중 3개
    • Remove the seven 7 mm screws from the bottom using a Phillips #0 screwdriver.

    • Loosen the two captive back corner screws using a Phillips #0 screwdriver.

    • The two corner screws are not removable. A clicking sounds indicates that the screw is fully loosened.

  3. Dell Inspiron 15 5584 SSD Replacement: 3 단계, 이미지 2개 중 1개 Dell Inspiron 15 5584 SSD Replacement: 3 단계, 이미지 2개 중 2개
    • Slide an iFixit opening tool underneath the right side USB port and the keyboard.

    • Gently trace the iFixit opening tool along the entire outer rim of the laptop, carefully applying an upwards pressure.

    • Be careful not to force open the plate or push too much off without loosening the other sides. This can cause the bottom cover to crack.

  4. Dell Inspiron 15 5584 SSD Replacement: 4 단계, 이미지 2개 중 1개 Dell Inspiron 15 5584 SSD Replacement: 4 단계, 이미지 2개 중 2개
    • Gently pry off the bottom cover from the laptop.

    • Use the iFixit opening tool to loosen any spots you may have missed from Step 3.

  5. Dell Inspiron 15 5584 SSD Replacement, Battery: 5 단계, 이미지 2개 중 1개 Dell Inspiron 15 5584 SSD Replacement, Battery: 5 단계, 이미지 2개 중 2개
    • Remove the four 3.5 mm screws holding the battery down with a JIS #0 screwdriver.

  6. Dell Inspiron 15 5584 SSD Replacement: 6 단계, 이미지 3개 중 1개 Dell Inspiron 15 5584 SSD Replacement: 6 단계, 이미지 3개 중 2개 Dell Inspiron 15 5584 SSD Replacement: 6 단계, 이미지 3개 중 3개
    • Detach the motherboard connector tab from the top left of the battery.

    • Remove the battery from the device.

    • Be sure to carefully wiggle the connector out from the battery socket. Ripping it out too forcefully could damage the socket.

  7. Dell Inspiron 15 5584 SSD Replacement, SSD: 7 단계, 이미지 3개 중 1개 Dell Inspiron 15 5584 SSD Replacement, SSD: 7 단계, 이미지 3개 중 2개 Dell Inspiron 15 5584 SSD Replacement, SSD: 7 단계, 이미지 3개 중 3개
    • Remove the single 3 mm screw from the SSD cover with a JIS #0 screwdriver.

    • Carefully lift off the SSD cover and put to the side.

  8. Dell Inspiron 15 5584 SSD Replacement: 8 단계, 이미지 2개 중 1개 Dell Inspiron 15 5584 SSD Replacement: 8 단계, 이미지 2개 중 2개
    • Disconnect the SSD cable from the motherboard port.

    • Remove the SSD and place it off to the side.

결론

To reassemble your device, follow these instructions in reverse order.

작성자

3다른 기여자 명과 함께

Sam Vorn

회원 가입일: 03/29/22

977 평판

안내서 9개를 작성함

UMass Dartmouth, Team 1-1, Mellen Spring 2022 UMass Dartmouth, Team 1-1, Mellen Spring 2022 회원

UMASSD-MELLEN-S22S1G1

3 회원들

안내서 10개를 작성함

댓글 0개

댓글 쓰기

조회 통계:

지난 24시간: 3

지난 7일: 13

지난 30일: 27

전체 시간: 851