소개
Before beginning, you should make sure that your laptop is not connected to a power source and that the battery has been removed.
필요한 것
-
-
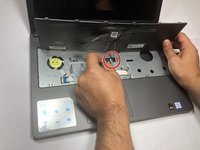
Use the metal spudger to pry the keyboard off. Do this by inserting the spudger into each of the five indicated slots at the top of the keyboard and gently pulling up on the keyboard with the spudger. Do not be afraid to use a bit of muscle to remove the keyboard, as it takes a bit of force to remove
-
-
-
-
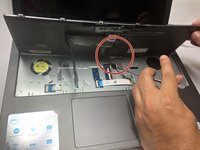
Disconnect the smaller of the two flat conductive tape cables.
-
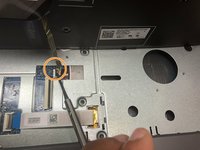
Place a metal spudger on the end of the cable that is connected to the laptop and use it to lift the black clasp holding the tape down, then pull the cable out toward the right. Repeat for the second larger piece of conductive tape.
-


To reassemble your device, follow these instructions in reverse order.
To reassemble your device, follow these instructions in reverse order.
다른 4명이 해당 안내서를 완성하였습니다.
팀

Baylor, Team S5-G5, Williams Spring 2018 Baylor, Team S5-G5, Williams Spring 2018 회원
BU-WILLIAMS-S18S5G5
3 회원들
안내서 5개를 작성함