주요 콘텐츠로 건너뛰기

Dell Inspiron 15-7537 Keyboard Replacement

필요한 것

  1. Dell Inspiron 15-7537 Keyboard Replacement, Bottom Case: 1 단계, 이미지 1개 중 1개
    • Make sure the display is closed. Then, flip the computer over so that you can see the bottom cover.

    • Loosen the two 5 mm Phillips #0 on the upper edge of the cover.

    • These screws will stay captive to the case.

  2. Dell Inspiron 15-7537 Keyboard Replacement: 2 단계, 이미지 1개 중 1개
    • Remove the two 5 mm interior screws that connect the cover to the assembly using the same Philips head screwdriver from the previous step.

  3. Dell Inspiron 15-7537 Keyboard Replacement: 3 단계, 이미지 1개 중 1개
    • Use a spudger to remove the base cover from the rest of bottom cover.

  4. Dell Inspiron 15-7537 Keyboard Replacement, Battery: 4 단계, 이미지 1개 중 1개
    • Remove the three 5mm Phillips #0 screws that keep the battery connected to the computer.

  5. Dell Inspiron 15-7537 Keyboard Replacement: 5 단계, 이미지 1개 중 1개
    • Ground the system board by turning over the computer, opening the display, and holding the power button down for about 5 seconds before proceeding.

    • Using the pull tab on the battery, lift the battery out of the computer.

  6. Dell Inspiron 15-7537 Keyboard Replacement, Removing the Keyboard: 6 단계, 이미지 1개 중 1개
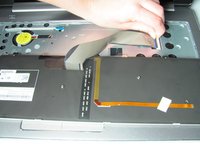
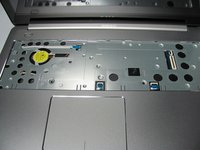
    • Remove the single 5mm screw that connects the keyboard to the palm assembly with the Phillips head screwdriver.

  7. Dell Inspiron 15-7537 Keyboard Replacement: 7 단계, 이미지 1개 중 1개
    • Flip over the computer and open the display as far as it can go.

    • Use the spudger to remove the keyboard from the palm assembly.

  8. Dell Inspiron 15-7537 Keyboard Replacement: 8 단계, 이미지 1개 중 1개
    • Gently flip over the keyboard and place it on the palm rest assembly.

    • Lift the connector latches and disconnect the keyboard and the keyboard back-light cables.

  9. Dell Inspiron 15-7537 Keyboard Replacement: 9 단계, 이미지 3개 중 1개 Dell Inspiron 15-7537 Keyboard Replacement: 9 단계, 이미지 3개 중 2개 Dell Inspiron 15-7537 Keyboard Replacement: 9 단계, 이미지 3개 중 3개
    • Take the keyboard off the palm rest assembly.

결론

To reassemble your device, follow these instructions in reverse order.

다른 11명이 해당 안내서를 완성하였습니다.

작성자

4다른 기여자 명과 함께

Jean Whitmore

회원 가입일: 01/22/15

984 평판

안내서 7개를 작성함

Cal Poly, Team 18-2, Maness Winter 2015 Cal Poly, Team 18-2, Maness Winter 2015 회원

CPSU-MANESS-W15S18G2

4 회원들

안내서 8개를 작성함

3가이드 댓글

Great guide, thanks for the help!

Patrick S - 답글

Thanks It’s Useful

ahmed omar - 답글

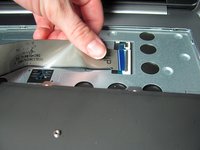
It is important to note that the little black clips on the ends of the keyboard wires SWIVEL UP! I broke mine because nothing in this guide told me how to get the wires out properly.

benton.addison - 답글

댓글 쓰기

조회 통계:

지난 24시간: 2

지난 7일: 10

지난 30일: 32

전체 시간: 6,912