주요 콘텐츠로 건너뛰기

Dell Inspiron 15-7547 Keyboard Replacement

필요한 것

  1. Dell Inspiron 15-7547 Keyboard Replacement, Bottom Cover: 1 단계, 이미지 1/1
    • Before you begin, be sure to turn off your laptop and unplug it from the outlet.

    • Close the display and flip the laptop on its back.

    • Loosen the ten 5.0 mm-long Phillips #0 screws.

    • The four screws marked with orange will remain captive to the cover.

  2. Dell Inspiron 15-7547 Keyboard Replacement: 2 단계, 이미지 1/1
    • Use a spudger to pry up and loosen the back cover.

    • Remove the back cover.

  3. Dell Inspiron 15-7547 Keyboard Replacement, Battery: 3 단계, 이미지 1/2 Dell Inspiron 15-7547 Keyboard Replacement, Battery: 3 단계, 이미지 2/2
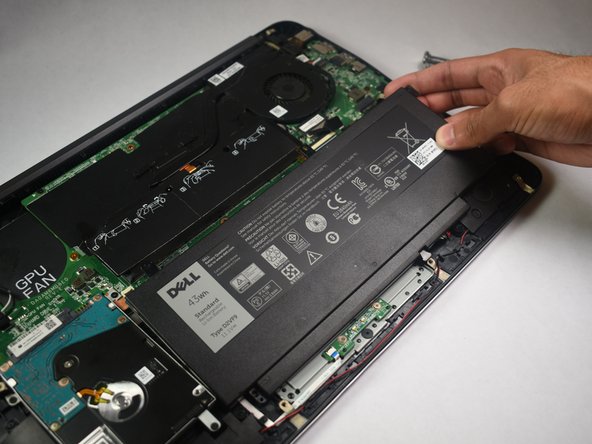
    • Remove the five 5.0 mm-long Philips #0 screws that connect the battery to the case.

  4. Dell Inspiron 15-7547 Keyboard Replacement: 4 단계, 이미지 1/2 Dell Inspiron 15-7547 Keyboard Replacement: 4 단계, 이미지 2/2
    • Lift the battery out of the case.

  5. Dell Inspiron 15-7547 Keyboard Replacement: 5 단계, 이미지 1/3 Dell Inspiron 15-7547 Keyboard Replacement: 5 단계, 이미지 2/3 Dell Inspiron 15-7547 Keyboard Replacement: 5 단계, 이미지 3/3
    • Pull the battery cable's pull tab towards the battery to disconnect it from the motherboard.

    • Pull parallel to the motherboard, not straight up.

    • Most of the cable is attached to the case with adhesive, which may cause slight resistance.

    • Remove the battery.

  6. Dell Inspiron 15-7547 Keyboard Replacement, Hard Drive: 6 단계, 이미지 1/2 Dell Inspiron 15-7547 Keyboard Replacement, Hard Drive: 6 단계, 이미지 2/2
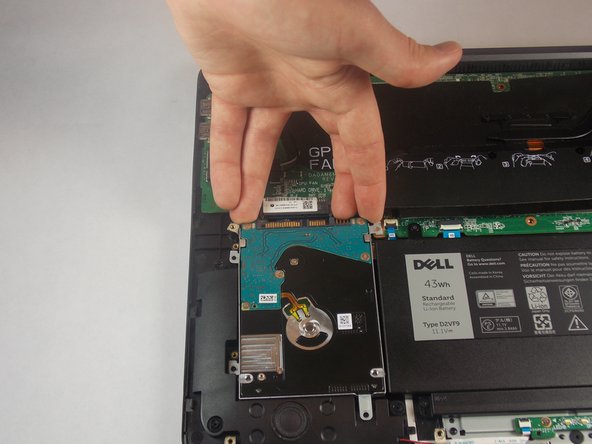
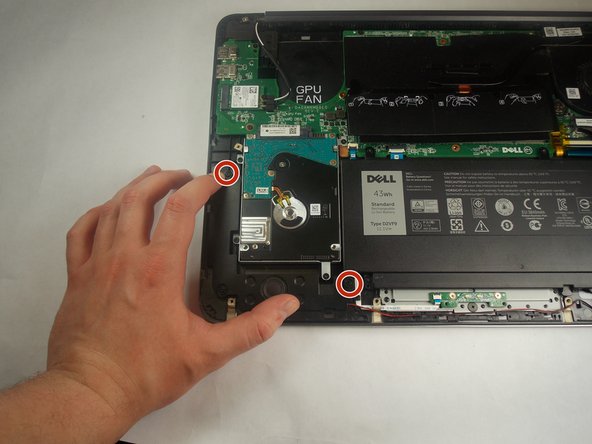
    • Remove the four 5.0 mm-long Philips #0 screws connecting the hard drive to the chassis.

  7. Dell Inspiron 15-7547 Keyboard Replacement: 7 단계, 이미지 1/2 Dell Inspiron 15-7547 Keyboard Replacement: 7 단계, 이미지 2/2
    • Disconnect the hard drive from the motherboard by placing your fingers at the back, and pulling forward towards the front of the chassis.

  8. Dell Inspiron 15-7547 Keyboard Replacement: 8 단계, 이미지 1/1
    • Lift the hard drive out of the chassis.

  9. Dell Inspiron 15-7547 Keyboard Replacement, WiFi Card: 9 단계, 이미지 1/2 Dell Inspiron 15-7547 Keyboard Replacement, WiFi Card: 9 단계, 이미지 2/2
    • Remove the 3.0 mm-long Philips #0 screw at the end of the Wifi-Card

  10. Dell Inspiron 15-7547 Keyboard Replacement: 10 단계, 이미지 1/2 Dell Inspiron 15-7547 Keyboard Replacement: 10 단계, 이미지 2/2
    • Remove the Wifi-Card from its socket by pulling away and up from the connector.

  11. Dell Inspiron 15-7547 Keyboard Replacement: 11 단계, 이미지 1/2 Dell Inspiron 15-7547 Keyboard Replacement: 11 단계, 이미지 2/2
    • Disconnect the white and black cables from the Wifi-Card.

    • Make a note of which wire goes where for reconnecting them to the replacement card.

  12. Dell Inspiron 15-7547 Keyboard Replacement, Speakers: 12 단계, 이미지 1/3 Dell Inspiron 15-7547 Keyboard Replacement, Speakers: 12 단계, 이미지 2/3 Dell Inspiron 15-7547 Keyboard Replacement, Speakers: 12 단계, 이미지 3/3
    • Orient the computer so that the hinge for the display facing away from you.

    • Start removing the speaker on the left by pushing the speaker in the direction of the tick mark on the 2 outer pegs, then upwards

    • The tick marks on the two marked pegs should indicate the speaker needs to be pushed towards the center of the front of the chassis.

  13. Dell Inspiron 15-7547 Keyboard Replacement: 13 단계, 이미지 1/2 Dell Inspiron 15-7547 Keyboard Replacement: 13 단계, 이미지 2/2
    • Remove the left speaker by pushing the speaker in the direction of the tick mark on the center peg, then upwards

    • The tick mark should indicate towards the middle of the back of the chassis.

  14. Dell Inspiron 15-7547 Keyboard Replacement: 14 단계, 이미지 1/2 Dell Inspiron 15-7547 Keyboard Replacement: 14 단계, 이미지 2/2
    • Remove the wire connecting the left speaker to the right speaker.

    • The wire is secured by small notches, be careful not to break these.

  15. Dell Inspiron 15-7547 Keyboard Replacement: 15 단계, 이미지 1/2 Dell Inspiron 15-7547 Keyboard Replacement: 15 단계, 이미지 2/2
    • Start removing the right speaker by pushing the speaker in the direction of the tick marks on the 2 pegs closest to the front of the device, and then upwards.

    • These tick marks should indicate towards the middle of the back of the chassis.

  16. Dell Inspiron 15-7547 Keyboard Replacement: 16 단계, 이미지 1/1
    • Remove the right speaker by pushing in the direction of the tick mark on the final peg, and then upwards.

    • This tick mark should point towards the center of the right side of the chassis.

  17. Dell Inspiron 15-7547 Keyboard Replacement: 17 단계, 이미지 1/2 Dell Inspiron 15-7547 Keyboard Replacement: 17 단계, 이미지 2/2
    • Remove the cable connecting the right speaker to the motherboard by pulling towards the front of the device.

  18. Dell Inspiron 15-7547 Keyboard Replacement, CPU Fan: 18 단계, 이미지 1/2 Dell Inspiron 15-7547 Keyboard Replacement, CPU Fan: 18 단계, 이미지 2/2
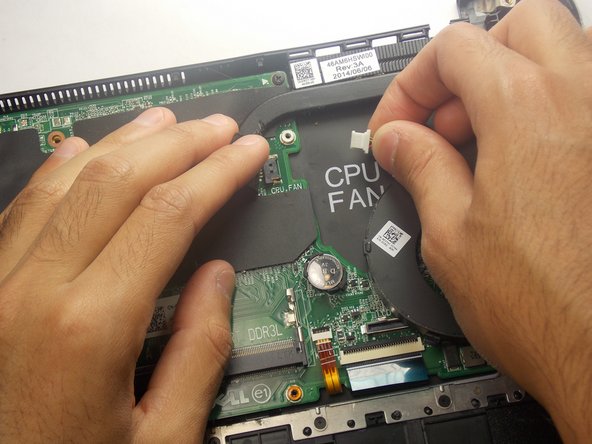
    • Remove the two 5.0 mm-long Philips #0 screws from the fan.

    • The screw marked in orange will remain captive to the fan.

  19. Dell Inspiron 15-7547 Keyboard Replacement: 19 단계, 이미지 1/2 Dell Inspiron 15-7547 Keyboard Replacement: 19 단계, 이미지 2/2
    • Disconnect the wire that connects the fan to the motherboard. This can be found under the flap directly to the left of the fan.

  20. Dell Inspiron 15-7547 Keyboard Replacement: 20 단계, 이미지 1/1
    • Lift the fan out of the chassis.

  21. Dell Inspiron 15-7547 Keyboard Replacement, LCD Assembly: 21 단계, 이미지 1/3 Dell Inspiron 15-7547 Keyboard Replacement, LCD Assembly: 21 단계, 이미지 2/3 Dell Inspiron 15-7547 Keyboard Replacement, LCD Assembly: 21 단계, 이미지 3/3
    • Remove the six 7.0 mm-long Philips #0 screws that mount the hinges.

  22. Dell Inspiron 15-7547 Keyboard Replacement: 22 단계, 이미지 1/3 Dell Inspiron 15-7547 Keyboard Replacement: 22 단계, 이미지 2/3 Dell Inspiron 15-7547 Keyboard Replacement: 22 단계, 이미지 3/3
    • Use a spudger to unlatch and unplug the display cable.

    • There will be a notch on the side of the connector.

  23. Dell Inspiron 15-7547 Keyboard Replacement: 23 단계, 이미지 1/3 Dell Inspiron 15-7547 Keyboard Replacement: 23 단계, 이미지 2/3 Dell Inspiron 15-7547 Keyboard Replacement: 23 단계, 이미지 3/3
    • Raise the left and right hinges.

  24. Dell Inspiron 15-7547 Keyboard Replacement: 24 단계, 이미지 1/1
    • Remove the LCD display assembly from the laptop.

  25. Dell Inspiron 15-7547 Keyboard Replacement, Motherboard: 25 단계, 이미지 1/3 Dell Inspiron 15-7547 Keyboard Replacement, Motherboard: 25 단계, 이미지 2/3 Dell Inspiron 15-7547 Keyboard Replacement, Motherboard: 25 단계, 이미지 3/3
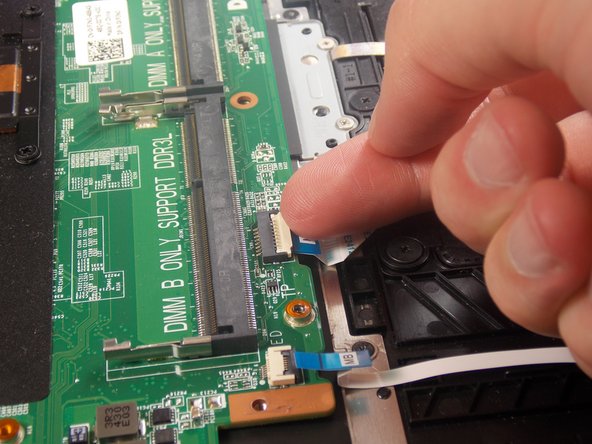
    • Unlatch the ribbon cable by pulling the white release up.

    • If this proves to be difficult using your fingers, try a plastic spudger.

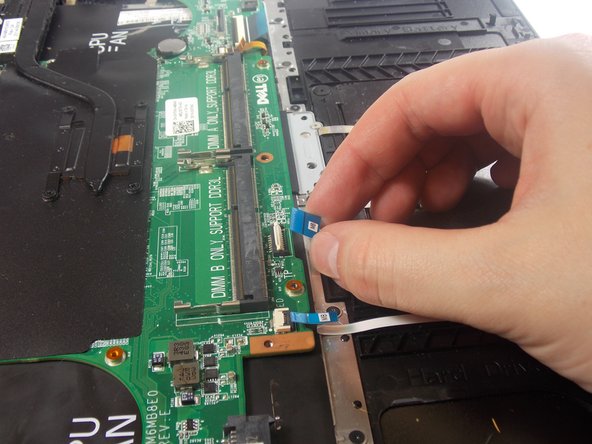
    • Hold the blue flap and pull to unplug the cable.

  26. Dell Inspiron 15-7547 Keyboard Replacement: 26 단계, 이미지 1/3 Dell Inspiron 15-7547 Keyboard Replacement: 26 단계, 이미지 2/3 Dell Inspiron 15-7547 Keyboard Replacement: 26 단계, 이미지 3/3
    • Unlatch black release on the ribbon cable.

    • Hold the blue flap to unplug the cable.

  27. Dell Inspiron 15-7547 Keyboard Replacement: 27 단계, 이미지 1/3 Dell Inspiron 15-7547 Keyboard Replacement: 27 단계, 이미지 2/3 Dell Inspiron 15-7547 Keyboard Replacement: 27 단계, 이미지 3/3
    • Unlatch the ribbon cable by pulling the black release up.

    • Unlike the others, this release is found at the back.

    • Hold the flap and unplug the cable.

  28. Dell Inspiron 15-7547 Keyboard Replacement: 28 단계, 이미지 1/3 Dell Inspiron 15-7547 Keyboard Replacement: 28 단계, 이미지 2/3 Dell Inspiron 15-7547 Keyboard Replacement: 28 단계, 이미지 3/3
    • Unlatch the ribbon cable by pulling the black release up.

    • Unlike the others this release is found at back.

    • Hold the blue flap and unplug the cable.

  29. Dell Inspiron 15-7547 Keyboard Replacement: 29 단계, 이미지 1/3 Dell Inspiron 15-7547 Keyboard Replacement: 29 단계, 이미지 2/3 Dell Inspiron 15-7547 Keyboard Replacement: 29 단계, 이미지 3/3
    • Unplug the DC jack cable.

  30. Dell Inspiron 15-7547 Keyboard Replacement: 30 단계, 이미지 1/2 Dell Inspiron 15-7547 Keyboard Replacement: 30 단계, 이미지 2/2
    • Remove the seven 3.0 mm-long Philips #0 screws that secure the motherboard.

  31. Dell Inspiron 15-7547 Keyboard Replacement: 31 단계, 이미지 1/1
    • Remove the motherboard from the laptop.

  32. Dell Inspiron 15-7547 Keyboard Replacement, Keyboard: 32 단계, 이미지 1/2 Dell Inspiron 15-7547 Keyboard Replacement, Keyboard: 32 단계, 이미지 2/2
    • Remove the five 2.0 mm-long Philips #00 screws from the metal back-plate.

  33. Dell Inspiron 15-7547 Keyboard Replacement: 33 단계, 이미지 1/3 Dell Inspiron 15-7547 Keyboard Replacement: 33 단계, 이미지 2/3 Dell Inspiron 15-7547 Keyboard Replacement: 33 단계, 이미지 3/3
    • Peal away the two plastic covers marked GPU fan and CPU fan.

    • If never previously removed, these covers should be removed very gently so as to not tear the plastic underneath.

  34. Dell Inspiron 15-7547 Keyboard Replacement: 34 단계, 이미지 1/2 Dell Inspiron 15-7547 Keyboard Replacement: 34 단계, 이미지 2/2
    • Remove the twenty-two 2.0 mm-long Philips #00 screws that connect the keyboard to the chassis.

  35. Dell Inspiron 15-7547 Keyboard Replacement: 35 단계, 이미지 1/1
    • Lift the the keyboard from the chassis.

결론

To reassemble your device, follow these instructions in reverse order.

다른 한 분이 해당 안내서를 완성하였습니다.

Isaac Brooks

회원 가입일: 09/10/18

355 평판

안내서 3개 작성하였습니다

댓글 한 개

I'm trying to source the 22 , 2.0 mm-long screws that connect the keyboard to the chassis but I dont know what the correct specifications to look for, can someone please help?

Marlon Fraser - 답글

댓글 쓰기

조회 통계:

24 시간 전: 0

7일 전: 5

30일 전: 27

전체 시간: 2,220