주요 콘텐츠로 건너뛰기

Dell Inspiron 1521 Bottom Panel Replacement

필요한 것

  1. Dell Inspiron 1521 Bottom Panel Replacement, Battery: 1 단계, 이미지 1/1
    • Rotate the laptop so its bottom is facing up.

  2. Dell Inspiron 1521 Bottom Panel Replacement: 2 단계, 이미지 1/3 Dell Inspiron 1521 Bottom Panel Replacement: 2 단계, 이미지 2/3 Dell Inspiron 1521 Bottom Panel Replacement: 2 단계, 이미지 3/3
    • Identify the lock mechanisms holding the battery in place.

    • Slide each button outward with your fingers to disengage the battery.

    • Pull the battery off with your hand to separate it from the laptop.

  3. Dell Inspiron 1521 Bottom Panel Replacement, Bottom Panel: 3 단계, 이미지 1/2 Dell Inspiron 1521 Bottom Panel Replacement, Bottom Panel: 3 단계, 이미지 2/2
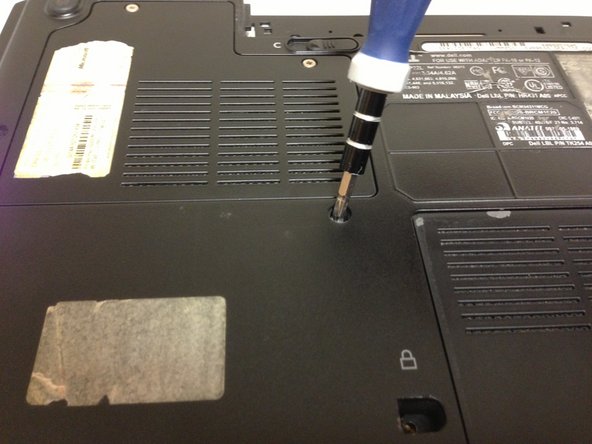
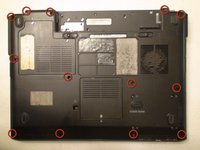
    • Locate the thirteen 10 mm Phillips #1 screws securing the bottom panel of the laptop.

    • Remove the thirteen indicated screws with a Phillips #1 screwdriver.

    • With the screws removed you can now remove the panel underneath keyboard.

결론

To reassemble your device, follow these instructions in reverse order.

다른 2명이 해당 안내서를 완성하였습니다.

Erik Sanchez

회원 가입일: 09/26/12

21 평판

안내서 1개 작성함

Cal Poly, Team 15-47, Forte Fall 2012 Cal Poly, Team 15-47, Forte Fall 2012 회원

CPSU-FORTE-F12S15G47

5 회원들

안내서 9개 작성하였습니다

댓글 0개

댓글 쓰기

조회 통계:

24 시간 전: 0

7일 전: 1

30일 전: 1

전체 시간: 1,161